Tuna and borlotti bean salad

This salad is brilliant at barbecues, where it’s a great light, sunshine-filled alternative to any giant hunks of charred meat you might be serving. It’s full of assertive flavours – the lemon, deliciously sweet peppers and raw onion, the celery and, of course, the tuna. It’s also very simple, and only takes a few minutes to throw together.

I’m a lazy cook. I very, very seldom cook beans from scratch – they’re very cheap to buy in cans, and in a salad like this the borlotti beans don’t suffer at all from coming out of a tin. If you prefer to use dried beans, you’ll need to soak them overnight, then boil for ten minutes. Take the pan off the heat and leave the beans to soak in their cooking water for two hours. Borlotti beans are a lovely little legume. They’re related to the kidney bean, and they have a lovely creamy texture and a slightly sweet taste. If you can’t find any, try making this with cannellini beans, which make a good alternative. To make a large bowl, big enough for a large family barbecue, you’ll need:

2 cans tuna in spring water
1 large sweet onion (a Vidalia or other sweet salad onion is excellent in this dish)
1 handful fresh parsley
1 plump clove garlic
1 can borlotti beans
5 stalks from a celery heart
1 orange pepper
4 tablespoons extra virgin olive oil
Juice of ½ a lemon
Salt and pepper

Chop the onion into quarters and slice finely. Mince the parsley and cut the celery and pepper into small dice. Crush the garlic and flake the tuna. Put the beans in a sieve and rinse them under cold running water.

Toss all the prepared ingredients together in a large bowl with the olive oil, lemon and seasoning, and cover with cling film. Leave in the fridge for an hour before serving for the flavours to mingle.

Green chilli cornbread

You don’t see cornbread recipes often in the UK. This is a traditional American accompaniment, made from ground maize or cornmeal (if you are making this in England look for fine polenta in the supermarket), and uses baking powder rather than yeast for leavening. It has a fine scent and flavour, a deliciously crisp shell and a soft, fragrant crumb.

Cornbread is often made in a cast-iron skillet in America. I like to use muffin pans to make individual servings. It’s extremely good with barbecued food – try it with pulled pork or sticky chicken.

At a Gospel Sunday service and brunch at the House of Blues (churchgoing comes with fried chicken as standard in Las Vegas) earlier this year, I found some fantastic little cornbread muffins, far tastier than other cornbread I’d tried. I asked the staff how they were made, and was told that the secret to the texture was the addition of canned, creamed sweetcorn to the batter. The cornbread was also studded with fresh jalapeño peppers. I’ve recreated them here, and I’m proud to report that they’re pretty much exactly right.

To make twelve individual cornbread muffins, you’ll need:

3 tablespoons butter
2 cups white cornmeal (polenta)
2 tablespoons soft brown sugar
1 cup milk
½ cup buttermilk
1 egg
1 teaspoon baking powder
½ teaspoon bicarbonate of soda (baking soda)
1 can creamed corn
4 green chillies (jalapeños if available), chopped finely

Turn the oven up to 220° C (425° F) and preheat the muffin pans with the butter dotted in the base of each. While the pans are heating, mix the cornmeal, sugar, milk, buttermilk, egg, baking powder and bicarb thoroughly in a large bowl.

Stir the creamed corn and chillis through the mixture. Pour an equal amount into each muffin tin, and bake in the hot oven for 20 minutes or until golden brown. A skewer inserted into the middle of one of the muffins should come out clean.

The muffins are delicious split and spread with some butter and a little honey (even better if you whisk the butter and honey together before spreading, for some reason). You can also use them to accompany savoury dishes. The muffins will keep well, maintaining their crisp surface, in an airtight box for a few days.

Aubergine caviar

This eggplant caviar recipe is a great way to squeeze every ounce of flavour out of an aubergine. It’s extremely easy to make if you have a food processor (and only a little more difficult if you don’t; I used to make it when I was a student using a large knife to chop everything very finely instead). Although the amount of garlic in this recipe looks a bit alarming, the garlic in the finished dip is roasted, so it’s very mellow and sweet. You won’t find it overpowering.

Traditionally called ‘caviar’ or ‘poor man’s caviar’, this is not at all fishy, nor very similar to caviar. I think it got the name from the days when aubergines were much seedier; those seeds have a lovely texture a little (if you are imagining hard) like fish roe. Today, aubergines are usually propagated without the seeds, which many people do not enjoy.

This is a particularly good accompaniment for lamb, and it’s really, really good with yesterday’s kofta kebab. The roast aubergine has a wonderful natural sweetness, brought out by the raw parsley, which seems made to be paired with hot lamb. Try it some time.

To serve four as a mezze you’ll need:

2 large purple aubergines (eggplants)
10 fat cloves garlic
1 large bunch parsley
2 tablespoons extra-virgin olive oil
Salt and freshly ground pepper

Cut both aubergines in half lengthways. Don’t bother salting and disgorging it – the same growing techniques which have made modern aubergines near-seedless have also made sure they aren’t bitter. Peel the garlic, lay the whole cloves on the cut side of the aubergines, and wrap each aubergine half with its garlic tightly in tin foil. Bake on a sheet at 180° C for 45 minutes, until the garlic and aubergines are very soft.

Peel the skin from the aubergines and discard it. Use a food processor or very sharp knife to finely mince the garlic, aubergine flesh and parsley. Stir in the olive oil. Add salt and pepper to taste and serve at room temperature.

Aubergine caviar will keep in the fridge for a few days. Try it on its own on toast for a quick lunch.

One-dish roast chicken, potatoes and accompaniments

Certain groceries were absurdly cheap in the markets we used in the Cote d’Azur. These two chickens, though, beautifully dressed and trimmed, with Appellation d’Origine Contrôlée labels and a lovely succulent plumpness, took the parsimonious biscuit. Each was large enough to serve four, and the special offer which gave me one free (in a lovely cardboard box) when I bought the other meant that the pair only cost €4. That’s €4 for more protein than my cats get in a week.

I decided to roast the chickens like this for a number of reasons. I was on holiday, so wanted a dish that wasn’t too fiddly, which meant I could spend some more time on the terrace drinking. They were good birds whose flavour deserved a chance to sing on its own. And this method meant that I could pile the dish high with Provençal flavours. I found some paste made from sun-dried tomatoes, garlic, capers and a very little anchovy, some roast red peppers marinated in olive oil and herbes de Provence, some nutty-tasting little new potatoes and other good things. To serve six with plenty left over, this is what I did with them :

2 chickens
5 tablespoons sundried tomato paste
8 salted anchovies
100g roast marinated red peppers, cut into strips
1kg new potatoes
750g shallots, peeled
6 bulbs (yes, whole bulbs) garlic
1 lemon
1 bottle rosé wine (I used the local Bandol, which was pretty much the only wine you could buy in the area)
150g butter
4 bay leaves
1 tablespoon herbes de Provençe
1 handful fresh chervil
1 handful fresh parsley
1 handful fresh basil
150g crème fraîche
Salt and pepper

Pull any fat out of the inside of the chickens and discard. Zest the lemons, putting the zest to one side. Chop the lemons in half and put one half in the cavity of each chicken with a bay leaf and a generous seasoning of salt and pepper.

Place the chickens in a large roasting dish, and fill the space around them with the potatoes, peeled, whole shallots, garlic bulbs (not peeled, and cut in half across the equator), the remaining bay leaves, the anchovies and peppers. The anchovies will ‘melt’ when cooked and will give a deeply savoury, but not fishy, base to the dish.

Place knobs of butter on the chickens, and scatter over the herbes de Provençe and some more salt. In a jug, whisk together the tomato paste, the lemon zest and the wine, and pour it all into the baking dish. Season and place in the oven at 180° C for two hours, basting frequently with the winey juices.

When the chickens come out of the oven, transfer them and the potatoes, shallots, garlic and peppers to a warm serving dish to rest. Chop the chervil, parsley and basil finely, and whisk them and the crème fraîche into the pan juices. Serve with a green salad and some more of the wine you used in the dish.

Garlic mashed potatoes

I love mashed potatoes, and I love garlic. Put the two together, and you’ve got the perfect starch to accompany a roast chicken, a steak or – pish! – whatever protein you fancy.

The garlic mash you’ll find in some restaurants is a bit questionable. Some places skimp, and use powdered garlic, which is a total disaster, leaving the dish tasting musty and somehow unpleasantly acidic. Try making it this way at home for a much mellower, smoother taste.

You’ll need:

8 white potatoes (Desiree mash best – Maris Piper are also good)
1 whole head of garlic, peeled
2 oz butter
¼ pint milk
1 large handful freshly chopped parsley
Salt and pepper to taste

Put the peeled potatoes and the peeled garlic in a thick-based saucepan, and cover with water. Bring the water to the boil and simmer for 15 minutes. Drain, and return the potatoes and garlic to the pan.

Mash the potatoes and garlic with the butter while you bring the milk to a simmer in a separate pan. Use a wooden spoon to beat the milk into the mashed potatoes, and then stir the finely chopped parsley through the dish with the seasoning. Serve immediately.

Ar Jard sauce

You’ve tried this before – it’s the crunchy, raw vegetable relish served in many Thai restaurants. I served it alongside some sweet chilli sauce with Thai pork toasts. It’s very easy, and can be prepared in minutes, so if you’ve a little time, try shaping your vegetables. Somehow a carrot tastes about 300% nicer if it’s approximately flower-shaped.

The sauce is delicious with rich dishes like the pork toasts; it’s fresh, sweet and sharp, cutting through the intense savouriness of the little toasts. I didn’t use any chilli in this recipe, but if you’d like your sauce to be spicy, take a red chilli, shred it finely and add it to the rest of the vegetables.

You’ll need:

2 carrots
½ cucumber
1 shallot
1 cup rice vinegar (available in some supermarkets and all oriental grocers)
⅔ cup caster sugar

Put the vinegar and sugar in a pan over a low heat, and stir until all the sugar has dissolved. Remove from the heat and set aside.

While the vinegar mixture is cooling, dice the vegetables into even-sized pieces. Exercise your artistic side if you like, and cut them into shapes. I cut mine freehand, but you can buy minuscule aspic cutters online and in kitchen shops – they’re like fairy cookie cutters, and if you’re like me, they’re pretty irresistible. Slice the shallot into thin slices.

Pour the cooled sugar and vinegar mixture over the diced vegetables. Serve immediately.

Honey, pine nut and pancetta salad

We had some friends round last night, and I served this salad to go with the antipasti I’d lined up as a starter. I was so pleased with it that Mr Weasel and I are having it for supper again today. This is a gorgeous salad recipe. The sweetly nutty walnut oil is beautiful with toasted pine nuts (toast them yourself in a dry frying pan, watching like a hawk, or buy them pre-toasted from Waitrose), and the pancetta is gorgeous with a tiny amount of honey drizzled over.

Use a mixture of leaves, including some rocket, and perhaps some watercress. To serve four, you’ll need:

2 bags salad leaves
12 slices pancetta, dry-fried until crisp
1 small handful toasted pine nuts
4 tablespoons walnut oil
2 teaspoons honey vinegar
1 teaspoon honey
Pepper

Easy as anything; toss the leaves with the walnut oil and honey vinegar. Sprinkle the pancetta and pine-nuts over the salad, add a few turns of the pepper grinder, and using a fork, drizzle runny honey all over the salad. Serve immediately, or the leaves will wilt.

Rösti with bacon and onion

You’ll read some tremendously complicated recipes for rosti, involving time-consuming methods like par-boiling and cooling before you grate, quick spells in the freezer, wrapping the grated potato in a tea towel and whirling it around your head in the garden, and so on. There’s none of that in this recipe, which is extremely easy.

There’s some dispute surrounding the boiling issue – it’s true that a par-boiled potato will make your rösti absorb sauces a little better. I’ve tried both methods and have found the difference to be minute. The raw potato method is faster and results in a deliciously crisp surface, giving to the pressure of your teeth like a thin layer of ice. The potato inside is soft and yielding – delicious.

Ashkenazi Jewish latkes are a similar kind of potato cake (without bacon, for obvious reasons). Recipes for latkes and other Hannukah foods abound in Evelyn Rose’s books – I’ve just managed to find a second-hand copy of the Entertaining Cookbook at an online bookstore for a quarter of the shudder-inducing price I’d been quoted elsewhere, so look forward to some recipes from it when it finally makes its tortured way through the Royal Mail.

I used Kestrel potatoes for these rösti. Kestrel are easy to grow in the garden, and have an excellent flavour. Be careful that whichever variety of potato you choose is a waxy-fleshed one. Don’t be alarmed by the amount of starchy liquid that comes out of your squeezed potato – you will get more than a mugful from 500g.

To serve four as an accompaniment, you’ll need:

500g Kestrel potatoes, peeled
4 rashers of bacon, chopped finely
1 small onion
3 tablespoons goose or duck fat (you can use any cooking fat with a good flavour, but goose or duck fat does create a particularly crisp surface. Bacon fat would be excellent in this, as would schmaltz.)
Salt and pepper

Grate the potatoes and onion finely. You can do this by hand, or in a food processor with a grating blade. Squeeze the grated potato and onion out, handful by handful, into a bowl and discard the juices. Mix in a large bowl with the bacon, and season.

Melt half the goose fat in a large, non-stick frying pan over a high flame, and add the grated mixture when the fat is sizzling hot. Pack the potatoes down into the pan firmly to create a dense cake, and turn the hob down to a medium heat for 20 minutes.

After 20 minutes, you’ll notice a change in the shreds of potato on the surface, which will now be transluscent and glossy. Take a large dinner plate and, using oven gloves, place it upside down on top of the frying pan. Turn the pan and plate arrangement upside down, so the rösti is neatly turned out onto the plate. Melt the rest of the fat in the pan, slide the rösti back in (the cooked side will be facing you) and leave for another 20 minutes.

This was delicious with a roast chicken, soaking up the buttery juices beautifully. Experiment with your rösti – try adding a grated apple, cheese, or fresh herbs. If there are only two of you, try making this larger amount and eat the remainder cold for lunch the next day.

Perfect mashed potatoes

Update, Feb 2008: Lots of people have asked me if you can freeze mashed potatoes. The answer’s complicated – mash will freeze, but it won’t be as good as it was fresh (it tends to change texture in a watery direction and lose some of its flavour). However (there’s always a however), if you want to have some spare mash kicking around to top shepherd’s pie, thicken soups or use as a base for fishcakes, it’s worth freezing individual portions to use in these recipes if you have some left over. Heat the portions for a while in a saucepan once defrosted to evaporate out some of the water before using.

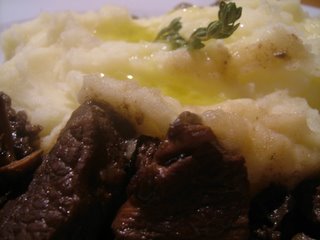
Mashed potatoes are probably my favourite comfort food. One of my earliest memories is that of my mother coaxing me away from the brink of death by measles with plain mashed potatoes and a little gravy. The mashed potatoes I dream about are not mashed potatoes spiked with mustard or garlic; no pesto colours them bright green for me. I like my mashed potatoes spiced gently with black pepper and nutmeg, and with plenty of salt. Some cooks will tell you to use white pepper for aesthetic reasons; I see nothing wrong with a few black specks in my mash, especially given that freshly ground black pepper tastes so much better in this dish than white does.

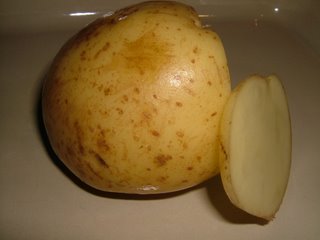
The potato you choose is important. Potato varieties can be split into two groups – waxy and floury. Waxy potatoes keep their shape well when cooked and are excellent in gratins – they remain quite moist when cooked. A floury potato cooks to a drier, more fluffy finish, doesn’t hold its shape well, and should be your potato of choice for mashing.

My great-grandma used to mash potatoes to lump-free perfection with a fork. God knows how. I use a bog-standard potato masher. Excellent results can be reliably achieved with a potato ricer, which sort of extrudes the cooked potato through tiny holes. Regular readers will know that I’m always chary about buying single-use devices, so I stick to my masher, which also gets used for other generalised vegetable-squashing tasks.

Whatever you do, don’t use a food processor. I am not quite sure about the physics behind this, but any high-intensity processing of the sort you get with a Magimix makes the potatoes very slimy and not very appetising.

King Edwards, Saxon, Estime or Nadine potatoes all mash well; they’re floury and flavourful. The technique is all-important; whipping scalding hot milk into your dry mash will make the mixture silky and fluffy, and a large knob of butter adds richness. To serve four, you’ll need:

700g potatoes, peeled and cut into evenly sized chunks
¼ pint full cream milk
1 large knob butter
Salt and pepper
Freshly grated nutmeg

Simmer the potatoes in boiling water with the lid on for about 20 minutes, until you can easily push a knife through the centre of one. Drain and return to the pan, and put down somewhere warm with the lid on for five minutes while you bring the milk up to a gentle simmer. Drop the butter into the middle of the pan with the salt, generous grindings of pepper and some freshly ground nutmeg, and mash vigorously until there are no lumps. (You’ll find the potatoes are best with a surprisingly large amount of salt, but I like potatoes better than my arteries.)

Hold the milk pan in your left hand and a wooden spoon in your right, and pour the milk into the mashed potatoes in a thin stream, beating it in with the wooden spoon. Serve immediately – these will be the creamiest, most delicate mashed potatoes you’ve ever eaten. If you’ve any left over, keep them in the fridge and make fishcakes tomorrow.

Roast new potatoes with sweet onion

A comment the other day complained that English potatoes are sweet and powdery things, not worth cooking with. I beg to differ; six months of living and cooking in Paris convinced me that the English potato is a glorious beast, not bettered anywhere in the world. No American or Asian potato has yet made me think otherwise.

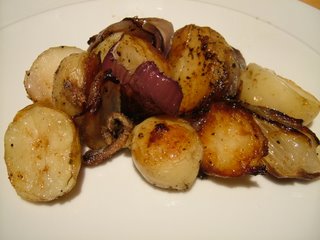
Tiny, young new potatoes are just appearing in the shops now; they’re dense, they’re waxy and there’s nothing sweet or powdery about them. They’ve a delicate and delicious taste. When the Jersey Royals appear in April, I’ll be steaming them in their papery skins with a little tarragon, and dipping them in home-made Hollandaise. The new potatoes in shops at the moment also steam deliciously, but it’s worth trying this recipe to bathe them with the sweet, sticky roasting juices from a couple of onions. No garlic in this one; you want the flavour of the onions to sing on its own. Anchovies give this side dish a deep and remarkably non-fishy background which complements the onion flavour; if you are an anchovy-hater (shame on you), leave them out. You’ll need:

500g new potatoes
2 large onions
Salt (I used Steenbergs’ Perfect Salt, which also contains some dried herbs)
Pepper
3 anchovies
2 tablespoons olive oil or duck/goose fat

Halve the potatoes and drop them into boiling water for eight minutes. Drain and transfer to a baking tray. Quarter the onions and separate each quarter into layers. Mix the potatoes, onions, anchovies, salt, pepper and fat well and put in an oven at 180°C for 45 minutes, or until everything is golden and fragrant.