Currant cakes

I love currants. The little dried rabbit-dropping things, I mean, not the tart currants that we grow in England, which are all very well in Cumberland sauce and so on, but lack the sweet seductiveness that you really need for an excellent cake. The currants I am talking about are Zante currants, which are tiny, tiny dried grapes grown absurdly sweet in the Greek sunshine. They’re the fruit you’ll find in Eccles cakes, and they have a wonderfully sweet and mildly tangy flavour, quite different from other dried vine fruits.

Horrifyingly, especially if you share my tidy British habit of compartmentalising foods, I discovered when living in France that on mainland Europe nobody differentiates between currants, sultanas and raisins. If it’s small, dark and wrinkly, it’s called a raisin, so if you are in France and want some currants, you’re going to have to do a bit of light mime in the grocer if you want to buy proper, tiny Zante currants rather than horrible giant American golden raisins, which are processed with sulphur and taste rubbish. The golden raisin sometimes masquerades as a sultana in the UK too – beware.

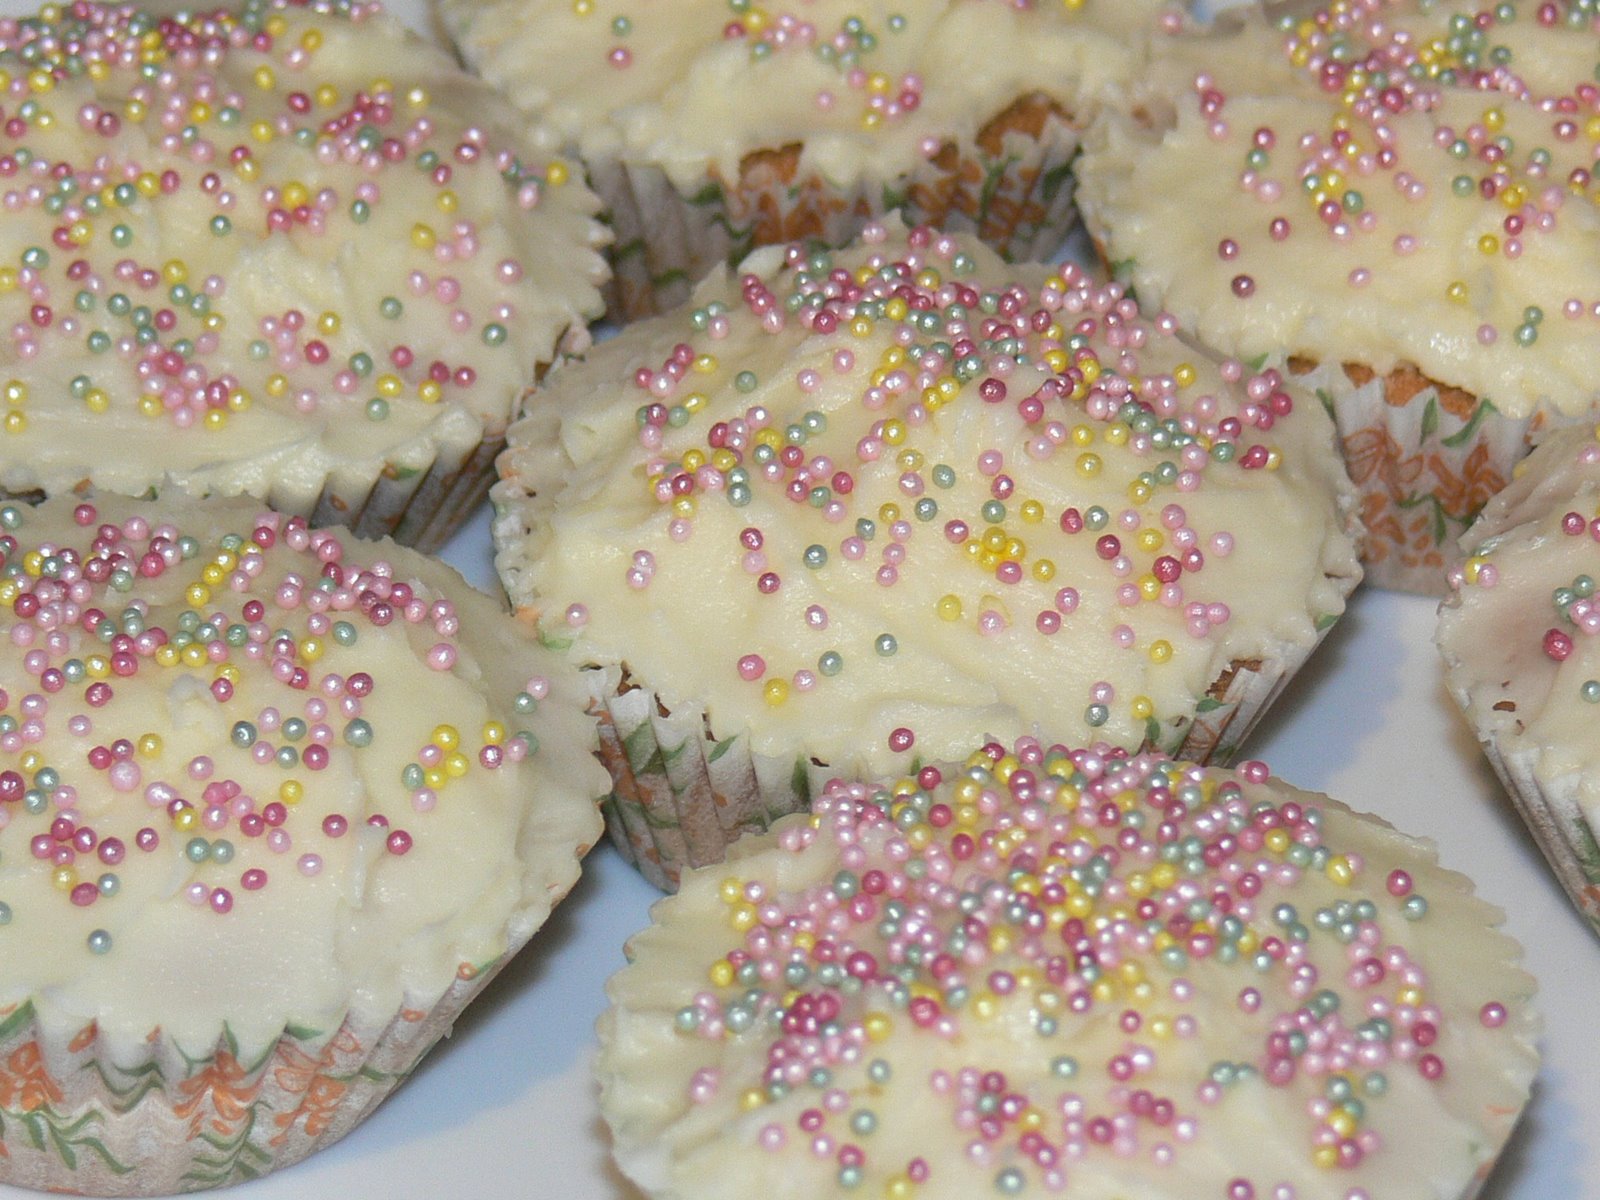
I’ve iced these currant cakes with a really easy buttercream, which is deliciously mellow with the tartness of the dried fruit. To make about 18 cakes, you’ll need:

Cakes
100g softened butter
100g caster sugar
100g self-raising flour
1 teaspoon baking powder
2 medium eggs
50g currants

Buttercream
175g softened butter
350g icing sugar
2 tablespoons warm water

Preheat the oven to 200° C (400° F). Lay 18 little paper cake cases in bun tins, and beat all the cake ingredients together in a mixing bowl with an electric whisk for two to three minutes, until the cake mixture is pale, smooth and fluffy. Divide the mixture between the cases (they should each be about half-full).

Bake in the hot oven for between 15 and 20 minutes. Devotees of this blog should be familiar with the Dr Weasel Aural Method of cake testing – when your little cakes come out of the oven, bring an ear close to them and listen carefully. If the cake is making tiny prickling noises, it is not ready: return it to the oven for a couple of minutes. A finished cake is silent. As Emily points out in the comments, a finished cake may not be *entirely* silent. Minimal prickling noises are allowed – do not allow your cakes to carbonise.

Put the cakes in their paper cases on a wire rack to cool. While they are cooling, make the buttercream icing by using your electric whisk to beat the butter, water and icing sugar together until it too is pale, smooth and fluffy. Spread the icing on the cakes when they are cold, and decorate any way you like.

Cheese fondue

I was born in the 1970s, which makes Dr W’s gift of a fondue set a pleasingly retro and apposite birthday present. Everybody’s parents had a set back in the day which they used for entertaining, and I remember hiding on the landing listening to raucous parties, then sneaking downstairs once they’d all finished and my parents had gone to bed. I would then while away the small hours eating any remaining cheesy bits and polishing off any leftover wine.

This, dear reader, is how I became a dipso at the tender age of three.

Fondues are fantastic interactive food. I’ve always held that the foods that require you to *do* something with what’s on your plate, whether it’s wrapping stuff in lettuce leaves, dribbling sauce down your arms or making minty little parcels, taste all the better for the work involved. Convivial and delicious – who could ask for more? You can do all the preparation of the fondue on top of the stove, and move it to the table and its little stand with the flame when you’re ready to eat.

I’ve used a mixture of cheeses here – Emmenthal, Gruyere and Comte. Using these cheeses results in a sweetly nutty fondue, and for me the balance of flavours between the three is pretty much perfect.

Cider’s not traditional here (fondue isn’t from Normandy), but it’s great with the cheese mixture, and hell – once you’ve spent all that money on cheese, I don’t want you impoverishing yourself by using good wine on this dish when you could be impoverishing yourself by drinking it instead. Be sure to mix the cornflour into the cold cider before you start to cook – this will make your fondue smooth and will prevent lumpy or greasy bits, making the cheese and other ingredients coexist in happy, glossy suspension.

I have read warnings that you should not drink too much cold liquid during or after consumption of a cheese fondue for fear of solidifying a bolus of melted cheese in your stomach and finding your digestive system horribly overwhelmed (and presumably dying, eventually, of cheese). If you have read similar warnings I can assure you that you can ignore them. I drank like a fish when we christened the fondue set in the picture at the top, and suffered neither indigestion nor death.

To serve three, you’ll need:

Fondue
200 g Emmenthal
200 g Gruyere
200 g Comte
2 shallots
1 tablespoon butter
1 tablespoon cornflour
300 ml medium dry cider
1 tablespoon grainy Dijon mustard
1 shot-glass Armagnac (this is mere posing – I’ve used it because it’s great with the cider and apples, but it’s not absolutely necessary. You can leave it out if you can’t find any)

To serve
1 large baguette
3 large carrots
3 apples (choose something tart like a Granny Smith)
9 new potatoes (Fingerlings, Pink Fir Apple and other nobbly potatoes are great here)

Chop the raw carrots and apples into bite-sized pieces and set aside. Steam the new potatoes whole for 20 minutes and set aside to cool.

Grate the cheeses and mix together in a large bowl. Dice the shallot very, very finely, and stir the cornflour into the cider in a large jug. (Be careful here – when you stir it in, it will foam, so make sure your jug is large enough to stop any bubbles from escaping.)

Put your fondue pot on the oven hob over a low heat, and sauté the finely diced shallots gently in the butter until they are sweet and translucent (about 10 minutes), stirring all the time so they do not colour. Stir the cider and cornflour mixture well, and pour it over the shallots. Bring everything to a gentle simmer.

Still over a low flame, add the grated cheese to the liquid in the fondue pot a handful at a time, stirring after you add each handful until the cheese is melted and incorporated into the cider mixture. Stir in the mustard and Armagnac with salt and pepper to taste (you may not need any salt – taste the mixture before seasoning). Move the fondue pot to the table, light the little flame, and dig in, dipping hunks of baguette, bits of carrot and apple, and whole, tiny potatoes into the gorgeously savoury cheese sauce.

Asterix in Switzerland(seriously) suggests vaguely sexual forfeits for anyone losing a piece of bread in the fondue pot. I have a better idea – if someone loses the bread, tell them it’s their turn to do the washing-up.

Chocolate brownies

I’ve had a couple of emails asking for a brownies recipe to accompany the blondies I posted here a few weeks ago. Your wish, dear reader, is my command.

These brownies are very easy to make. They’re squodgy, squishy, chocolatey and have that lovely caramel-nut flavour that only toasted pecans can give. It’s very easy to adapt this recipe – if you want to try toasted hazelnuts instead of the pecans, or to add some chocolate chips, you have my blessing.

For families who fight over the slices of brownie which have come from the edge of the tin (the pieces with a crisp, chewy edge and a wonderful gradation of softness into the middle), there’s a solution to your problems: the Edge Brownie Pan. This baking tin is designed like paths in a maze, and ensures that every slice of brownie you bake has at least two edges. (The cook deserves the pieces with three.) I really must buy one of these.

Use a chocolate which has as high a percentage of cocoa solids as you can find. To make a large tray (mine measures 10 x 14 inches, just right for making enough brownies for a party), you’ll need:

1 pat salted butter (8 oz, or 110 g)
4 oz (100g) plain dark chocolate, high in cocoa solids
4 eggs
1 lb (450g) caster sugar
4 oz (100g) plain flour
2 teaspoons baking powder
1 teaspoon vanilla essence
Pinch of salt
6 oz (150g) toasted pecan nuts

You can toast the nuts yourself in a dry frying pan over a medium flame. Watch carefully to make sure the nuts do not burn – they can turn from nicely toasted to bitter and burned in moments.

Preheat the oven to 180° C (350°F).

Melt the butter and chocolate together. You can use the microwave or a bowl suspended over some boiling water (a bain marie).

While the butter and chocolate are melting, beat the eggs, salt and sugar together with the vanilla essence, and line a baking tin with greaseproof paper. Stir the chocolate mixture into the egg mixture and sieve the flour into the bowl. Stir until everything is well blended.

Turn out the brownie mix into the lined tin, and sprinkle the pecans over the raw batter. (I prefer to add the pecans to the mix when it’s in the tray rather than adding them in the bowl, as it means you’ll get a more even distribution.) Bake in the oven for about 30 minutes, until the mixture starts to come away from the sides and the top has a dry, crackling look to it. It will still be soft in the centre.

While the brownies are still hot from the oven, divide into squares. After about ten minutes they will have firmed up enough to transfer to racks to cool.

Char siu pastry

Here’s another dim sum recipe; in Cantonese this savoury pastry, a bit like a little pie, is called Char Siu Sau. It’s a parcel of crisp, flaky puff-pastry wrapped around succulent barbecued pork in a sweetly spicy sauce.

Char siu, the barbecued pork in question, has featured on this blog before, and is very easy to make – see the recipe here. The pastry I use to make these is a Malaysian-Chinese flaky pastry, made incredibly short and delicate with a lot of fat and some lemon juice. This is an altogether fatty recipe which is best made for a party (and believe me, if you serve them at a party they’ll vanish in no time at all).

To make about thirty little pastries (they freeze very well before the final baking stage, so you can assemble them and then freeze a few for a treat later on) you’ll need:

Filling
2 fillets of char siu
2 tablespoons lard
8 fat cloves garlic, chopped finely
2 medium onions, cut into small dice
4 tablespoons soft light brown sugar
2 teaspoons sesame oil
2 tablespoons kecap manis (sweet dark soya sauce – use 2 tablespoons of dark soya sauce and a teaspoon of soft light brown sugar if you can’t find any)
2 tablespoons light soya sauce
4 fl oz water
2 tablespoons plain flour
1 tablespoon vegetable oil

Pastry
1 lb flour
4 oz butter
8 oz lard
1 egg, and another to glaze
2 tablespoons sugar
Juice of ½ a lemon
6 fl oz water

Begin by cooking the filling. Chop the two fillets of pork into small dice. Dice the onions finely and chop the garlic. Mix the vegetable oil and flour in a cup. Saute the garlic in the lard until it begins to give up its scent (about 2 minutes) and then add the onions, moving them around the pan until they turn translucent (another 2 minutes or so). Add the sugar, sauces, water and sesame oil to the pan, and bring up to a gentle simmer. Add the diced pork and stir until everything is well coated with the sauce. Add the oil and flour mixture, and stir until everything is thickened (about a minute).

Remove everything to a large bowl and chill in the fridge. (Your little pastry packets will be easier to fill with a thick, cold mixture.)

For really successful pastry, there are a few rules: keep the ingredients as cold as possible, rest the pastry for at least half an hour, and handle it as little as you can manage. To make the pastry, mix a beaten egg with the water, sugar and lemon juice, and chill until nicely cold. Rub the butter, straight from the fridge, into the flour until the mixture resembles breadcrumbs, then use a knife to chop the chilled lard into small dice, about the size of the top joint of a woman’s little finger. Stir the lard into the butter and flour mixture. Add the liquid ingredients to the bowl and use a knife or spatula (cooler than your hands) to bring everything together into a dough. Wrap with cling flim and rest in the fridge for at least half an hour.

When you are ready to assemble the pastries, roll half the ball of dough out into a rectangle about half a centimetre thick, fold it into three (as if you were folding a piece of A4 paper to put in an envelope), turn it through 90 degrees so the long edge is facing you, and roll it out again. Fold, roll and turn another four times. You’ll end up with a slab of pastry which has been folded and rolled into many, many thin, flaky layers (you can see the layers in the raw pastry, already visible partway through rolling, here on the left).

Preheat the oven to 230° C.

Use pastry cutters to make circles, or a knife to make squares, and place a dollop of the cold char siu mixture in the centre of each. Use a beaten egg to seal the edges, crimp with a fork and make a little hole with your fork in the top side of each pastry (important, this – it will allow steam to escape and prevent your pastries from gaping open when they cook). Brush each one with some of that beaten egg, and put on a non-stick baking sheet in the oven for 10 minutes. When the 10 minutes are up, reduce the heat to 200° C and bake for a further 20 minutes. Cool the pastries a little before you eat – the insides will be unbelievably hot, as well as unbelievably delicious.