Beer can chicken

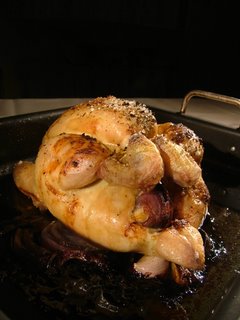
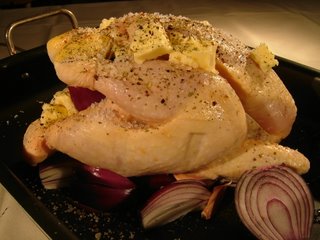
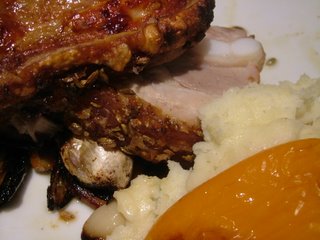
Your eyes aren’t deceiving you – this is a chicken with a can of Guinness bunged up its how-do-you-say. With a dry rub, it’s a brilliant, if slightly obscene way to cook chicken. The beer, flavoured with some of the spicy rub, steams the chicken from inside, resulting in a juicy, delicate flesh, while the skin cooks to a crackling, caramelised crispness.

My friend Lorna pointed me at this extraordinarily cheap roasting stand from Amazon when I complained that my beer can often threatens to topple when I make this dish. It’s worth spending a couple of pounds on a stand like this (bend one of the wire loops to fit the can onto the little dish; it’ll keep the chicken nice and sturdy along with the can). If you don’t own a stand, just make sure that the chicken is resting levelly on the can. Don’t be fooled into using the chicken’s legs to balance the beast – they’ll shrink and change shape when they cook.

To roast one rude-looking chicken to perfect succulence you’ll need:

1 plump chicken without giblets
1 can of beer
2 heaped tablespoons ground cinnamon
1 heaped teaspoon mustard powder
1 teaspoon chilli powder (I like powdered chipotles for this, but you can use cayenne pepper)
1 teaspoon allspice
1 tablespoon salt
3 heaped tablespoons soft dark brown sugar

Snip through any strings holding the chicken’s legs neatly together, and spread them out. Mix all the dry ingredients together in a bowl and rub them all over the chicken, then add a tablespoon of the rub to the cavity of the chicken and smear it around a bit with the back of a spoon. Leave for the flavours to penetrate for two hours at room temperature. Meanwhile, open the beer can, pour half of the beer out and drink it. (This is a fun recipe.) Use a metal skewer or a nail and hammer to make a few more holes in the top of the half-full beer can.

Put a tablespoon of the remaining rub in the can with the beer. It will froth and bubble, so add your rub carefully. After the two hours are up, rub any remaining spice mix onto the chicken and push the bird carefully, bottom (that’s the end with the legs) first, onto the upright beer can, as in the picture. Roast the whole apparatus at 180° C (350° F) for 1 hour and 30 minutes, remove the bird carefully from the can without spilling any beer, and rest for ten minutes before serving. (If you are a lucky person with a large and easily controlled barbecue, try cooking the chicken in there over some flavourful wood – it’ll be delicious.)

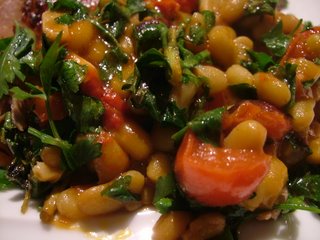
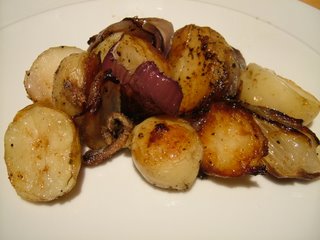
Don’t be tempted to use the hot beer as a sauce. It’ll taste bitter and revolting, so just pour it down the sink. Let the chicken’s natural juices (there will be plenty, and they’ll come out of the bird as it rests) act as a gravy. This is a great dish with a salad and a pilaf or cous cous. Serve with a couple of nicely chilled cans of whatever beer you used in the cooking.

If you’d like to try a different take on beer can chicken, I’ve come up with a recipe for a slightly Chinese-ified version too – enjoy!

One-dish roast chicken, potatoes and accompaniments

Certain groceries were absurdly cheap in the markets we used in the Cote d’Azur. These two chickens, though, beautifully dressed and trimmed, with Appellation d’Origine Contrôlée labels and a lovely succulent plumpness, took the parsimonious biscuit. Each was large enough to serve four, and the special offer which gave me one free (in a lovely cardboard box) when I bought the other meant that the pair only cost €4. That’s €4 for more protein than my cats get in a week.

I decided to roast the chickens like this for a number of reasons. I was on holiday, so wanted a dish that wasn’t too fiddly, which meant I could spend some more time on the terrace drinking. They were good birds whose flavour deserved a chance to sing on its own. And this method meant that I could pile the dish high with Provençal flavours. I found some paste made from sun-dried tomatoes, garlic, capers and a very little anchovy, some roast red peppers marinated in olive oil and herbes de Provence, some nutty-tasting little new potatoes and other good things. To serve six with plenty left over, this is what I did with them :

2 chickens
5 tablespoons sundried tomato paste
8 salted anchovies
100g roast marinated red peppers, cut into strips
1kg new potatoes
750g shallots, peeled
6 bulbs (yes, whole bulbs) garlic
1 lemon
1 bottle rosé wine (I used the local Bandol, which was pretty much the only wine you could buy in the area)
150g butter
4 bay leaves
1 tablespoon herbes de Provençe
1 handful fresh chervil
1 handful fresh parsley
1 handful fresh basil
150g crème fraîche
Salt and pepper

Pull any fat out of the inside of the chickens and discard. Zest the lemons, putting the zest to one side. Chop the lemons in half and put one half in the cavity of each chicken with a bay leaf and a generous seasoning of salt and pepper.

Place the chickens in a large roasting dish, and fill the space around them with the potatoes, peeled, whole shallots, garlic bulbs (not peeled, and cut in half across the equator), the remaining bay leaves, the anchovies and peppers. The anchovies will ‘melt’ when cooked and will give a deeply savoury, but not fishy, base to the dish.

Place knobs of butter on the chickens, and scatter over the herbes de Provençe and some more salt. In a jug, whisk together the tomato paste, the lemon zest and the wine, and pour it all into the baking dish. Season and place in the oven at 180° C for two hours, basting frequently with the winey juices.

When the chickens come out of the oven, transfer them and the potatoes, shallots, garlic and peppers to a warm serving dish to rest. Chop the chervil, parsley and basil finely, and whisk them and the crème fraîche into the pan juices. Serve with a green salad and some more of the wine you used in the dish.

Teriyaki lamb shoulder

There are two ways to get the best out of a chunk of lamb – you can roast it fast and hot to preserve all the fragrance (see Frangelita’s take on it, which sounds fantastic), or you can cook it slowly at a low, low temperature for maximum tenderness and flavour. Frangelita’s honey/soy mixture got me thinking in the direction of teriyaki, and the shoulder of lamb in the freezer suddenly started to look a lot like serendipity.

This lamb is cooked for six hours, so the fat melts into the flesh. The fibres in the muscle will be coming apart so the meat is falling off the bone; you should be able to carve it with a blunt spoon. The skin becomes crisp, and the teriyaki sauce and juces from the onion permeate the moist, tender flesh until it’s perfectly delicious. I served the lamb with rice, and some spaghetti squash tossed in parsley and butter. If you’re using spaghetti squash, just prick it a few times with a fork, pop it in the oven an hour before serving at the same temperature as the lamb, and remove the seeds when it comes out of the oven. Fluff some butter, salt and fresh parsley through with a fork before serving.

To serve four, you’ll need:

1 shoulder lamb
1 wine glass full of teriyaki sauce
1 tablespoon grated ginger
1 tablespoon grated garlic
1 teaspoon sesame oil
3 onions, peeled and quartered
Water

Preheat the oven to 150° C.

Lay the onions on a non-stick baking dish with their cut sides facing skywards. Rub the garlic and ginger over the lamb, and place the joint in the tray, surrounded by the onions. Drizzle the teriyaki sauce over the lamb’s skin and dip the cut sides of the onions into any that leaks onto the bottom of the dish.

Place the baking dish into the oven. Check every 45 minutes that the liquid isn’t boiling dry – if it looks as if it may be, add a few tablespoons of water. Use the liquid to baste the onions and the lamb.

After six hours the onions will be caramelised and gooey. The lamb will be incredibly moist and tender, with a crisp crust. Rest for ten minutes before pulling the meat apart with two forks, and serve with rice to dribble the onion-y juices over.

Slow-roasted tomatoes

The recent glut of tomato recipes (the result of a glut of tomatoes) should end with this one, I hope; semi-preserving tomatoes by roasting all the moisture out of them and marinading in olive oil produces something so good that I think I’ll be roasting all my future tomatoes too this year. It’s a good method for dealing with large number of tomatoes, because when cooked in this way they reduce in volume so dramatically. The few pounds of raw tomatoes I cooked here resulted in about a jam-jar full of finished tomatoes.

Imagine how a tomato might taste if it was twenty feet tall and made of sunlight shining through a piece of red stained glass. Slow-roasting will transform your garden tomatoes into Platonic tomatoes of perfection, more tomato-ish than the juiciest tomato salad. The long, long cooking shrinks the tomatoes, concentrating their flavour – your whole house will smell of sunshine. Start this recipe in the morning; you need to keep the tomatoes in the oven for about seven hours. There’s very little actual work involved, though; once your tomatoes are cooking, you can forget about them for the day.

My tomatoes were the cherry-sized Tumbler. If you have a larger variety, you will need to cook them for longer. You’re aiming for a texture which is not quite dry, but not juicy. Test your tomatoes every half hour or so after seven hours to check for texture. (Try not to eat them all while you test. It’s quite a challenge.)

For one tray of tomatoes you’ll need:

Tomatoes, halved, to cover baking tray (about 2lb of cherry-sized tomatoes)
2 pinches caster sugar
1 level tablespoon dried oregano
2 large pinches salt
A generous amount of pepper
Olive oil to drizzle

Arrange the tomatoes in a single layer, cut sides up, on a baking tray. Sprinkle over all the dry ingredients evenly, and drizzle olive oil over the cut surfaces. Make sure you use plenty of freshly ground black pepper, which will help the tomatoes’ flavour sing.

Place in a low oven (100° C – you are aiming to dry rather than cook) for seven hours until the tomatoes are no longer juicy. Pack them with their oil into a jar, top up with some more olive oil and seal. Add half a clove of grated garlic to the jar if you want even more flavour to your tomatoes. The tomatoes will keep in the fridge for up to a week, but since you are unlikely to be able to open the fridge without being tempted to eat a spoonful in that time, they probably won’t be around for long enough for you to find out.

Zesty roast chicken

How on earth have I managed to go for so many months without roasting a chicken? I found this beautiful free-range, maize-fed bird in Waitrose. It was calling out in a ghostly chicken voice to be stuffed with zingy, summer aromatics.

Roast chicken using this method is as easy as anything; you only need to spend a few minutes preparing the bird to go into the oven, and it produces so much buttery, herby, oniony juice that you don’t need to make a gravy.

Some people like to roast their chicken with the breast pointing downwards, in order to keep everything moist. You don’t get such a crisp skin with this method, though, so I prefer to roast the chicken the right way up, breast pointing skywards, and baste every ten minutes or so with the buttery juices.

You’ll need:

1 chicken
1 lime, cut in halves
3 red onions, sliced roughly
10 cloves of garlic, skin on
1 handful marjoram from the garden
1 stalk celery
3 tablespoons butter
Sea salt
2 teaspoons flaked dried chilis and freshly ground pepper (I used a grinder of Spirits of Fire mix from the Elements of Spice company in South Africa – a present, along with another five grinders of wonderful things, from our friends Greg and Sienne.)

Preheat the oven to 180°C. Put both halves of the lime, the celery (in pieces), one of the onions, the marjoram, half the garlic, a tablespoon of butter and a teaspoon of chillis and pepper inside the cavity of the bird. You may have to push quite hard, but persevere; it’ll all fit with a bit of squeezing.

Stack the remaining onions and garlic in the bottom of the roasting tin, and place the chicken on top. Dot the rest of the butter on the surface of the chicken, and grind the rest of the spices all over.

You should cook your chicken for 45 minutes per kilo, plus 20 minutes. Baste every 10 minutes or so, and rest the bird for 5-10 minutes when you remove it from the oven. It will have released delicious juices into the tray, which you can spoon over your accompaniments along with the now roast onions and garlic. I served this with a bacon and onion rosti, which soaked up the juices beautifully – watch this space for a recipe.

No sandwich in the world is better than the sandwich you make the day after roasting this chicken with the jellied juices, a little roast onion and the tender meat you’ve stripped from the carcass.

Provençale roast lamb with flageolet beans

Spring is finally here in Cambridgeshire. In celebration of the fact that some of my bulbs are finally flowering, I thought I’d eat a dear little fluffy baa-lamb.

This recipe is wonderful for this time of year, when the sun is bright and there’s a jug of tulips on the windowsill. The herbs and sweet tomatoes are a real foretaste of summer. Enjoy this with a cold glass of white wine, or a pint of real ale.

To serve two, you’ll need:

½ a shoulder of lamb
100g tin flageolet beans, drained
10 small tomatoes
6 cloves garlic
1 glass white wine
1 tablespoon tomato puree
1 teaspoon Marigold vegetable bouillon
A few stems of rosemary
A few stems of thyme
4 teaspoons quince jelly (use redcurrant if you can’t get hold of quince)
1 handful parsley
1 handful oregano

Begin by making little slits in the skin of the lamb – six to a half-shoulder will be plenty. Stuff each resulting pocket with a quarter of a clove of garlic and a sprig of rosemary. (You may want to leave the knife in the slit and twist it to fit the garlic and rosemary into the hole.) Slice the rest of the garlic finely. Sprinkle the skin of the lamb with salt.

Quarter the tomatoes, and mix them with the the remaining rosemary and garlic and the rest of the ingredients in a heavy baking tray. Place the lamb on top, skin side up, and roast for an hour and twenty minutes at 180°C.

While the lamb is roasting, finely chop the parsley and oregano, and combine it half of it with two teaspoons of the quince jelly and a large pinch of salt. Remove the lamb from the oven and smear the herb paste all over the skin. Stir the other two teaspoons of quince jelly and the rest of the herbs into the beans around the lamb, and return to the oven for ten minutes, until glossy and beautiful.

The beans will have soaked up the juices from the tomatoes and meat, becoming sticky, rich and packed with flavour. You should be left with some meat for tomorrow’s sandwiches – the beans are also delicious cold.

Roast new potatoes with sweet onion

A comment the other day complained that English potatoes are sweet and powdery things, not worth cooking with. I beg to differ; six months of living and cooking in Paris convinced me that the English potato is a glorious beast, not bettered anywhere in the world. No American or Asian potato has yet made me think otherwise.

Tiny, young new potatoes are just appearing in the shops now; they’re dense, they’re waxy and there’s nothing sweet or powdery about them. They’ve a delicate and delicious taste. When the Jersey Royals appear in April, I’ll be steaming them in their papery skins with a little tarragon, and dipping them in home-made Hollandaise. The new potatoes in shops at the moment also steam deliciously, but it’s worth trying this recipe to bathe them with the sweet, sticky roasting juices from a couple of onions. No garlic in this one; you want the flavour of the onions to sing on its own. Anchovies give this side dish a deep and remarkably non-fishy background which complements the onion flavour; if you are an anchovy-hater (shame on you), leave them out. You’ll need:

500g new potatoes
2 large onions
Salt (I used Steenbergs’ Perfect Salt, which also contains some dried herbs)
Pepper
3 anchovies
2 tablespoons olive oil or duck/goose fat

Halve the potatoes and drop them into boiling water for eight minutes. Drain and transfer to a baking tray. Quarter the onions and separate each quarter into layers. Mix the potatoes, onions, anchovies, salt, pepper and fat well and put in an oven at 180°C for 45 minutes, or until everything is golden and fragrant.

Roast belly pork with fennel seeds

See this post for methods to get your pork crackling crisp and puffy.

I bought this belly pork from Sainsbury’s to see how successfully it would roast; I’m looking for belly pork to make Siu Yuk, a Chinese crispy belly pork with, and am roasting it in a European style until I find a successful joint which is fatty enough. This joint wasn’t fatty enough, but it made a rich and delicious supper roasted Italian-style with lemon, fennel and onions.

Update – about a year later, I did manage to track down some pork which was just right for Chinese crispy belly pork. You can see that recipe here.

The joint was really quite disturbingly lean and upsettingly tiny (this is what I get for supermarket shopping late at night in the middle of the week), but at least it was nice and dry. It’s not always easy to find belly pork on the bone in the first place; when roasted this only yielded about two tablespoons of fat. Amazing; this is where a pig stores its body fat, and I would expect to see nice, thick lines of white fat separating the layers of lean meat, with a soft layer beneath the skin to aid crackling. This pig had been working out (or had been bred for lean meat, but there’s a whole post on exactly what I think of modern farming methods waiting to be written one day when I’m in a bad mood). I had some lard in the fridge from a pork joint I cooked a while ago, and used that to annoint my anorexic pig-tum.

I’ve noticed fennel being used with pork in a lot of restaurants recently, and it’s a very good accompaniment. With lemon and onion it makes for a rich base of flavour. To serve two, you’ll need:

800g belly pork on the bone
1 onion, sliced thinly
1 lemon, sliced thinly
4 cloves garlic
1 tablespoon fennel seeds
1 tablespoon lard
Salt and pepper

Prepare the pork skin for crackling, being very sure on this small joint to keep your scoring close. Rub the surface with salt, pepper and half of the fennel, and place the whole joint in a roasting tin on top of the sliced onion and lemon (skin still on), sprinkled with the rest of the fennel, and the whole cloves of garlic. Roast at 220°C for half an hour, then bring the temperature down to 150°C for twenty minutes. Rub the skin with the lard, and finish the joint under a hot grill for around five minutes, watching it carefully to stop the crackling from catching.

I served this with mashed potato and sweet red and yellow, pointed peppers which I grilled in a griddle-pan on the top of the oven, mixing the juice from the peppers with the pork’s pan juices to make a kind of gravy. Rich and delicious.

Yorkshire pudding

I’ve had a couple of emails following yesterday’s post about roast pork, one asking what a Yorkshire pudding is, and one asking whether I can post a Yorkshire pudding recipe. I’m very pleased to get a chance to write about this; Yorkshire pudding is a traditional English roast meal accompaniment, it’s delicious, it looks impressive if you cook it properly and tastes great.

Yorkshire pudding was historically served as a first course to fire up the appetite. These days you’ll find Yorkshire pudding with gravy as a main course in restaurants in certain areas of Yorkshire, and it’s presented as a crisp and delicious side dish in homes all over the country.

This is a batter pudding, but it is not the same as the American popover; the batter is less rich and results in a lighter, crisper and airier finish. Some people prefer to cook individual small puddings in muffin or fairy cake tins; others (my mother among them, and she makes some of the best Yorkshire pudding I’ve eaten) prefer to cook enough for everyone in a single, large roasting tin. The batter rises purely as a result of the air beaten into it expanding in the very hot fat and dish you use. You’ll need to cook your puddings in a convection oven or in a single layer very high in a regular oven. Before doing anything else, heat the oven to a blistering 220°C. If you are roasting a joint, you can bring the oven up to this temperature for the last fifteen minutes of cooking, then remove the joint to rest while the puddings finish. To make four individual puddings you’ll need:

75g plain flour
1 egg
75ml milk
50ml water
Salt and pepper
1 teaspoon of beef dripping or goose fat per pudding

Put a teaspoon of fat in each depression in the muffin tin, and put the tin in the oven to come up to temperature. Sieve the flour into a bowl with the salt and pepper, and use the unbroken egg to make a depression in the middle of the heap of flour. Break the egg into this well and use an electric hand-whisk to slowly incorporate it into the flour, adding the milk and water gradually as you whizz. Transfer the batter to a jug. (Some Yorkshire pudding batters need to stand after you’ve made them; this one doesn’t, which is . . . pleasing.)

You need to work as fast as you can now; make sure you don’t allow the oven or the pan to cool down at all. Quickly pour a quarter of the batter in each of the oil-filled depressions and slam everything in the oven again as fast as you can.

Twenty five minutes later, your puddings should have risen and turned golden. Serve immediately (a cold Yorkshire pudding will deflate slightly). These soak up gravy beautifully. Enjoy.

Roast pork with crackling

Cripes. Make that “Roast pork with award-winning crackling”. A few years after I wrote the post below, the recipe ended up being tested on the Guardian’s Word of Mouth blog, where it beat the competition hollow. This would be unremarkable it that competition hadn’t been Hugh F-W, Delia, Prue Leith, Good Housekeeping and Simon Hopkinson. Get to it with that hairdryer.

These days, it can be hard to find meat that hasn’t been treated in processing with water and glucose to make it moister and heavier. Even when your joint of pork is free from these additives, it can be difficult to treat it in a way that results in roast pork with a popcorn-crisp, crackling skin. When you do manage it, puffed, salty crackling is a delectable thing of wonder. The technique has a lot to do with using varied cooking temperatures, and absolutely everything to do with making sure the skin is prepared properly before it even gets anywhere near the oven.

Modern joints are harder to raise a crackling skin from than the joints I remember from when I was a little girl. This has a lot to do with consumer demand for extra-lean, muscly meat, which just doesn’t have enough fat to make the magic happen. Look for a joint with plenty of fat under the skin. This is a 2kg rolled loin: enough to serve six people with plenty for sandwiches later. Although convenient, rolled joints are also hard to make crackle, especially where the skin meets the roasting tin. Don’t despair, though; you can still make it work with a bit of preparation.

The day before you eat, the skin of your pork must be dried thoroughly with paper kitchen towels, and scored well. Even if your butcher has already scored it, you will probably benefit from making sure the scoring is fine and regular, so you will want to add your own cuts to the skin. Use a craft knife on the cold skin of the meat (this is easiest when the skin and fat are cold and firm), scoring it in lines about half a centimetre apart. When the joint cooks, the fat will melt and bubble through those lines, crisping the skin it touches. Rub salt into the skin, as if the pork were somebody you are particularly fond of who is demanding a lovely exfoliating massage.

Now prepare to look slightly unbalanced in front of any visitors, and take a hairdryer to the skin of the meat until it’s absolutely bone dry. Wrap your joint in a teatowel and refrigerate it overnight. (The atmosphere in your fridge is extremely dry, and this will help any more moisture to evaporate.)

On the day you cook it, rub some more salt into the skin, making sure it gets through the cracks where you scored it and into the fat. Put a bed of onions at the bottom of a metal roasting dish and rest the pork on top of it. Heat up a large knob of good pork dripping or goose fat (use goose fat in preference to one of those white blocks of lard) over a high flame in a small saucepan and pour the searing hot fat over the skin, then put the roasting tin in the oven at a very hot 220°C. After quarter of an hour, lower the heat to 180°C and cook the joint for two hours, basting every 20 minutes. Finally, turn the heat back up again for a final quarter of an hour – this should cause your minutely prepared skin to puff up and crackle deliciously. (Keep an eye on it and leave it in for a few minutes longer if necessary.)

Every family has its own gravy method, just like Tolstoy said. (Mr Weasel tells me that this is not what Tolstoy said at all. Pshaw. It’s what he should have said.) While you rest the joint for ten minutes in a warm place, make gravy to your family recipe. Remove the carapace of crackling, carve the meat and divide the splintering crackling between the plates. Serve with Yorkshire pudding, roast potatoes, green vegetables and apple sauce. Hooray for the old days.