Seared scallops in smoked prosciutto with chilli oil

Waitrose is currently carrying a really good prosciutto affumicato – a cold-smoked, raw Italian ham. It’s delicious straight out of the packet, but I’ve been wondering for a few weeks what I could do with it in a recipe. It needed to be something simple; this stuff is very good indeed, and deserves not to have its flavour masked with too many other ingredients.

The answer came to me at the fish counter at the end of the day. There were a dozen queen scallops left – small, but sweet and firm, and not pumped full of weight-increasing water. (If you are shopping for shucked scallops, ignore any which are soft and white – they will be full of water. A non-watered scallop is a creamy colour, and is sometimes tinted the palest pink.) They were labelled with some money off, since they’d have gone out in the trash at closing time if they’d not been bought. I snaffled them along with a dozen slices of the prosciutto and ran in the direction of my frying pan.

Pork goes curiously well with shellfish. One of the most memorable meals I’ve had in years of French eating – I even lived in Paris for a bit, hunting down that perfect supper – was a silky, heady casserole of pig’s trotters and beautiful baby clams. (The restaurant was le Pont de l’Ouysse in the Dordogne, for those doing the stereotypically British thing this summer. Turn your speakers off before clicking that link – there’s French electric guitar midi on the jump page.) Of course, the Chinese specialise in the pork/shellfish combination; much of the filling in your dim sum is made from a minced prawn and pork mixture, and some of the more wonderful things I’ve had with scallops, preserved oysters and abalone have been heavy on the stewed belly pork.

This being the case, I got some Chinese chilli oil out of the fridge to go with the scallops. I usually have a few jars on the go; one with a dried shrimp base, one with just garlic and chillis (surprisingly good in Italian sauces) and one with a dried scallop base. This was Way On‘s XO scallop version (many Chinese supermarkets in the UK carry it – if you can’t find it, use one with shrimp), and it finished the dish beautifully, making the scallops darkly rich and spicy without tasting characteristically Asian.

For twelve little parcels, you’ll need:

12 queen scallops, without roe
12 slices of prosciutto affumicato (use Speck if you can’t find the prosciutto)
1 teaspoon chilli oil (see above)
Olive oil

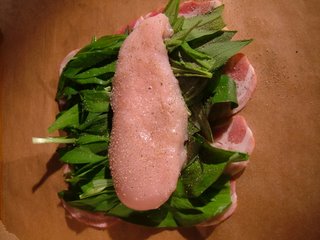
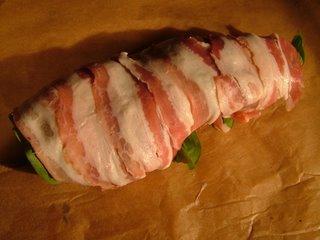
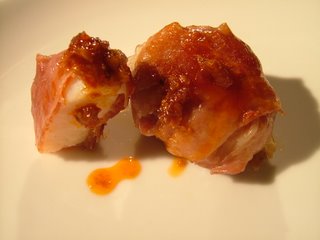
Wrap each scallop, parcel-style, in a piece of the prosciutto. You don’t need to secure with a skewer; the ham clings to itself nicely, and once heated will not be soft enough to unravel. Don’t season – there’s plenty of salt and spicing in the ham, and you’ll get heat from the chilli oil. Heat the olive oil over a medium flame for a couple of minutes.

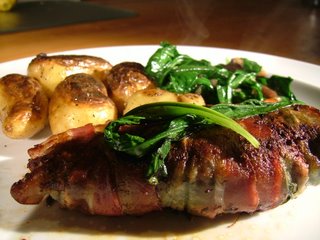
Cook the scallops for precisely four minutes on each side (you want the ham to be crisp and golden where it’s touched the pan, but the scallops should be only barely cooked in the centre to keep them sweet and toothsome). Remove to a serving dish and drizzle with the chilli oil – it’s packed with searingly hot chillis, so a little goes a long way. Serve with crusty bread and a Sauvignon Blanc.

Honey-mustard dill sauce for smoked salmon

Before we get onto the recipe, some family boasting is in order. Mr Weasel had his viva voce yesterday, and was let out after two hours fierce examining with no corrections to his thesis. This means that in June, he’ll become Dr Weasel at a ceremony for which I get to wear a hat. Well done, sweetheart!

Onto the food.

Evelyn Rose is an English cookery writer who specialises in Jewish family recipes and entertaining on a large scale. This recipe is from her The Entertaining Cookbook, published in 1980, which I seem to find myself drawn back to on every large family occasion. She has a calm and deft ability with cooking for large groups, and all the recipes I’ve tried have been foolproof. I use my mother’s copy, which she’s had for twenty years; most of its pages are falling apart now, and the cucumber salad page is splattered with two decades of the best sugary Swedish dressing in the world. Sadly, the book seems to be out of print now, although I have spotted second-hand copies online for around £40. Fortunately, I am frequently to be found in second-hand bookshops, so it’s likely I’ll find a cheaper copy some time before I get too old to read.

Update: I finally found a copy of the book in late 2007, at the tender age of 31, for a mere quid on good old eBay.

This dill mustard is far better than the stuff from a jar. It’s my favourite accompaniment for smoked salmon; try it with salmon, some buttered rye bread and a small salad. Evelyn Rose says it keeps in the fridge for a month – here, it’s never hung around long for enough for me to test that assertion. The ingredients list may sound a little unorthodox, but I promise you it’s the nicest honey-mustard dill sauce you’ve tried.

To make a small bowlful (enough for ten people or more) you’ll need:

4 rounded tablespoons mayonnaise (I used Hellmann’s)
1 level tablespoon Dijon mustard
1 level tablespoon clear honey
2 teaspoons soya sauce (I used Kikkoman)
White pepper
2 teaspoons chopped fresh dill (or more to taste)

Just mix all the ingredients together in a small bowl until everything is well-blended, and chill for a few hours before serving so the flavours mingle. I prefer freshly ground black pepper in this recipe, and usually use far more dill – two of the regular-sized supermarket packs, or about five tablespoons when chopped finely.

Banoffee pie – homemade dulce de leche

Banoffee pie is one of the easiest desserts to make – there’s no real cooking involved, just some butter-melting, some biscuit-smashing, some pre-emptive tin-boiling, some cream-pouring and some banana-slicing. Easy as . . . pie.

No cream in these photographs; I didn’t get that far before the pie was crumbled into bits by enthusiastic lunch guests. (I prefer my banoffee pie with pouring cream, although you’ll read many recipes which call for whipped cream. Follow your own preference.)

The gloriously gloopy toffee stuff in a banoffee pie is dulce de leche, an Argentinian caramelised milk sauce. You can buy it in jars from Merchant Gourmet in most supermarkets, but it’s very easy to make at home. Just cover an unopened tin of condensed (not evaporated) milk with water in a saucepan and boil for an hour and a half, making sure that the water stays topped up. The can won’t come under enough pressure to go pop. When your dulce de leche is finished, it will keep indefinitely in the can; I like to make several cans full at a time and keep some in the cupboard for my emergency pie needs. Use a permanent marker to identify your boiled tins – the paper will have come off them.

Banoffee pie uses a cheesecake base, which is easy to prepare and freezes well. If you make some spares and freeze them, you’ll have a near-instant dessert for the next time you have visitors.

For one pie, you’ll need:

20 digestive biscuits
3 rounded tablespoons butter
1 tin dulce de leche (see above)
5 bananas
Cream for pouring

Line a springform cake tin with greaseproof paper.

Crush the biscuits into crumbs. This takes a few seconds in the food processor, but if you don’t have one you can put them in a sealed plastic sandwich bag and wallop the bejesus out of them with a rolling pin. Melt the butter and combine with the crumbs until you have a stiff paste. Mould the paste in the bottom of the tin until you have a flan base with shallow sides. Don’t worry about being too tidy; you’ll be covering the base up in a while.Put the cake tin in the fridge for about an hour to harden.

When the pie crust is nice and solid, remove it from the cake tin and spread a whole tin of cooled dulce de leche on the base. Top this with chopped, fresh bananas. Pour over gouts of cream and serve.

Chicken wrapped in wild garlic leaves and pancetta

Thanks to Kalyn for hosting Weekend Herb Blogging (and I’m sorry I’ve not taken part in a while; the winter has made herb blogging a real stretch of the imagination in the UK!)

Wild garlic isn’t the same plant as the garlic you buy in the supermarket. It belongs to the same family, but wild garlic (Allium Ursinum) has a tiny bulb with no separate cloves, soft leaves and a strong smell but a gentle flavour. Cultivated garlic (Allium Sativum) is a tougher-looking plant, with larger, much more pungent bulbs, and without the soft leaves, instead growing leaves a bit like a leek.

The leaves of wild garlic look a little like the leaves of lily of the valley; a little less glossy and rather softer, but similarly strap-like. In late spring and summer, their extremely pretty white, star-shaped flowers appear – they’re also edible, and are very good as a garnish or in salads. The abundant leaves are very strongly scented, so if you are walking in a wood where there is a patch, you’ll be able to find it with your nose before you spot it. Pick in winter and spring; the plant dies down after flowering. The bruising that happens when you pick the leaf makes the smell even stronger, so don’t leave the container you’ve put your leaves in in the back of the car- consign them to the boot. This smell (and the flavour) becomes softer and sweeter when the leaves are cooked. The leaves will keep raw for several days in the fridge.

I picked a bag of the leaves in Yorkshire, in my mother-in-law’s garden. Wild garlic spreads like crazy, especially in damp shade, and it’s considered a weed when found in gardens. I also dug two clumps and their accompanying soil up, and put them in pots in my own garden. I’m not going to plant them in the ground, because I have a feeling that if I follow my garlicky instincts, in a couple of years I may end up with an all-garlic garden, which isn’t a good look.

Try the leaves in a salad to taste them at their freshest. They’ll also cook beautifully in the same way as spinach (as in the side-dish I prepared to accompany this chicken – saute mushrooms in butter, and add the leaves towards the end, stirring until wilted, then add lemon juice, cayenne pepper and salt), but I think I’ve found the perfect application for them in this chicken and pancetta parcel. I’m very, very pleased with this recipe – if you can get your hands on any wild garlic, give it a try.

You’ll need (per person):

1 chicken breast fillet
5 slices pancetta
1 handful fresh wild garlic leaves
Pepper
1 knob butter

Lay the slices of pancetta out in a rectangle on a piece of greaseproof paper. The slices should overlap so there are no gaps. Lay the wild garlic leaves all over the top, then place the chicken breast on top of that. Grind pepper all over the chicken (you don’t need any salt; the pancetta will be salty enough on its own) and use the greaseproof paper to wrap the pancetta and garlic leaves around the chicken, as if you were rolling a Swiss roll. Use toothpicks to secure the ends of the pancetta.

Melt the butter in a heavy-bottomed, non-stick pan, and when it starts to bubble, saute the wrapped fillets for eight minutes each side. (Start by cooking the presentation side – the one without toothpicks – first.) Garnish with some wilted leaves and pour over the pan juices.

I served the chicken with roast new potatoes, the mushrooms and garlic leaves described above, and a bottle of Pouilly Fuisse. Delicious.

Kedgeree update

A friend would like me to amend the egg-boiling instructions in the kedgeree recipe from last week:

“I’d suggest you replace ‘boil for six minutes, peel, slice in half’ with ‘boil for six minutes, remove, attempt to peel, burn fingers, swear a great deal, drop egg on floor, retrieve squashed egg, attempt to remove shell with oven gloves on, give up, place egg in freezer, wait, remove, remove shell from frozen egg, place egg in microwave, heat, slice previously frozen egg in half, look at sorry mess and give up. ‘ “

Sorry Pete.

Those having similar problems with their eggs should try peeling the egg under a running cold tap. Mr Weasel tells me that this is a piece of perfectly obvious information he too had never come across, and would like to point out that had I told him this ten years ago our relationship would be punctuated with far fewer fragments of eggshell.

Easter egg

One of the nicest thing about spring in the Cambridgeshire fens is fields like these, full of daffodils. (Completely inedible, but very pretty.) I took this picture from the side of the road heading north; we’ve been away for a few days visiting family in Yorkshire. Some very good things have come out of this for later blogging, including a plastic bag full of wild garlic, a new Australian Women’s Weekly book of Malaysian recipes, three new kinds of thyme, a recipe for Fat Rascals (a Yorkshire spiced bun of exceptional deliciousness) and the most gorgeous Easter egg I have ever, ever seen.

It’s my Easter egg, a present from Dr and Mrs Weasel Senior. (I suppose that at least half of it belongs to my husband, but I am hoping he will mistake it for some art and fail to eat it.) A picture can, in this particular case, speak a thousand words; isn’t it beautiful? These eggs are handmade at the Betty’s bakeries – the glossy dark chocolate has hand-moulded icing roses all over the front.

I can’t bring myself to start eating it. It’s too pretty.

Smoked salmon kedgeree

Kedgeree is one of those curious dishes to come out of colonial India, with European ingredients (in this case smoked fish, usually haddock) alongside Indian spices and rice. There’s an Indian dish called Khichri which is a close cousin of our kedgeree, made from rice, lentils, onions and spices.

Here in the UK it’s a (now rather uncommon) breakfast dish. When I was a kid, our neighbours used to invite the whole street round for a New Year’s breakfast, in which kedgeree played a starring role. Kedgeree is a good idea if you’ve a lot of people staying in the house; you can prepare it the day before and microwave it for a very rich and delicious brunch.

This kedgeree is a bit more delicate than the traditional smoked haddock version. It uses barely cooked smoked salmon and fresh, sweet and juicy king prawns, and instead of strong onion, I’ve used spring onions. The salt used in curing the salmon is sufficient for the whole dish; you will not need to add any extra.

It’s important that the rice is chilled before you cook; if it is warm or hot, the grains are prone to break up and become mushy in cooking.

To serve four, you’ll need:

100g basmati rice, cooked and chilled
10 spring onions, chopped
1 inch of ginger, grated coarsely
1½ tablespoons Madras curry paste (I used Patak’s)
10 raw, peeled king prawns
1 pack smoked salmon, torn into shreds
1 egg per person
½ pint chicken stock
¼ pint double cream
1 handful coriander, chopped
1 knob butter

Carefully slide the eggs into boiling water and boil for six minutes; the yolk should still be soft, and the white just set. Peel, halve and set aside.

Stir fry the ginger and spring onions in a wok until soft, then add the curry paste and prawns and stir fry until the prawns have turned pink. Add the rice to the wok and stir fry. After five minutes, add the stock and salmon, and continue stir frying until the salmon has turned opaque.

Remove the wok from the heat and add the cream and coriander. Stir well, and serve with a segment of the soft, creamy egg.

This dish is inextricably associated with New Year in my head, so I served it this evening with a glass of toasty, nutty champagne. Delicious.

Perfect mashed potatoes

Update, Feb 2008: Lots of people have asked me if you can freeze mashed potatoes. The answer’s complicated – mash will freeze, but it won’t be as good as it was fresh (it tends to change texture in a watery direction and lose some of its flavour). However (there’s always a however), if you want to have some spare mash kicking around to top shepherd’s pie, thicken soups or use as a base for fishcakes, it’s worth freezing individual portions to use in these recipes if you have some left over. Heat the portions for a while in a saucepan once defrosted to evaporate out some of the water before using.

Mashed potatoes are probably my favourite comfort food. One of my earliest memories is that of my mother coaxing me away from the brink of death by measles with plain mashed potatoes and a little gravy. The mashed potatoes I dream about are not mashed potatoes spiked with mustard or garlic; no pesto colours them bright green for me. I like my mashed potatoes spiced gently with black pepper and nutmeg, and with plenty of salt. Some cooks will tell you to use white pepper for aesthetic reasons; I see nothing wrong with a few black specks in my mash, especially given that freshly ground black pepper tastes so much better in this dish than white does.

The potato you choose is important. Potato varieties can be split into two groups – waxy and floury. Waxy potatoes keep their shape well when cooked and are excellent in gratins – they remain quite moist when cooked. A floury potato cooks to a drier, more fluffy finish, doesn’t hold its shape well, and should be your potato of choice for mashing.

My great-grandma used to mash potatoes to lump-free perfection with a fork. God knows how. I use a bog-standard potato masher. Excellent results can be reliably achieved with a potato ricer, which sort of extrudes the cooked potato through tiny holes. Regular readers will know that I’m always chary about buying single-use devices, so I stick to my masher, which also gets used for other generalised vegetable-squashing tasks.

Whatever you do, don’t use a food processor. I am not quite sure about the physics behind this, but any high-intensity processing of the sort you get with a Magimix makes the potatoes very slimy and not very appetising.

King Edwards, Saxon, Estime or Nadine potatoes all mash well; they’re floury and flavourful. The technique is all-important; whipping scalding hot milk into your dry mash will make the mixture silky and fluffy, and a large knob of butter adds richness. To serve four, you’ll need:

700g potatoes, peeled and cut into evenly sized chunks
¼ pint full cream milk
1 large knob butter
Salt and pepper
Freshly grated nutmeg

Simmer the potatoes in boiling water with the lid on for about 20 minutes, until you can easily push a knife through the centre of one. Drain and return to the pan, and put down somewhere warm with the lid on for five minutes while you bring the milk up to a gentle simmer. Drop the butter into the middle of the pan with the salt, generous grindings of pepper and some freshly ground nutmeg, and mash vigorously until there are no lumps. (You’ll find the potatoes are best with a surprisingly large amount of salt, but I like potatoes better than my arteries.)

Hold the milk pan in your left hand and a wooden spoon in your right, and pour the milk into the mashed potatoes in a thin stream, beating it in with the wooden spoon. Serve immediately – these will be the creamiest, most delicate mashed potatoes you’ve ever eaten. If you’ve any left over, keep them in the fridge and make fishcakes tomorrow.

Tortilla Espaniola

We’ve done Spanish omelette before – this one really takes the biscuit, though, and deserves its own spot. Asparagus is appearing in the shops (early – it’s from continental Europe); tiny, sweet sugar snap peas (Kenya – the food-miles-goblin has been doing his work this week) are on the shelves, and suddenly my habit of buying emergency chorizo whenever I see it does not look so daft.

This recipe works best when the vegetables you use are sweet either through long, slow cooking (the onions and red pepper) or through their near-raw freshness (the asparagus and peas). Combined with soft potato, which takes on all the flavour of the onions, and with salty, spicy chorizo, these sweet vegetables become something very special.

I particularly enjoy this dish cold (it’s often served as a cold tapa in Spain). It’s also good hot, but try it if you have a lunch party in the summer; you can make it the night before and serve it at room-temperature alongside other nibbles. This quantity will make enough for six (or for three, hot, for dinner and three, cold, at lunch tomorrow). You’ll need:

2 large onions, sliced finely
2 red peppers, cut into strips
5 small potatoes, peeled (not new potatoes if possible)
2 rings of chorizo, cut into coins
10 stalks asparagus cut into thumb-sized pieces
1 handful sugar snap peas
10 eggs
1 handful cheddar cheese, grated
1 small knob butter
Salt and pepper

Start by sauteeing the onions gently in the butter for ten minutes in a large non-stick frying pan, stirring occasionally. Add the potatoes and the peppers, and continue to cook for another 15-20 minutes, until the potatoes are not so soft they’re collapsing, but pleasantly toothsome. Mix the chorizo, peas and asparagus with the ingredients in the pan, and quickly beat the eggs with some salt and pepper. Pour the eggs over the mixture and cook for another ten minutes.

Sprinkle the tortilla with the cheese (don’t smother it; this is for colour and a kick of flavour, not a duvet) and bung the whole pan under the grill for 5-10 minutes, until the egg mixture is cooked through and the top is bubbling and crisp. Serve with a green salad.