Sweet pepper salad

Sweet pepper saladI’ve given quantities here for four diners, but you should be aware that this is one of those things that people will ask for seconds and thirds of, so cook a generous amount. This is a lovely sunshine-filled salad, assertively flavoured with garlic, fresh lemon juice, sweetly salty anchovies, and good olive oil.

The peppers are grilled and peeled before the salad is assembled. This makes them much more digestible (many people’s stomachs are bothered by the indigestible skins of peppers in quantity), and gives them a wonderfully satiny texture. Allow your peppers to macerate in the fridge overnight (or preferably for two or three days), and you’ll find that all the flavours in the dish meld sweetly into a gorgeous golden, silky whole.

To serve four, you’ll need:

6 peppers – use a mix of red, yellow and orange
½ a lemon
4 anchovies in oil
3 cloves garlic
8 tablespoons olive oil
Salt and pepper

Start by cutting each pepper into three or four segments (you’ll be able to see the pepper’s ribs – just cut along these). Discard the stalk and seeds, and lay the segments out, skin side up, on the grill tray.

Grill the peppers until the skins are brown and blistering. Put all the segments into a plastic freezer bag and knot the top, then leave the bag alone for about twenty minutes. The peppers will steam gently inside the bag, loosening their skins. When the peppers are cool, unseal the bag and start to peel the skins off. You’ll find they come away easily. Do this over a bowl to catch any drips of sweet juice.

Cut the peeled segments of pepper into slim strips and put them in the bowl with the juice. Add the garlic, crushed or grated, the chopped anchovies, the lemon juice and the olive oil. Mix well, cover and refrigerate. The peppers will get better and better as they macerate, so feel free to leave them for up to three days – just remove them from the fridge a couple of hours before serving so they can come up to a toothsome room temperature.

Tarragon cream chicken

This recipe is absurdly quick and simple – it’s good for unexpected guests because you’re likely to have most of the ingredients in the house already (and may well already find them all lurking in your fridge). It’s rich and delicious, and it only needs a salad and some crusty bread to accompany it and soak up the creamy juices.

If you can get your hands on some fresh tarragon, use that. Dried tarragon, however, is surprisingly good here. There are no similar short-cuts you can take with the parsley, though; dried parsley is useless and revolting, so you’ll have to find some fresh.

To serve three, you’ll need:

Three chicken breast fillets
3 tablespoons flour
400ml crème fraîche
3 tablespoons chopped fresh tarragon (or 3 teaspoons dried)
3 tablespoons chopped fresh parsley
1 tablespoon Dijon mustard
Half a lemon
2 tablespoons butter
Salt and pepper

Chop the chicken breasts into bite-sized pieces and dust them with the flour and a little salt and pepper. Melt the butter in a sauté pan and heat it until it starts to bubble. Add the chicken to the pan and sauté until it is cooked through and starting to brown at the edges. Turn the heat down low.

Tip the crème fraîche, herbs and mustard into the pan and stir well. Bring up to a simmer and add the lemon juice and some salt and pepper. Taste for seasoning, adding a little more lemon juice if you like, and serve immediately.

Pathetically easy guacamole

Easy guacamoleI am almost ashamed to be calling this a recipe, given that it’ll take you about three minutes to make. All the same, it’s very tasty, and it’s a great partner to the other Mexican recipes I’ve been making this week.

I have an interesting piece of avocado trivia for you today: the word guacamole comes from the Nahuatl word ahuacamolli – literally ahuacatl mole, or sauce. Ahuacatl is the Nahuatl language word for avocado…and it also means ‘testicle’. Be gentle as you chop your avocados.

Some people assert that tomatoes have no place in guacamole. I think it’s much, much nicer with tomatoes, which offer sweetness and a little acid to the mixture – if you use tomatoes, you can get away with a little less lime. Experiment at home and see what you think.

To make guacamole for four, you’ll need:

4 avocados (I used the Hass variety)
6 cherry-sized tomatoes
1 medium onion
1 handful coriander (cilantro for Americans)
2 jalapeño chillies
1 lime
Salt and pepper

Cut the tomatoes into eighths, and cut the onion into small dice. Chop the coriander finely. Remove the seeds and ribs from inside the chillies and dice their flesh finely. Finally, chop the flesh of the avocados roughly and mix vigorously with the other chopped ingredients, squashing things around a bit in the bowl. Squeeze over lime juice to taste and season with salt and pepper.

Carnitas

CarnitasCarnitas are one of my favourite Mexican dishes. This is a luscious way with pork, which brings out a deep flavour from the meat and gives it a superbly silky texture. Unfortunately, I can predict as I type this that some of you are going to balk once you’ve read the recipe – because all this deliciousness comes about because the meat is poached in nearly its own weight in pork fat, then drained. I know that the word ‘lard’ is about as popular as the word ‘anthrax’ in recipes these days. It’s a great, great shame – there is joy in good foods, and some of the very best are thick and unctuous with glossy animal fats.

We appear to have developed a terrible national neurosis about fat in general, and animal fats in particular. In moderation (after all, you’re probably not going to be eating carnitas more than a couple of times a year at the most), fat is just part of a balanced diet. It provides a vehicle for vitamins A, D, E and K, which are only made available to your body when dissolved in fat. Fat maximises flavour, creates exceptional textures (think of a lardy puff-pastry, a potato cooked in goose fat, a crisp slice of bacon), and, quite simply, fat can make you happy, which is as positive an outcome as I can imagine. Fat is, undoubtedly, fattening…but I encourage you to take a trip to the supermarket and look at the average size of the glum people stuffing their trolleys with low-fat spreads and low-fat ready meals. Worst of all, there have been reports recently that parents have been so worried by the dire messages we’re all getting about fat that they are feeding their children a diet unnaturally low in fats, resulting in deficiencies in those fat-soluble vitamins and, surprisingly, obesity later in life. If you’re worried about your cholesterol level, the best advice I can offer is to follow your carnitas up with a bowl of porridge for pudding.

So here is an unapologetically fatty recipe. Please cook it and enjoy it rather than worrying about it. To serve six, you’ll need:

1 kg lean pork, cut into 2-inch cubes
750g lard (this is best purchased from your butcher if he cooks on the premises – otherwise, a block from the supermarket will be fine)
1 onion
1 handful coriander
2 green chillies
Sour cream or crème fraîche, salsa and tortillas to serve.

Make sure the pork is well trimmed of fat. I bought a whole, boned leg joint and diced it myself, removing the skin – this can sometimes be cheaper than buying ready-diced pork. Put the pork in a large bowl and season it generously (use a little more salt than you think you will need) with salt and pepper.

Melt the lard over a medium flame in a large, heavy-bottomed pan. Tip the pork into the lard and simmer for between 1 hour 15 minutes to 1 hour 30 minutes. When the pork is ready it will just be beginning to brown, and it will be soft to the fork. Use a slotted spoon to remove the pork from the lard, and put it in a baking dish. Preheat the oven to 200° C (400° F).

CarnitasUse two forks to shred the meat well. Chop the onion into small dice, and slice the chillies. Chop the coriander finely. Mix the onion, chillies and coriander with the meat in the dish, then cover the whole lot tightly with tin foil.

Bake the dish for 15 minutes. The carnitas will be warmed through – the onion, not completely cooked, will be sweet, but will still retain its crunch. I poured some heated mole verde from Sol at Mexgrocer over the dish, but this isn’t necessary – I just felt like some delicious Mexican overkill.

Serve your carnitas with some salsas, soured cream and tortillas, (and watch this space for a pathetically easy guacamole). Summer might have finished, but if you eat like this you can almost convince yourself that your dining table is temporarily in Mexico.

Mexgrocer – Salsa Verde recipe

Mexican ingredientsThose of you who read this blog regularly might remember that about a year ago, I mentioned in passing that I couldn’t find any tomatillos in the UK. There were a few Mexican ideas I wanted to try out with some of the little green beasties, but besides growing my own, it looked as if there was no way I’d be able to find any.

Eventually, I gave up on tomatillos. Then, about two weeks ago, I had an email from Sol, half of the husband and wife team that runs Mexgrocer.co.uk. After we’d chatted for a bit, Sol sent me a lovely box of Mexican ingredients to play with, and nestling at the top of the box, I found a bag full of beautiful fresh, ripe tomatillos, wrapped up in their papery husks. Other things in that box went to make a big meal for a group of friends (you’ll read more about that meal later on this week). Sol and his Mexican wife have made sure that you will be able to find ingredients which have been unavailable in the UK for years. There are chocolatey moles (a thick, savoury sauce which I used to smother some sticky sauteed chicken pieces), tamales, nopales (prickly pear cactus – a very delicious vegetable), a breathtaking selection of fresh, dried, smoked and bottled chillies, and some herbs and spices I’ve never seen on this side of the Atlantic.

TomatillosSo then, you ask. What are these tomatillo things? It’s probably simplest if I explain what they aren’t. They’re not cape gooseberries, even though they have a papery, Chinese-lantern-type husk protecting the fruit (cape gooseberries and tomatillos both come from the physalis family). They’re not unripe tomatoes, even though a tomatillo without a husk looks precisely like a green tomato. They have a fresh, lightly acidic, juicy taste, lots of tiny seeds, and are firm and gloriously green when ripe. They feature very heavily in green sauces in Mexican cooking, and if you’ve not tried them before, you’re in for a treat.

TomatillosTomatillos keep very well in their husks – pop them in the fridge and they’ll last for a couple of weeks. You can also freeze them successfully if you’re going to be using them in a sauce.

An uncooked, emerald-coloured salsa is the ideal way to show these little fruits off. This salsa couldn’t be easier to prepare, and it’s fantastic with rich foods, its fresh zing cutting through fatty, creamy sauces. To make salsa verde for six, you’ll need:

400g tomatillos
2 mild green chillies
6 spring onions
1 large handful coriander
100 ml water
1 teaspoon salt

Tomatillo salsaRemove the husks from the tomatillos and wash them to remove their natural sticky coating. Halve them, removing the woody bit where the stem met the fruit. Remove the seeds from the chillies, and wash the spring onions and coriander carefully to remove any grit.

Put all the ingredients in the food processor, and whizz until you have a slightly chunky mixture. Chill before serving. This salsa is great used as a dip, and it’s also delicious as a topping for rice, or as an ingredient to lift the flavour of a lovely meaty taco.

Beautiful Lunar Landscape

As proud as I am of the crispy pork from the other day, I’m prouder of this. My brilliant brother, Ben, sings and plays a number of instruments in a band called Beautiful Lunar Landscape. Their new EP, Alone in this Dark Romantic Night, is available for download from their record company’s site and from iTunes in certain territories, and they’ve just released their first video, which is being shown on MTV. I like to think that a childhood of having his teeth brushed with soap by a bullying big sister moulded Ben into the fine figure of a young man he is today.

You can watch the title track from Alone in this Dark Romantic Night below. This is trippy, shimmering music and I love it. Well done guys – it’s a fantastic video and a brilliant song.

[youtube=http://www.youtube.com/watch?v=jQSTCgj61Vs]

If all this has enthused you, check out Beautiful Lunar Landscape’s Myspace page.

Crispy Chinese roast pork

I am pathetically proud of having successfully cooked a strip of Chinese roast belly pork (siew yoke or siew yuk, depending on how you transliterate it) at home. This pork, with its bubbly, crisp skin and moist flesh is a speciality of many Cantonese restaurants. An even, glassy crispness is hard to achieve if you’re making it at home, but I think I’ve cracked it; with this method, you should be able to prepare it at home too.

You’ll need a strip of belly pork weighing about two pounds. Here in the UK you may have trouble finding a belly in one piece (for some reason, belly pork is often sold in thick but narrow straps of meat); look for a rolled belly which you can unroll and lay flat, make friends with a pliant butcher or shop at a Chinese butcher (you’ll find one in most Chinatowns). Look for a piece of meat with a good layer of fat immediately beneath the skin. The belly will have alternating layers of meat and fat. Try to find one with as many alternating strips as possible.

To serve three or four (depending on greed) with rice, you’ll need:

2lb piece fat belly pork
1 teaspoon sugar
1 teaspoon salt
1 teaspoon five-spice powder
½ teaspoon cinnamon
1 tablespoon Mei Gui Lu jiu (a rose-scented Chinese liqueur – it’s readily available at Chinese grocers, but if you can’t find any, just leave it out)
3 cloves garlic, crushed
2oo ml water
2 tablespoons Chinese white vinegar

Bring the water and vinegar to the boil in a wok, and holding the meat side of your pork with your fingers, dip the rind in the boiling mixture carefully so it blanches. Remove the meat to a shallow tray and dry it well. Rub the sugar, salt, five-spice powder, cinnamon, Mei Gui Lu jiu and garlic well into the bottom and sides of the meat, leaving the rind completely dry. Place the joint rind side up in your dish.

Belly porkUse a very sharp craft knife to score the surface of the rind. If your rind came pre-scored, you still need to work on it a bit – for an ideal crackling, you should be scoring lines about half a centimetre apart as in this photo, then scoring another set of lines at ninety degrees to the original ones, creating tiny diamonds in the rind. Rub a teaspoon of salt into the rind. Place the dish of pork, uncovered (this is extremely important – leaving the meat uncovered will help the rind dry out even further while the flavours penetrate the meat) for 24 hours in the fridge.

Heat the oven to 200° C (450° F). Rub the pork rind with about half a teaspoon of oil and place the joint on a rack over some tin foil. Roast for twenty minutes. Turn the grill section of your oven on high and put the pork about 20cm below the element. Grill the meat with the door cracked open for twenty minutes, checking frequently to make sure that the skin doesn’t burn (once the crackling has gone bubbly you need to watch very closely for burning). The whole skin should rise and brown to a crisp. This can take up to half an hour, so don’t worry if the whole thing hasn’t crackled after twenty minutes – just leave it under the grill and keep an eye on it.

Remove the meat from the heat and leave it on its rack to rest for fifteen minutes. Cut the pork into pieces as in the picture at the top of the page. Serve with steamed rice, with some soya sauce and chillies for dipping. A small bowl of caster sugar is also traditional, and these salty, crisp pork morsels are curiously delicious when dipped gingerly into it.

Honey-mustard roast chicken

Roast chickenThis is a very easy and totally delicious way to roast a chicken. The honey-mustard baste keeps the flesh moist and plump, and dribbles into a bed of roast onions which caramelises to a sticky sweetness. The skin on a chicken cooked like this is fantastic – crisp and honeyed with a lovely zing from the baste.

To roast one medium chicken you’ll need:

1 roasting chicken
1 lemon
5 onions
1 handful fresh parsley
1 tablespoon soya sauce
1 heaped tablespoon Dijon mustard
1 heaped tablespoon whole-grain mustard (I used Grey Poupon)
2 heaped tablespoons honey

Preheat the oven to 190° C (357° F).

Remove any excess fat from the inside of the chicken and discard. Zest the lemon and put the zest aside in a bowl, then slice the lemon in half and push it into the cavity of the chicken with one halved onion and the parsley. Chop the remaining onions roughly and use them to make a little mound to stand the chicken on in the bottom of your roasting tin.

Add the soya sauce, both mustards and the honey to the lemon zest in the bowl and mix well. Put two tablespoons of the mixture inside the chicken and place the bird on top of the onions. Smear another two tablespoons over the outside of the bird. (Don’t worry about making sure the baste gets on the onion base – it will drizzle over them in just the right quantity as you baste the chicken.)

Roast chickenCover the chicken with foil and place in the oven for 1 hour and 15 minutes, basting with a little of the honey-mustard mix every twenty minutes or so. After the 1 hour and 15 minutes, remove the tin foil from the bird and turn the heat up to 210° C (410° F). Continue to cook for another 15 minutes, checking that the skin browns but does not char (keep an eye on it and replace the tin foil if you feel it’s getting too brown). Remove from the oven, rest for ten minutes (the chicken will produce lots of savoury juices) and serve with the roast onions from the bottom of the pan, roast potatoes and a green vegetable.

Imam Bayaldi

Imam BayaldiI’m writing about Imam Bayaldi, a favourite middle-eastern aubergine dish (it means ‘the imam fainted’), specifically in order that my friend Martin, who has a vegetarian to entertain, has something new to cook. Sorry Martin – I’ve been meaning to get round to this for ages. I guess I just like meat.

It’s odd how many dishes from places all over the world have names like this, where religious men are felled by dinner. There’s Buddha Jumps over the Wall soup (a Chinese soup so good, apparently, that even the Buddha was driven to interrupt his meditation with worldly gymnastics – I wouldn’t know, because it’s so expensive I can’t bring myself to order it). There’s Strozzapreti, an Italian pasta which translates as ‘strangled priests’, apparently because they are so good a venal priest choked himself to death when gorging on them. The imam in the case of Imam Bayaldi has, at least, only been driven to unconsciousness rather than unseemly jumping or choking, so I suppose he wins.

There’s a lot of olive oil in this recipe. Aubergines are notorious for soaking oil and flavourings up; it’s what makes them so delicious. If you’re feeling bad about your waistline, go for a jog tomorrow. Life’s too short to avoid aubergines.

To make two stuffed aubergines you’ll need:

2 aubergines
1 red onion, chopped
6 cloves garlic, crushed
1 celery heart, chopped finely (make sure you get the yellow/green leaves here)
2 medium tomatoes, chopped
1 green pepper, chopped
3 bay leaves
1 small handful fresh oregano
1 small handful fresh mint
1 shall handful fresh parsley (plus extra to garnish)
250ml chicken stock (substitute vegetable stock if serving to vegetarians)
Olive oil
Salt and pepper

AubergineBegin by slicing the aubergines in half lengthways and use a knife to carefully hollow them out, making them into boat shapes. Chop the flesh you’ve removed into 1cm squares, and put it in a large covered bowl. Use a serrated knife (like a tomato, the aubergine has a tough skin and soft flesh, so it’s easier to cut with a serrated knife) to remove long strips of skin from the outside of the boats (see picture). This will help the aubergines’ flesh take on flavour evenly from the stock and olive oil. Try as hard as you can to avoid puncturing all the way through to the inside of the hollowed out shells, but don’t worry; it’s not the end of the world if you do.

Imam Bayaldi fillingChop the onion, celery, tomatoes and the green pepper into pieces about the same size as the aubergine pieces you chopped earlier. Mix these with the aubergine flesh, the garlic and the herbs (apart from the bay leaves), a few twists of the pepper grinder and a teaspoon of salt. If you can find some flat-leaved parsley (which does have a subtly different flavour), use that – you can see from the pictures that all I had in the garden was curly-leaved parsley. Add three tablespoons of olive oil to the bowl and mix well.

Place the aubergine shells in a baking tin with reasonably high sides. Fill the aubergines with the mixture in the bowl, and tuck the bay leaves between them. Drizzle with some extra oil so the edges of the aubergines are well-lubricated, then pour the chicken stock into the bottom of the dish so it laps around the sides of the aubergines. Pour another five tablespoons of olive oil into the dish with the chicken stock.

Bake the aubergines, covered with some aluminium foil, for 45 minutes at 180°C (350°F), until they are soft. Remove from the dish and discard any remaining stock and oil in the pan. Serve immediately – the couscous from yesterday’s post is a fantastic accompaniment (and, like this dish, can be made vegetarian by swapping the chicken stock for some vegetable stock). You can avoid aubergines which (as in the photograph at the top of the page) look like a chia pet by the simple expedient of not garnishing them with way too much curly parsley. I blame the very large glass of retsina I was drinking at the time.

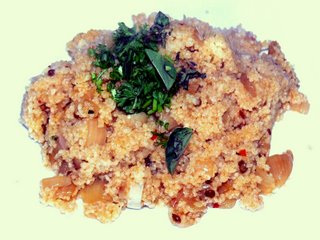
Spicy couscous

It took me a while to come around to couscous. My first (and second, and third, and fourth) experience with it was disappointing – in France, there are lots of Moroccan couscous restaurants serving wet, wet stews and dry, dry couscous to soak up your sauce with. Back when we lived in Paris, these restaurants were actually a lot of fun with friends…but they weren’t somewhere I looked to for delicious carbohydrate.

So I steered clear of couscous (which is not a milled grain, but actually almost a kind of pasta, made by rolling damp semolina flour between the hands and then powdering the resulting ‘grains’ with dry flour to stop them sticking) for some years, until we went to a friend’s house here in the UK and she served a flavoured couscous. This wasn’t stick-to-the-roof-of-your-mouth dry like the stuff I’d had before – it was moistened with lots of sweet butter and spiked with spices, onion and a clever agrodolce – a vinegar/sugar mix. The addition of a small amount of a good vinegar lifts the flavour and really enlivens the spices, without adding any vinegary, sour taste – try it. It’ll surprise you.

Since then we’ve eaten couscous several times a month. It’s a great accompaniment to middle-eastern dishes, and it also goes surprisingly well with grilled meats. Couscous keeps well, once cooked, in the fridge, and can be eaten cold (very good as a salad at a picnic with some chopped tomatoes, celery, cucumber and olive oil thrown in) or reheated in the microwave.

To make couscous as an accompaniment for four, you’ll need:

4 shallots, chopped finely
1 stick celery, chopped finely
4 cloves garlic, chopped
1 tablespoon olive oil
2 large knobs butter
1 teaspoon cumin, crushed in a mortar and pestle
1 teaspoon coriander, crushed in a mortar and pestle
1 inch-long piece cinnamon
1 teaspoon Ras al Hanout (use Belazu brand if you can find it)
2 bay leaves
1 tablespoon sherry vinegar
1 teaspoon caster sugar
250g couscous
450ml chicken stock
Salt and pepper

Fry the shallot, celery and garlic in a large, heavy-bottomed pan in the olive oil and a knob of butter, until the shallots are translucent. Add the cumin, coriander, cinnamon, Ras al Hanout, bay leaves, a teaspoon of salt and a generous amount of freshly ground pepper, and continue to fry for two minutes until the spices are giving up their aroma.

Add the vinegar and sugar to the hot pan. It will bubble and spit. Keep the pan on the heat, stirring, until the vinegar reduces to a glossy syrup. Add the dry couscous to the pan and stir well to make sure it is completely mixed with the other flavourings. Pour the hot stock into the pan and put the lid on. Turn the heat down low and simmer for about 7 minutes, until all the stock is absorbed into the couscous. Take the second knob of butter and fluff it through the grains and taste to check the seasoning, adding more salt if necessary. Garnish with some fresh herbs – I like oregano and parsley.