Salt caramels

It’s funny how quickly we assimilate food ideas. Salted caramel was considered suspiciously French, a kind of extreme sweetie sophistication, when we first encountered it about ten years ago. Now it’s all over the place – you can even buy jars of the stuff in the supermarket.

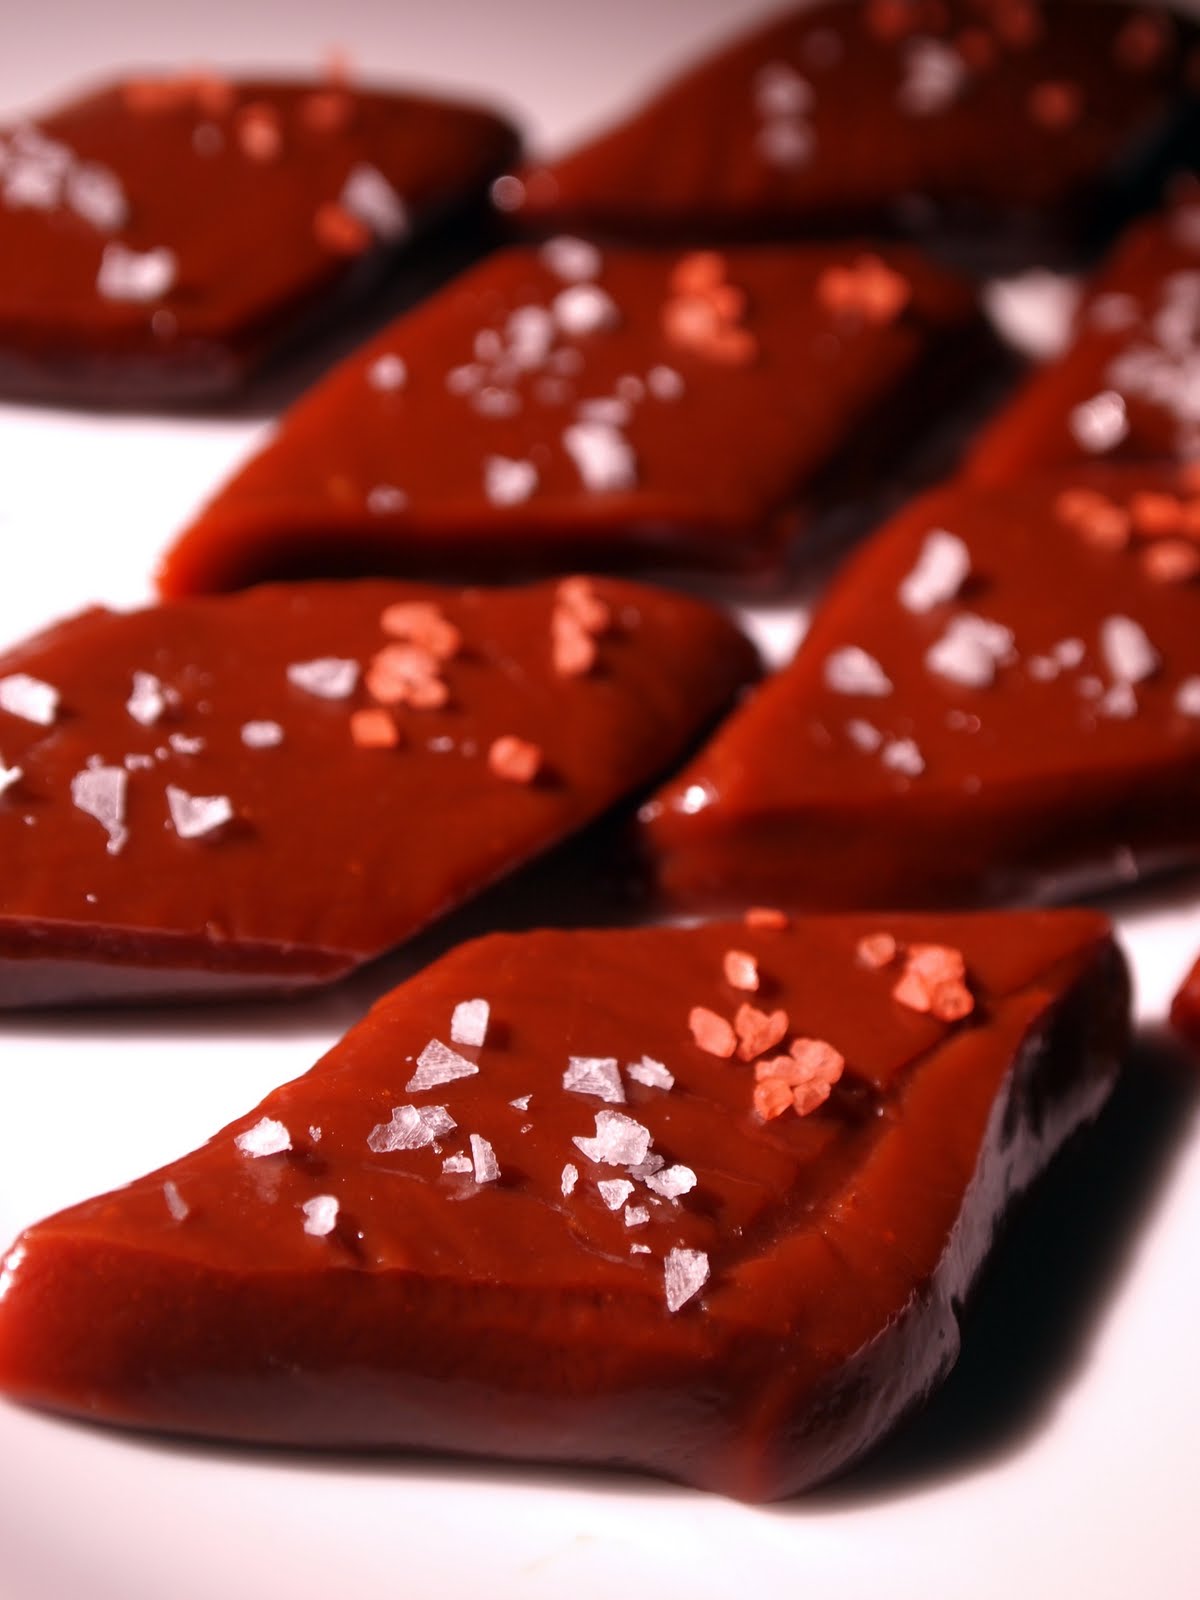
Salt caramels are still, as far as I’m concerned, a grown-up’s sweet. Buttery, creamy and velvety on the tongue, the addition of some salt to the mixture lifts the flavour, bringing out the dairy smoothness in a way you just can’t achieve in an unsalted caramel. A little extra salt sprinkled on top makes for a tongue-shockingly good contrast between sweet and salty. They’re easy to make at home, and make a great gift. Try them as an after-dinner nibble – they’re especially good with coffee. Home-made salt caramels are also a very good application for any interesting salt you might have lurking in the cupboard (the red salt in the picture here is Hawaiian volcanic salt I was given as a present just after I got married in 2004. Embarrassingly, this is the first thing I’ve used it in).

I like my caramel to have a hint of smoky bitterness. The best way to achieve this is to use an unrefined sugar in the recipe. If you prefer a lighter caramel, you can substitute another 150g of caster sugar for the light brown sugar below.

The usual boiling sugar warnings apply. Do not lick the spoon or dip your finger in the mixture until it has cooled completely. Keep an eye on the pan at all times to ensure it doesn’t boil over. And your life will be made much easier if you use a sugar thermometer – if you don’t have one, caramel at the hard ball stage should form a squishy ball that can hold its shape but can be squeezed by the fingers when dropped into a bowl of cold water.

You’ll need:

150g caster sugar
150g soft light brown sugar
80g butter (choose something with a good flavour – I used an unsalted Beurre d’Échiré)
200g double cream
75ml golden syrup
1tsp salt, plus more to sprinkle at the end

Line a square cake tin (mine measures 20cm on each side) with buttered greaseproof paper.

Combine the caster sugar with 30ml water in a saucepan, and bring to the boil over a medium flame. Swirl the pan every now and then, and keep watching it until the sugar starts to change colour. It will quickly work its way from clear to pale gold through to a reddish brown. As soon as it hits the reddish brown point, remove it from the heat and wait for the bubbles to subside.

While the sugar is cooking, melt the brown sugar, butter, cream, syrup and a teaspoon of salt together in a separate pan and stir well. Pour the mixture into the reddish brown caramel and return to the heat with a sugar thermometer. Stir gently to combine the ingredients.

Bring the mixture to a boil and continue to simmer, swirling occasionally, for between 5 and 10 minutes, until the mixture reaches hard ball stage on your sugar thermometer (125°C, 260°F). Remove from the heat and wait for a few minutes until the bubbles in the pan subside. Pour the mixture into the prepared cake tin and cool for an hour or so until the caramel is solid. Cut into pieces and decorate each piece with a pinch of salt. Flaky Maldon salt is fantastic here – and if there’s any Hawaiian volcanic salt in your cupboard, now’s the time to use it.

Jerked chicken – and brining 101


I promised you a post about brining. Brining sounds a bit counter-intuitive at first; how on earth is giving a piece of meat a bath in salty water going to make it taste better?

Back in the dark ages when I was at school, cooking lessons were called domestic science. I am unconvinced that there’s a lot in common between my constructing a pie and the Large Hadron Collider at CERN, but understanding how brining works does actually require you to think back to your biology lessons. This is because what’s going on in your chicken once you’ve popped it in its salty bath involves osmosis, whereby the cell walls in the muscle let through the concentrated brine to try to balance the concentration inside and outside the cells. This results in a plumping of the muscle – the cells draw up the brine all the way into the core of the piece of meat and become very juicy, leaving you with a lovely moist piece of cooked meat. There’s also some denaturing of protein thanks to the salt; this will make your meat much more tender. All this science works at its fastest and best when your brine is as close to freezing as possible – once you’ve made yours, refrigerate it (perhaps with a couple of ice cubes bobbing around in there) until it’s very cold before using.

The brine can also push certain flavours deep inside the meat (far deeper than ordinary marinading can achieve). When choosing what flavours to add to your brine, be careful – you need to use only those aromatics which are soluble in water or vinegar, not those (like the essential oils in a lot of herbs and spices) which are only fat-soluble – these flavours won’t make it past the cell membranes. Any of those chilli sauces which have a vinegar base (Tabasco, Frank’s and so on) work brilliantly in a brine; so does lemon juice, Worcestershire sauce, soy sauce, mustard, flavoured vinegars and any alcohol. Be careful when adding wine or cider to a brine though; because the brine works on the deep tissue of the meat, not just the surface, it can be hard to cook the brined meat little enough to keep it tender while also cooking it enough to burn off any alcohol lurking deep in the middle.

I like sugar or honey in a brine, especially with chicken, because as well as adding flavour to the meat, it makes the surface skin much nicer – brown, crisp and quick to caramelise. You can add another variable by buying some vacuum containers like the ones I reviewed here, which will make brining about four times faster. Without a handy vacuum tub, brining times for chicken are:

  • Chicken breasts, no bone – 1 hr
  • Chicken joints, with bone – 1 ½ hrs
  • Whole chicken (about 4lb) – 3 hrs

I’ve made a jerk rub to slather all over chicken once it comes out of the brine. This Jamaican seasoning is unusual in its heavy use of allspice, usually a dessert spice, and it works really well here. To make unbelievably succulent, spicy chicken for two, you’ll need:

Chicken and brine
1 chicken, jointed into six pieces (ask the butcher to do this for you or go at it yourself with a very sharp cleaver)
70 g salt
1 litre water
1 ½ tablespoons Tabasco sauce
2 tablespoons honey

Jerk seasoning
2 tablespoons ground allspice
1 teaspoon fresh thyme leaves
1 tablespoon paprika
1 teaspoon cayenne pepper
1 teaspoon onion salt
1 teaspoon dried habañero pepper
1 teaspoon black pepper

Mix the water, salt, Tabasco and honey and heat gently in a saucepan, stirring, until all the salt has dissolved. Chill in a large bowl in the fridge until very cold. Add the chicken pieces to the brine and leave for an hour and a half.

Remove the chicken from the brine and pat dry with paper towels. Drizzle with a little olive oil and rub well with the jerk seasoning. Grill the chicken on the barbecue or under the grill in your oven for about 7 minutes per side (be careful here – for some reason, brined chicken takes less time to cook than virgin chicken).

I’ll put up a recipe later this week for a plantain accompaniment for this chicken.

Preserved lemons

Preserved lemonsI have been having some very good dreams recently about those sweetbreads with preserved lemon I ate a couple of weeks ago at Moro. Although sweetbreads are pretty hard to find round here, Moroccan preserved lemons are not – you can buy Belazu’s very good lemons at the supermarket, or make your own. I chose to make my own, because making preserves gives me a self-righteous glow and something nice to display in the kitchen.

This is a really easy preserve to make, largely because it involves no cooking. The lemons are preserved in salt and their own tart juices, with spices and herbs tucked in between. Once ready, the rinsed lemons’ skins can be used as a condiment, and their pulp and juice as a seasoning. To fill a sterilised 1.5 litre jar, you’ll need:

About 15 unwaxed lemons (buy a few extra in case you need the juice)
500g coarse salt
2 bay leaves
3 cardamom pods
10 coriander seeds
3 dried chillies
1 cinnamon stick
5 cloves

Preserved lemons, cinnamon stickBegin by making a 2 cm layer of salt at the bottom of the jar, and dropping a couple of the whole spices in it. Take a lemon and cut the top and the bottom off. Make as if you are going to cut the lemon in half from top to bottom, but don’t cut through the last 1 cm of flesh and skin. Turn the lemon upside down and make another cut from top to bottom, as if you were going to quarter the fruit, again not cutting all the way through. You’ll end up with a lemon with two top-to-bottom slits in it. Holding the fruit above the neck of the jar, stuff each slit with as much salt as you can fit in, then drop it into the jar, pushing it firmly into a corner.

Continue filling your lemons with salt and packing them firmly into the jar, sprinkling salt and spices between them as you go. You’ll notice that the juice from the squashed lemons will begin to cover the fruits as you work. When you have packed as many lemons into the jar as will fit, squeeze over fresh lemon juice until the top lemon is at least 1 cm deep in the preserving liquid.

Put the lid on tightly and leave the lemons in a warm place (the kitchen worksurface will do just fine) for six weeks, shaking the jar gently every day to mix the ingredients. The lemons, once ready, do not need to be refrigerated, and will keep indefinitely – if, once you start using them, the liquid no longer covers all the lemons, just add more salt and lemon juice.