Som tum – Thai green papaya salad

Thanks for being so patient while I bunked off from blogging and from my other work for an indolent week. It’s been lovely – I’ve been to the seaside, got sunburned, drunk lots of lovely summery booze, eaten some great meals, and done lots of work on new recipes: it means I’m able to come back to you fully recharged. There’s lots to look forward to over a very busy couple of months to come, when I’ll be blogging from Cardiff, a cruise ship just outside Southampton, New Orleans, then Vegas and Phoenix – you can probably see why I felt I needed a short break before getting back down to things!

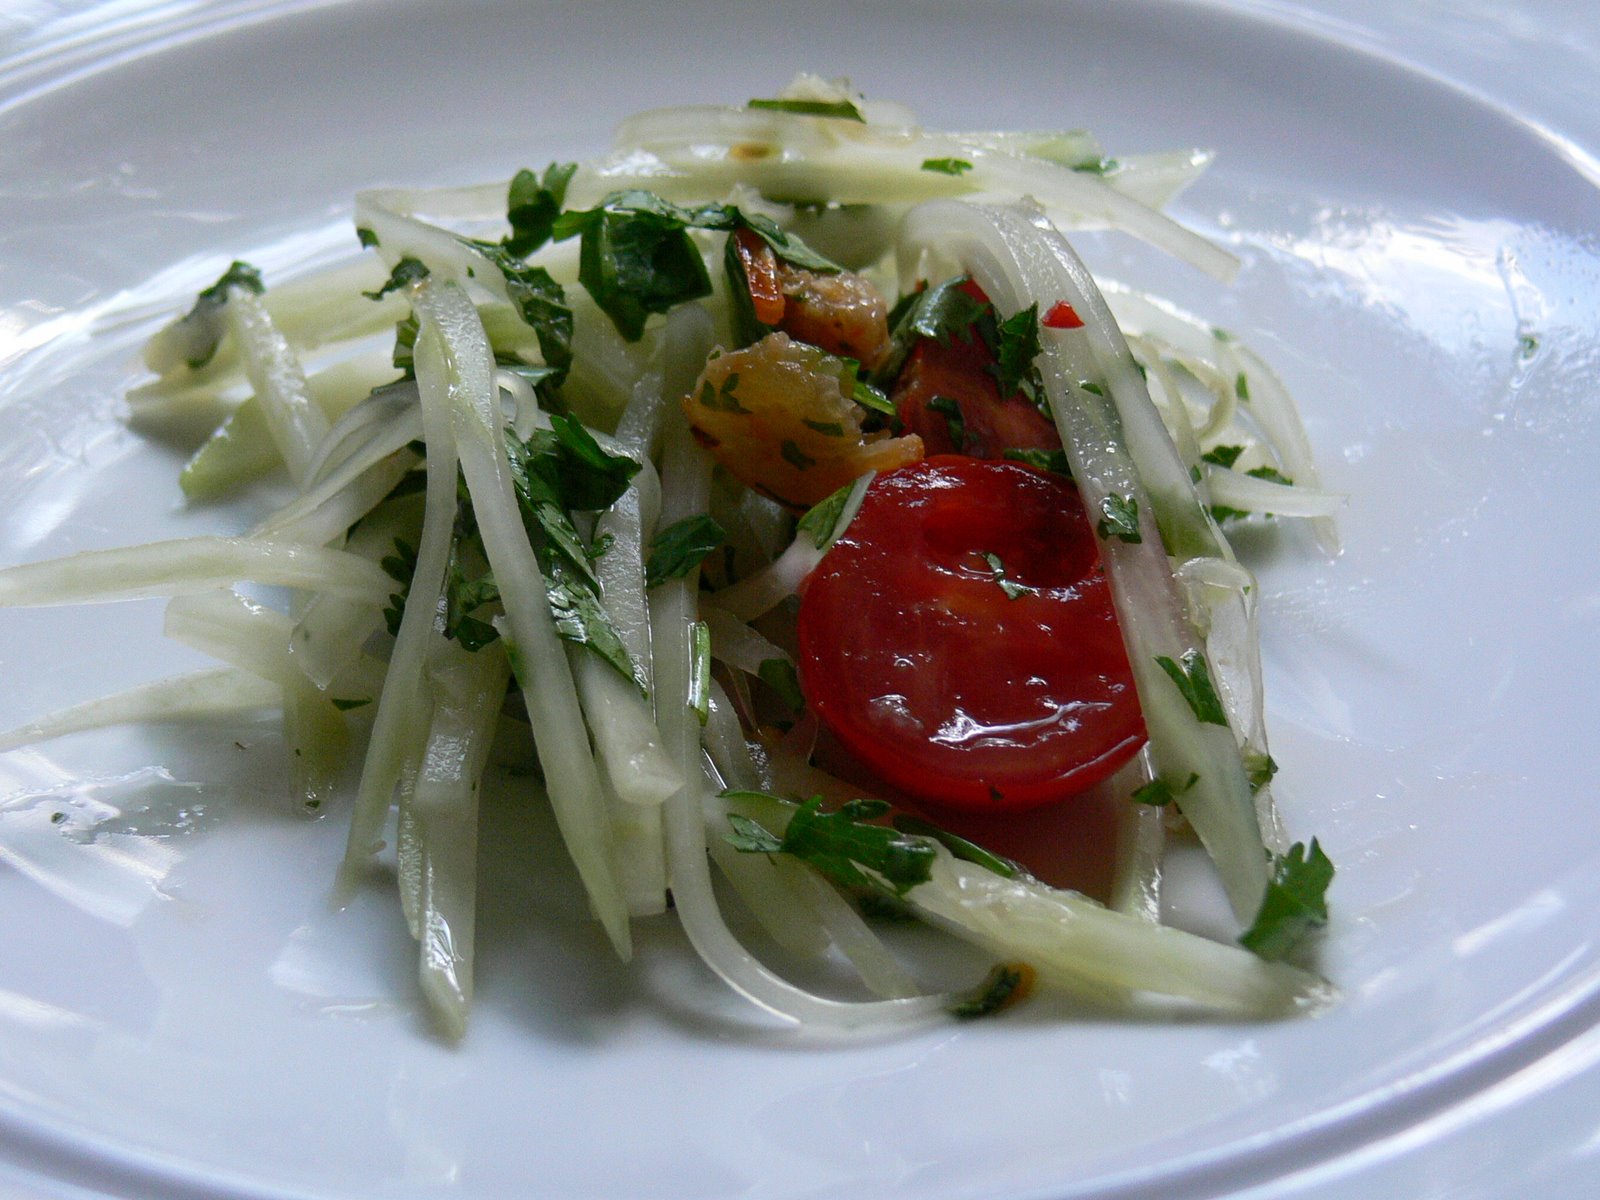
So then: som tum. You might have ordered this dish (and if you haven’t, you should; I’d rate it as one of the world’s best salads) in a good Thai restaurant. Green papaya makes the base of this salad, its dense, crisp texture made the most of with some careful shredding with a sharp knife. It’s bathed in a dressing which, for me, promotes it right to the head of the international salad flavour conspiracy. (See also: coban salatasi, panzanella and Swedish cucumber salad.) Som tum dressing touches every part of your tongue. It’s sweet with palm sugar, salty and umami with fish sauce and dried shrimp, sour with fresh lime juice, and spiked with chilli to give the whole mouth heat. Some aromatic herbs give it a lovely nose as well – for my tastes, this is about as good a picnic dish as you could make.

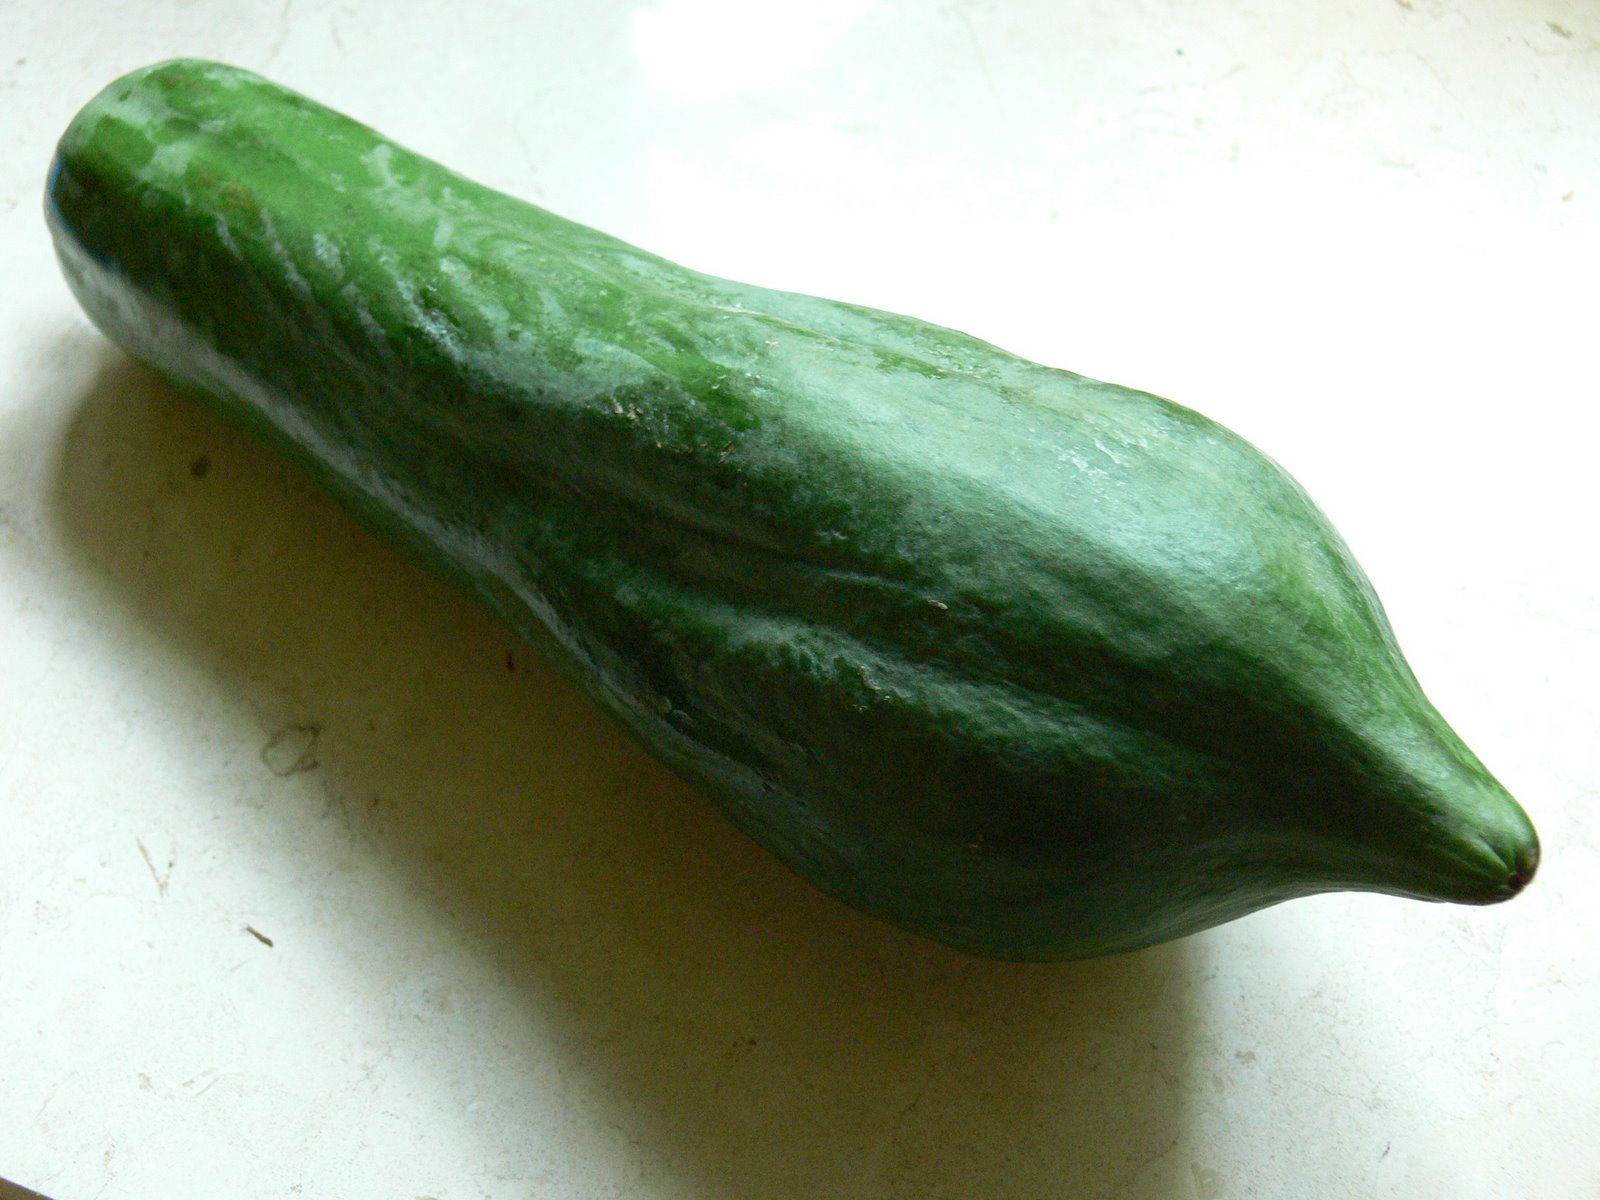
Green papaya is surprisingly neutral in flavour. If you can’t find any, Natacha de Pont du Bie, who encountered it in Laos, found to her pleasure that you can substitute a raw turnip in similar Laotian salads and that doing so will even fool Laotians, so I don’t see why you shouldn’t make the same substitution here. My papaya came from the Chinese supermarket on the railway bridge on Mill Road in Cambridge, and other oriental supermarkets with good fruit and veg sections will probably be able to help you too.

To serve up to six as a side dish, you’ll need:

1 green papaya
2 fat cloves of garlic
1 Scotch bonnet chilli (or three or four Thai bird’s eye chillies)
1 small handful (about 20g) dried shrimp (available from the Chinese supermarket in the chiller section)
8 cherry tomatoes
Juice of 2 limes
2 tablespoons fish sauce
2 tablespoons palm sugar (use soft dark brown sugar if you can’t find any)
1 large handful coriander, chopped finely
1 small handful mint, chopped finely

Start by shredding the papaya. Peel it with a potato peeler (surprisingly easy), and cut into the thinnest possible strips. Some find that holding the papaya in one hand and making lengthways cuts like lots of guitar strings halfway into the fruit, then slicing down along those cuts so the shreds fall away from the fruit, is a good method. I prefer to cut the whole fruit into thin pages, and then cut piles of those into strips, because I have trouble with the hollow centre of the fruit when using the first method. Put the shredded papaya into a large bowl.

Crush the garlic thoroughly in a pestle and mortar, and add the shrimp, pounding it with the garlic for about 20 seconds. The shrimp won’t reduce to shrimpy rubble, but they should be well-squished and full of flavour from the garlic. Mix the garlic and shrimp well with the papaya in the large bowl, and add the halved tomatoes, tossing everything in the bowl thoroughly as if to bruise the tomatoes and papaya a little.

Make the dressing in a jam jar so you can adjust seasoning as you go. Add the lime juice, fish sauce, palm sugar and very finely chopped chilli to the jar and shake it with the lid on until the palm sugar has dissolved. Taste the sauce – you may feel it needs to be sweeter, saltier or more sour depending on your taste, so adjust it with some extra juice, sauce or sugar. Pour it over the salad in the bowl, add the finely chopped herbs and toss vigorously again.

This salad will hang around happily for hours, so it’s great to take to a picnic. I particularly love it with fatty meats or barbecued foods, or, of course, to accompany a Thai main dish.

Will you look at that – a hailstorm. Looks like I chose just the right moment to get back to work.

Caramelised onion, horseradish and blue cheese crusted steak

Sometimes, you might find yourself in possession of a less-than-handsome steak. Now, if your steak is richly marbled, fat and nicely aged, I wouldn’t recommend you do more than rub it with olive oil, salt and pepper – maybe a little garlic too – and grill it briefly. The pieces of topside I found myself with needed a bit more help, so I came up with this recipe.

I’ve been spending lots of time hanging out at the Polish deli in Newmarket recently – I’ve already told you about the salt pork and cherry juice, and I’m really enjoying the smoked sausages and pickled herring. I decided to sample some Polish horseradish (chrzan) after reading an extremely enthusiastic hymn to it in a book I was editing a few weeks ago, and found that if anything, the author wasn’t giving it all the love it deserves. English creamed horseradish can be a bit wet and insipid, but this Polish stuff is fiery, sweet and intensely fragrant – just sniffing the jar caused hallucinatory roast sirloins of beef to parade before my eyes. Look out for it in your local Polish deli – some supermarkets now have a Polish aisle too. You might also be able to find a variant called cwikla, which is horseradish with sweet red beets. It’s delicious, but it’ll make the crust here an alarming pink.

The crust on this steak is soft and light under its buttery, crisp surface, and is full of flavours which make the very best of your steak. To make enough to crust four steaks, you’ll need:

1 large onion
3 heaped tablespoons Polish horseradish sauce (or whatever you can find)
3 heaped tablespoons crumbled blue cheese (choose something strong – I used an elderly Bleu d’Auvergne)
100g fine, fresh breadcrumbs (just whizz white bread in the food processor)
100g butter
1 bunch (about 15g) chives
Salt and pepper
Olive oil

I also made some garlic-lemon green beans, which used the meat juices. If you want to make these too, you’ll need:

100g green beans
2 fat cloves of garlic
Zest and juice of one lemon
Salt and pepper

Get the steaks out of the fridge well before you want to cook them to allow them to come to room temperature. Rub them with olive oil, salt and pepper, and set them aside. While the steaks are coming up to temperature, prepare the crust.

Cut the onion into very fine dice, and fry over a low heat in two tablespoons of the butter, stirring regularly, until the onion is a lovely golden caramel colour. Put the cooked onion with its butter into a large mixing bowl, and melt the rest of the butter in the onion pan. While the butter is melting, use the back of a fork to blend the onion in the bowl with the cheese – try to distribute the cheese as evenly as you can. Stir through the horseradish, then stir the breadcrumbs into the mixture, adding the melted butter bit by bit until you have a mixture that is still loose, but that holds together when pressed. Stir the chives through the crust mixture, taste and season. (If your cheese is particularly salty, you may not need any extra salt.)

Cook the steaks for a minute per side in olive oil in a very hot frying pan – just enough to sear them on each side. Remove to a plate, keeping the oil in the pan. Divide the crust mixture into four and press it into the top of each steak. (If you find you have some left over, you can just make it into a little rectangle and grill it along with the steaks for a cook’s treat.) While you are working, some of the steak juices will come out of the steak onto the plate. Hold onto these for the beans, which cook very quickly, so you can do them as the crust grills.

Transfer the steaks with their topping to a grillpan and put under the grill for 6-8 minutes (or as long as you find your topping takes to go golden and crisp on top). Transfer to warm plates to rest for a few minutes before serving. I served this with some roast potatoes and more of that lovely horseradish.

To make the beans, warm the olive oil you seared the steaks in, and fry the garlic in it for a few seconds before tipping the topped, tailed and chopped beans in. Toss the beans around the pan until they start to turn bright green, then pour over the lemon juice mixed with the zest and the steak juices. Allow the liquid to bubble up and reduce a little, check the seasoning, then remove to a hot serving dish.

Aubergines with den miso

Years ago, before I’d even met Dr W, I had a boyfriend whose sister-in-law was Japanese. She and I didn’t agree on much, but we did agree that these aubergines (which she made every time I visited her house) are pretty sublime.

Takako used to make this using those lovely wee Japanese aubergines – the sort that leave you gasping with their visual similarity to eggs and explain the whole eggplant nomenclature thing (not obvious when you are 18 and the only eggplants you have ever met are purple and shaped like a torpedo). Happily for those of us without a supplier of dear little Japanese aubergines, this works very well with the purple sort too. Aubergines are a wonderfully meaty sort of vegetable. Although this works really well as an accompaniment, this lovely meatiness means that you can happily serve this dish as the main event, with rice and perhaps a salad dressed with some rice vinegar. It’s also a good win if you have an unexpected visiting veggie, and, being one of those things you serve at room temperature, I think it’s really, really good as part of a picnic. These do soak up quite a lot of oil, as is common with aubergines, but hell – it’s not like you’re making this dish every day. To serve two, you’ll need:

2 medium aubergines
200g shiromiso (white miso)
2 tablespoons sake (Chinese rice wine is good here if you have no sake)
2 tablespoons sugar
2 tablespoons mirin
6 tablespoons ground nut oil

As usual, if you’re having trouble finding white miso, head for a large independent health food shop. They tend to have a bewilderingly good selection of miso, seaweeds, pickled ginger and the like. I have no idea why, given that most of the other nutty, protein-knitted, fermenty things masquerading as food that the health food shop I use sells are things I have no interest in ingesting at all. Boo hippies.

Start by slicing the aubergines into three lengthways. Slash the cut surfaces diagonally, without cutting all the way through the flesh, and without cutting the skin. Fry in the hot oil over a medium heat, turning halfway through, until the skin and flesh is golden brown, and the aubergine is soft.

While the aubergine slices are frying, make the den miso by combining the mirin, sugar, sake and miso in a small frying pan and bringing to a very gentle simmer, stirring all the time. Cook the sauce for two minutes and keep warm until the aubergines are cooked.

Move the cooked aubergines to a plate and smear the hot den miso all over their upper surface, making sure the paste gets into the slashes. Leave the slices to come down to room temperature before serving – for some reason, this dish is all the more delicious when it’s cold.

Cauliflower cheese

There’s something disproportionately impressive about wheeling a whole cauliflower out to the table, glistening in a robe of scented, cheesy sauce. It raises cauliflower cheese from a nursery tea dish to the sort of thing you might serve as a dinner party accompaniment.

I only ever make cauliflower cheese when I can find a pristine cauliflower. The cauli you choose should be firm and white, and still surrounded by its green leaves, which should be stiff, not floppy (floppy leaves mean the cauliflower has been out of the ground for too long). Don’t use a cauliflower with any bruised bits visible.

The Mornay sauce that’s slathered all over the cauliflower is a little more complicated than usual; the milk for the sauce is infused with aromatic herbs for a couple of hours before making the sauce up. It’s worth the tiny amount of extra effort. You’ll end up with a delicately scented, Parmesan-savoury cloud of white curds, a much finer dish than the wet stuff you remember from school.

To serve four as an accompaniment or two as a main course (if you’re eating this as a dish on its own, it’s very good with some toasted sourdough bread to mop up the lovely sauce) you’ll need:

1 large, firm, fresh cauliflower (around 1kg)
300ml whole milk
1 shallot
5 cloves
10 peppercorns
2 bay leaves
1 bunch parsley
75g butter
75g plain flour
A grating of nutmeg
1 teaspoon dry mustard powder
150g grated Parmesan cheese plus a couple of tablespoons for sprinkling
Salt

A few hours before you start to eat, cut the shallot in half and stud it with the cloves. Place it in a saucepan with the bay leaves, parsley and peppercorns and pour over the milk. Bring the milk up to a gentle simmer, put the lid on and remove from the heat, leaving in a warm place for about three hours.

When you are ready to assemble the dish, use a sharp knife to remove all the outer leaves from the cauliflower except the very fine ones from the inner layer of leaves which curl around the curds. Cut the stalk off the bottom of the vegetable so it will sit flat when placed on a plate. Cut two big slashes in a cross shape into the bottom of the stalk – this will help the thickest part of the cauliflower to steam faster, so nothing will overcook and the whole vegetable retains a good texture. (Nothing is worse than a soggy cauliflower cheese.)

Steam the cauliflower in a large pan for twenty minutes, and heat the oven to 180°C (350°F).

While the cauliflower is steaming, make up the Mornay sauce. Melt the butter in a heavy-based saucepan with the flour, and stir well over a low heat for three or four minutes – do not allow the roux (flour/butter mixture) to brown. Strain the milk and discard the aromatics. Add the milk to the pan very gradually, stirring all the time, until you have a thick white sauce. Stir the cheese, mustard and nutmeg through the sauce to finish.

Place the steamed cauliflower in an ovenproof serving dish, and spoon the thick sauce all over the cauliflower. Bake in the hot oven for 30 minutes – the sauce will be bubbling. Finish the dish by spooning some more of the sauce from the dish over the cauliflower and sprinkling over the extra grated parmesan, then placing under the grill until the cheese is golden and bubbling. Serve immediately.

Pommes Sarladais – French garlic potatoes

In my mental spreadsheet of The Very Best Things You Can Do With A Potato (everyone should have one of these), Pommes Sarladais come in near, if not at, the very top. If you visit the Dordogne region of France, you’ll find these on every menu; in this area where duck and goose farming is so common, and the fat from those birds so ubiquitous in cookery, this preparation of potatoes comes as naturally as breathing.

This is an intensely rich, garlicky recipe. The peeled potatoes are par-boiled, then sautéed in generous amounts of duck or goose fat until golden and crisp. In the last few minutes, pulverised garlic is briskly stirred through the hot fat and crunchy potatoes, and finally the finished dish is tossed with a handful of aromatic, fresh parsley. This is an ideal accompaniment for duck confit, roast chickens, dense and boozy stews – almost anything rich and European. (Insert Silvio Berlusconi joke here.)

Choose a floury potato for this recipe. I like King Edward potatoes here – if you can’t find any, try Desiree, which have a pleasant sweetness that works well against the robust flavour of the garlic. I’m recommending a more generous amount of potato per person than you might expect here, simply because this is so tasty that people do tend to overeat. The semolina dusting doesn’t make it into the standard French recipe, but I gave it a whirl after hearing about the Nigella Lawson semolina trick with English roast potatoes, and found that it raises the golden crispiness to a simply heavenly level around the soft interior of each bite – this dish is the mouth-feel equivalent of about 80 naked, silky angels bopping lewdly to the best bits of ABBA. Admittedly, Pommes Sarladais are full of all those things you’re meant to be avoiding after Christmas like animal fat and carbs, but I’m convinced that the joyful endorphins you’ll produce while munching on them more than make up for that. So to serve four, you’ll need:

1kg King Edward or Desiree potatoes
5 heaping (and I mean heaping) tablespoons duck or goose fat
5 large, juicy cloves garlic
1 large (hand-sized) bunch flat-leaf parsley
1 tablespoon semolina flour
Generous amounts of salt

Peel the potatoes, and cut them into squares of about 1 inch. Bring a large pan of water to the boil and drop the potatoes in. Bring back to the boil and simmer for four minutes. While the potatoes are simmering, bring the duck or goose fat to a high temperature in your very largest frying pan. (If you don’t have one large enough to house all the potato chunks in a single layer, split the dish between two pans.)

Drain the potatoes well in a colander, and return them to the saucepan you parboiled them in. Sprinkle over a heaped tablespoon of semolina flour and toss the potatoes well. The semolina should be coating the potato chunks unevenly – tossing the potatoes will have caused their edges to bang up against each other and become craggy and fluffy.

Ladle the semolina-coated potatoes into the hot fat in a single layer. Cook, turning every few minutes, until the potatoes are evenly crisp and gold (about 20 minutes). As you turn, you may feel that the pan is becoming dry – if this is the case, add another tablespoon of duck or goose fat.

While the potatoes are cooking, pulverise the garlic by crushing or grating. When the potatoes are gold, add the garlic to the pan and toss the potatoes around the pan for four minutes to make sure all the garlic cooks and is distributed throughout the whole dish.

Remove the cooked potatoes to a large bowl and toss with the chopped parsley and a generous sprinkling of salt (these can take a lot of salting, which is an excellent excuse to do some tasting as you season). Serve immediately.

Christmas stuffing and chipolatas

I mentioned the other day that you’re best off not stuffing the cavity of a turkey or, for that matter, a chicken – it increases the cooking time to an unacceptable length, and quite honestly, stuffing is just nicer prepared outside the bird, where it has a chance to go crispy on the outside. The trimmings are one of the most important parts of a Christmas dinner, but they can be a bit of a faff to prepare, so I like to assemble and cook mine on Christmas Eve, and heat them up at the last minute on Christmas Day – you really can’t tell that the stuffing and chipolatas have been reheated, and they’re absolutely delicious.

Buy the very best chipolatas you can find. I was in Yorkshire for Christmas, and went to Booths, which is a simply fantastic supermarket. Quality and choice here is better than at any of the supermarkets we have here in Cambridgeshire (even Waitrose); I ended up with a pack of chipolatas flavoured with chestnut purée which were as good as any butcher’s sausage. Unfortunately, Booths only operates in Lancashire, Cheshire, Cumbria and Yorkshire, so the rest of us are stuck with having to make a trip to the butcher’s for the chipolatas and for the sausage meat which goes in the stuffing, which should be of the best quality you can find.

For Christmas trimmings (or trimmings for any poultry or game you happen to be roasting for a non-Christmas occasion) you’ll need:

Stuffing
85g Paxo sage and onion stuffing mix (I know, I know – bear with me here)
250g good-quality sausage meat
1 Braeburn apple
2 banana shallots
1 pack vacuum-sealed chestnuts
1 tablespoon finely chopped fresh sage
75g butter
Boiling water
Salt and pepper

Chipolatas
16 chipolata sausages
16 strips pancetta

Paxo stuffing mix? Well, despite the memories you may have of childhood Paxo made up by your grandmother to the packet instructions (dusty, squashy and very little fun), it works really, really well when you combine it with sausage meat. The recipe for Paxo is more than a hundred years old; it was invented by a Manchester butcher in 1901. I’m using it here because the wheat and barley rusk that forms the crumbs contains a bit of raising agent, which will make the texture of your stuffing very light, with a crisp outside – and the dried sage and onion are actually really good against a porky background.

Put the stuffing mix in a large mixing bowl with the butter, and pour over boiling water, according to the packet instructions. Stir well and cover with a teatowel while you chop the apple, shallots and chestnuts into small, even dice, and chop the sage finely. When you’re done, the stuffing mix should be cool enough to handle. Use your fingers to mix the sausage meat very thoroughly with the stuffing mix, then add the chopped apple, shallots and chestnuts and sage with a little salt and some pepper, and mix with your hands until everything is evenly distributed. Form into spheres about the size of a ping-pong ball and lay on well-greased baking trays. (The stuffing balls will almost certainly stick a bit, but you can prise them off relatively easily with a stiff spatula.)

Preheat the oven to 180°C (350°F). Wrap each sausage in a strip of pancetta. You don’t need to secure these with a toothpick (as well as saving you time, this also avoids any Christmas day toothpick-embedded-in-palate accidents). Arrange the sausages on another well greased tray.

Bake the sausages and stuffing balls for between 35 and 45 minutes (the cooking time will depend on the characteristics of the sausages and sausage meat you have chosen). The stuffing balls should be browning and crisp on the outside, and the pancetta crisp and golden. Remove from the trays when cooled, and move the stuffing balls and wrapped sausages to oven-proof bowls. When you come to serve them, just reheat at 180°C (350°F) for 12 minutes.

Cranberry sauce and bread sauce

These two sauces, one American and one thoroughly, thoroughly English, are an essential part of my Christmas dinner – it’s just not Christmas without them. Cranberries are incredibly tart when raw, and I consider them pretty inedible (despite the Finnish habit of eating them raw, with shaved ice and caramel). This recipe is very easy, and it transforms them; cooked until they pop with sugar and a lovely lemony liqueur, a lot of the bitterness vanishes. The sauce is the perfect accompaniment to your turkey or goose on Christmas day, or to some Christmas Eve ham.

If your only experience of bread sauce so far is the stuff you reconstitute from a packet, you are likely to have read the title of this post, pulled a face and sworn never to make it yourself. You’ll be missing a treat – made properly, it’s a creamy, fragrant cloud that you’ll find yourself slathering all over a good roast dinner, potatoes and all. The trick is in infusing the milk with aromatics like bay, shallots and plenty of cloves for a good long time, so that the sauce is rich with flavour. (A bad bread sauce is a bland nightmare.) I make this year-round, and it’s great with any roast poultry or game birds. It’s also extremely good cold as part of a Boxing Day leftovers sandwich.

The cranberry sauce can be made well in advance, and keeps for weeks, covered, in the fridge. All the preparation for the bread sauce (setting the milk to infuse, making the breadcrumbs) can be done the night before you eat, which means that you won’t be in such a rush to pull the different elements of your meal together on Christmas Day.

To make the cranberry sauce you’ll need:

350g raw cranberries
200g sugar (granulated or caster)
30ml Limoncello liqueur
zest of 1 lemon
60ml water

This is hopelessly easy. Just stick all the ingredients in a small saucepan, bring to a brisk simmer and cook for 10-15 minutes, until all the cranberries have popped. You’ll be able to hear the individual berries pop as they heat up, which is somehow rather pleasing. The cranberries are full of pectin, so the sauce will solidify as it cools. Keep it in the fridge until you need it, and stir through briskly before serving so it doesn’t look like a chunk of jelly.

To make the bread sauce, you’ll need:

1l full-fat milk
200g fresh breadcrumbs (just put 200g of crustless white bread in the food processor and whizz)
3 bay leaves
1 sprig thyme
2 shallots
20 cloves
10 black peppercorns
100g salted butter
100ml double cream
1 teaspoon salt

Cut the shallots in halves and press the cloves into them. Put them in a large saucepan with the milk, bay leaves, thyme, peppercorns and salt. Warm the milk to the barest simmer – the milk should be shuddering rather than bubbling. Remove from the heat, cover the pan and leave it in a warm place overnight. (I put mine on top of the boiler.)

About an hour before you plan to eat, sieve the solid ingredients out of the milk and return the liquid to the pan. Bring to a gentle simmer and stir in the breadcrumbs and cream. Remove from the heat again and lay a piece of cling film right on top of the sauce (this stops it forming a skin). The breadcrumbs will swell with the milk, stiffening the sauce. When you are ready to serve the bread sauce, bring it up to a simmer again and stir in the butter. Taste for seasoning, adding more salt if you think it needs it.

Maple-mustard glazed vegetables

British readers will notice that the baby vegetables they are able to buy at the moment are, for babies, somewhat husky. This is because EU legislation, which was only repealed last week and which will remain in force until July 2009, sets strict rules for the dimensions of vegetables – carrots may not be sold, even as baby carrots, if they weigh under 8g.

Legislation on the weight, symmetry, roundness, straightness, evenness and colour of vegetables in the EU has, in my experience, been roundly ignored by market sellers in France, Italy and Spain, while it’s prosecuted with zeal by UK council officials. (Meanwhile, amazingly, it was the French, Italians and Spanish who were in particular opposition to any change in legislation – I am at a total loss to understand how it comes to be the rigid old British and the Germans who are calling the situation as it is untenable.) It’s good to know that these protectionist rules, which used to result in the waste of around 20% of all farm produce, are being dumped as a result of the EU-wide rise in food costs, and I look forward to the appearance of spurred and bendy cucumbers in my local supermarket. Meanwhile, I wish they’d extend the repeal of these rules to all vegetables – even once next year’s changes come into force, it will still be illegal to sell imperfect apples and pears (note that a lot of old English varieties are rusty and spotty, and as such impossible to sell legally) unless you slap a label on them saying “product intended for processing”. Citrus fruit, kiwi fruit, lettuces, peaches and nectarines, pears, strawberries, sweet peppers, table grapes and tomatoes will also remain covered by the old legislation. I long for a funny-shaped tomato, or one of those lovely ripply peppers. The law in this area is a mess, protecting the interests of farmers while raising prices, putting financial pressure on householders and excluding us from choice and flavour. Sometimes I feel my best option might be to turn the back garden into an allotment.

Anyway. I seem to have gone off on a tangent. These glazed carrots and radishes are delicious, extremely easy to make, and not as bad for you as you might imagine. They’re a regular fixture on our table at Christmas, but they’re fantastic at any time of year. I have faked true baby Chantenay carrots here with the judicious trimming of pubescent-but-legal, 8-gram Chantenays. Until next year, you’ll have to do the same. Or emigrate.To serve two, you’ll need:

12 baby carrots
12 radishes
2 tablespoons maple syrup
1 heaped tablespoon grainy Dijon mustard
½ teaspoon salt
50g butter
50ml water

Top and tail the radishes. Top and tail the carrots and trim them to be a similar size to the radishes. Melt the butter with the water, maple syrup, salt and mustard in a small saucepan, and bring the mixture to a gentle simmer. Cook the carrots in the mixture over a low heat, stirring, for about eight minutes, then add the radishes and cook for a further two minutes. Serve immediately, with some of the glaze drizzled over the top.

Roast buttered chestnuts

Roast chestnuts – another truly seasonal ingredient. When I was a kid, they were a real treat. We bought them in paper twists from the man with a roasting cart outside the British Museum, we gathered them in the woods to roast them in the oven at home, and once, excitingly, we roasted them on a coal shovel in the fireplace, one chestnut left unpricked so it exploded like a violent kitchen timer to tell us when it was ready.

Now, chestnuts just roasted in their skins and eaten immediately are delicious. But an Italian friend at university taught me to sauté the peeled chestnuts in butter and sprinkle them with coarse salt after roasting, and it’s now far and away my favourite way to prepare them. The butter kicks up the flavour a notch, the sautéing does wonderful things to the chestnuts’ texture, and a scattering of coarse salt (I used a French fleur de sel) is the perfect contrast to the sweet, fluffy flesh of the chestnuts.

If you’re stuck in the UK, you’re likely to be stuck with the English chestnut, which has a papery pith inside the shell, covering the nut. It’s a pest to remove, and is easiest to take off while the chestnuts are still very hot – this is easiest to deal with if you are one of the asbestos fingered fraternity. It’s great if you can find someone to help you peel – it gets the job done faster, so you can get to the chestnuts when the piths will still come away easily.

The Chinese chestnut, a little smaller than the English variety, has no inner pith, and we ate them by the bushel-load when I was a kid in Malaysia. They’re a lovely chestnut – if you can find some where you are, grab plenty and freeze some – all raw chestnuts freeze well. In the USA this pithless Asian variety has been hybridised with the sugary American variety, so you can buy big, fat, achingly sweet chestnuts without any papery pith. I hope British growers will cotton on to this trick soon – they’re appallingly good. When you buy your chestnuts, try to find some which are plump and glossy. They lose moisture and flavour quickly, so it’s a good idea to either freeze them until you’re ready to cook them or to cook them as soon as you get them home.

To roast and sauté enough chestnuts (of whatever variety you choose) to serve four, you’ll need:

1kg fresh chestnuts
2 large tablespoons butter
2 teaspoons salt to sprinkle

Preheat the oven to 200°C (400°F). While the oven is warming, cut a cross in the flat side of each chestnut with a sharp knife – try to pierce the skin without cutting into the flesh. This is very important – an unpierced chestnut will explode when it cooks, so make sure you don’t miss any!

Arrange the chestnuts on baking sheets and roast for 25 minutes. Start to peel as soon as you can bear to touch them (this way it will be easier to remove the pith) and set the peeled chestnuts aside.

Melt the butter in a large frying pan and throw the peeled chestnuts in when it starts to bubble. Saute, keeping the nuts on the move, until all the butter is absorbed and any crumbly bits of nut are turning gold and crisp (about 5 minutes). Turn out into bowls and scatter salt over. Serve immediately.

Spiced parmesan parsnips

One of my very favourite Delia Smith recipes is this lovely way with roast parsnips, where she tosses them in grated parmesan and flour before cooking. My Grandma used to make Delia’s parsnips every Christmas, and there was always a fight over who got the last few.

It’s funny, really; in the UK, parsnips are a very ordinary accompaniment to a roast dinner, a slightly posh vegetable to be rolled out only on Sunday lunchtimes. Elsewhere in the world, the parsnip is considered more appropriate for feeding animals than people. Part of this is down to our climate. Parsnips need exposure to frost for their flavour to be fully developed, so in warmer places the parsnip is a less impressive beast, weedy and comparatively flavourless – hence the French tendency to feed them to pigs rather than people.

This is my version of the Delia recipe my Grandma used to cook. I’ve changed the fat used – you’ll get a much better crisp using dripping, and the flavour you’ll achieve with a good butcher’s pot of beef dripping is amazingly good if you serve these next to roast beef . I’ve also upped the ratio of parmesan and added some curry powder (always unbelievably good with a parsnip) and lots of lemon zest and fresh basil, which lifts the whole dish. Result: crunchy, savoury parsnips, sweetly fluffy inside and amazingly crisp outside – and so delicious you too will be fighting over the leftovers.

To serve eight with a roast, you’ll need:

1.25kg parsnips
175g plain flour
100g parmesan, grated finely
1 tablespoon medium curry powder (I like Bolst’s)
Grated zest of 2 lemons
1 heaped teaspoon salt
3 large tablespoons beef dripping
3 tablespoons chopped fresh basil

Preheat the oven to 200°C (400°F). Put a heavy roasting dish containing the dripping in the oven as it heats up. Combine the flour, parmesan, curry powder, salt and lemon zest in a large mixing bowl. Peel the parsnips and cut them in half across their width. Cut the top half of each parsnip into four long pieces, and the bottom half into two.

Cook the prepared parsnips in boiling water for five minutes. Remove the saucepan from the heat and drain the parsnips a few at a time, rolling the steaming-hot parsnips in the flour mixture and setting aside on a plate. When all the parsnips are coated thoroughly, remove the roasting dish from the oven and arrange the parsnips in the hot fat (careful – it may spit). Put the dish of parsnips high in the oven for 20 minutes, turn the parsnips and put back in the oven for another 20 minutes.

When the parsnips are ready, they’ll be a lovely golden colour. Remove them to a serving dish and sprinkle generously with basil.