Pan con tomate – Catalan tomato bread

Pan con tomate
Pan con tomate

It’s a total mystery to me how Catalan cuisine, out of all the cuisines in the world, could have given birth to the ultra-complicated school of molecular gastronomy headed up by Ferran Adria. Catalan cooking, in its non-molecular state, is centred in simplicity and great ingredients; there’s a growing collection of super-simple tapas here on Gastronomy Domine, all of which are typical of the region.

My newly minted sister-in-law, Katie, has family in Barcelona and studied Catalan at university. She and my brother married just outside Barcelona, which afforded them the perfect opportunity for a wedding meal made up of course after course of delicious tiny nibbly tapas, alongside a whole leg of Iberico ham (complete with a knife-wielding dude to carve it), three enormous dishes of paella cooked over propane burners and enough fruit tart (standing in for wedding cake) to sink an armada.

Pan con tomate, as you’ll have guessed if you’ve ever visited Barcelona, was on the wedding table (alongside chorizo al vino, padron peppers, positive gallons of sangria, and some garlicky prawns, croquetas, boquerones and other bits and bobs I’ll blog recipes for later on). It might just be the recipe with the best ease-of-making to total-deliciousness rating ratio in the world. I’m not even going to list amounts below – it’d go against the whole nature of the thing.

Quality of ingredients is always important, whatever you’re cooking; but if you’re making something this simple it becomes absolutely paramount. You should look for a really dense bread (not wholemeal) with a decent chewiness to it. And the tomatoes – hoo boy. There is no point in making this recipe at any time of year when you can’t get a decent supply of juicy, fresh, large tomatoes. You’re best off by far with tomatoes from your own greenhouse, and the things that resemble red potatoes from the supermarket should be avoided at all costs. Reckon on using half a tomato on each slice of bread. Your garlic should be plump and unblemished, and your olive oil the very best you can get your hands on.

You’ll need:

Good sourdough bread
Garlic
Very ripe, large tomatoes
Extra-virgin olive oil
Salt (I like Maldon salt here)

Grill the slices of bread until golden, and rub each slice with the garlic pieces, which will wear down to nubbins as you go. Cut a tomato in half and rub it on a garlicky slice of bread, pushing as you go to make sure the juices and seeds  are pressed into the piece of bread. Discard the pulp.

Pour a generous slug of olive oil over each slice of tomato bread, and sprinkle with a little salt.

These are fantastic just on their own, and can be made even better by laying a slice of raw Iberico ham on top before taking a bite.

Garlic bread

Garlic bread
Garlic bread

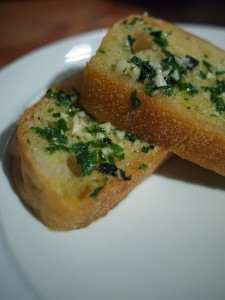
I was tempted to title this post “F***ing fantastic garlic bread”, because when people taste it, they tend to say something along the lines of: “Cripes. This is f***ing fantastic garlic bread.” But my Mum reads this blog and has a habit of looking horrified and exclaiming: “Elizabeth!” if I so much as say “Damn” in her presence, so plain old “Garlic bread” it’ll have to be. Sorry, Mum.

I wooed a boyfriend with this stuff once (and swiftly thereafter wished I hadn’t, but that’s by the bye). It’s powerfully good; you won’t go back to shop-bought garlic bread once you’ve tried it. The trick here is to simmer the garlic in the butter to sweeten it up and release its aroma before you let it anywhere near the bread, alongside the judicious application of some herbs. Use whatever loaf you fancy here. Something reasonably open-textured to soak up all that butter is a good move. This recipe will make sufficient garlic butter to anoint a whole baguette, but you can make a smaller loaf and keep any leftover butter in the fridge for up to a week. There were just two of us eating when I made this, so I used a ciabatta and steeled myself for leftovers – if you put the remains back together into something that resembles a cut-down loaf, rewrap it in the tin foil and refrigerate, you can take the recipe from the point where you put it in the oven again the next day.

You’ll need:

450g butter
2 large, juicy heads garlic
15g fresh chives
15g fresh flat-leaf parsley
15g fresh oregano
½ teaspoon salt
Several turns of the peppermill

Peel the garlic, and use a knife to mince it until you have a heap of garlicky rubble in the middle of your chopping board.

Melt the butter in a small saucepan over a very low heat, and spoon the garlic into it. Allow the garlic to cook very gently in the butter for about ten minutes, until it is soft and fragrant. While the garlic is cooking, chop the herbs and put them with the salt and pepper in a bowl.

Pour the hot butter and garlic mixture over the herbs in the bowl, and stir well to combine everything. Leave at room temperature for ten minutes, then cover with cling film and move to the fridge. Refrigerate until solid. (The butter doesn’t need to be rock-hard – a couple of hours should be sufficient.)

When the butter is stiff enough to spread, warm the oven to 150ºC (300ºF).

Slice the bread and spread each side of each slice generously with the garlic butter. Reassemble the loaf, and wrap it tightly in tin foil. Bake on a metal tray for 20 minutes, and remove from the oven. Unwrap and serve piping hot. You will be unable to avoid getting garlic butter all over your chin as you eat, and possibly on your elbows, so have napkins standing by.

Parmesan, leek and thyme scone bread

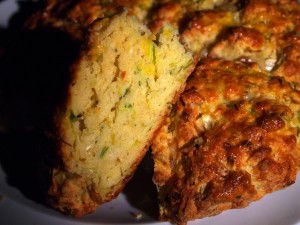
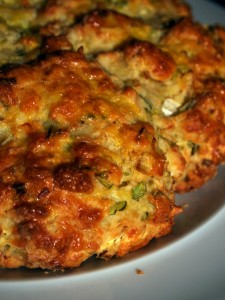
Cut parmesan sconeInspiration comes from funny places, on this occasion Dr W’s nostalgic thoughts about a parmesan and leek scone that Starbucks sold when they first arrived in the UK and we all discovered Frappuccinos and comfy chairs. I remember that scone dimly, and it seems the scone in my imagination and the scone in his are not the same thing at all. The scone I remember was a dry and sad production with not enough cheese, not enough leek, and a miserable little pot of cream cheese to smear inadequately on the cut surface to moisten it. Dr W remembers it as some sort of delicate überscone, a scone of youth and freedom. I love him, so I came up with a scone bread for his dinner that might remind him of the original (not too closely, obviously, because I didn’t like the original much – this one’s much moister and packs a lot more flavour).

You shouldn’t need any butter to moisten this scone; it’s very rich. Treat it as a bready accompaniment to go with ham, some hard cheese, chutney and a salad for a quick supper. It’s best served warm from the oven, but it’s terrific cold, and will be great the next day in a lunchbox too. A bread leavened with baking powder like this is great for those who are nervous around yeast, and, because it doesn’t need long periods of proving and rising, is much quicker to make than a yeasty bread too.

To make enough for six portions, you’ll need:

240g plain flour
1 tablespoon baking powder
1 teaspoon salt
100g salted butter
100g leeks, green and white parts
1 tablespoon fresh thyme leaves, picked from stems
75g Parmesan cheese
50g Cheddar cheese
2 large eggs, plus one to glaze
120ml semi-skimmed milk

Parmesan leek sconePreheat the oven to 190°C (375°F).

Sieve the flour, salt and baking powder into a large bowl. Cut the cold butter into little pieces in the flour bowl and rub them into the flour with your fingers until the mixture resembles breadcrumbs.

Chop the leek into very small dice and grate the cheeses. Stir the leek, cheese and thyme into the flour and butter mixture.

In a small bowl, whisk two eggs and the milk together. Pour into the dry mixture and use your hands to bring ingredients together gently until you have a ball of dough.

On a greased tray lined with parchment paper, press the ball of dough into a flat, round loaf shape. Beat the egg for glazing and brush it over the surface of the loaf.

Bake for 35 minutes until pale gold. A skewer inserted into the middle should come out clean – if it doesn’t, keep cooking for 5 minutes and check again until the scone bread is done.

When the scone bread is ready, remove it to a cooling rack and leave it for twenty minutes to cool off a little. Slice into six pieces and serve warm.

Bread and butter pudding

Bread and butter pudding

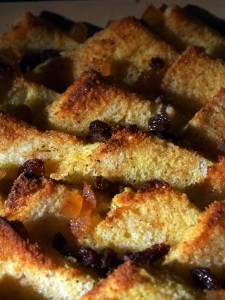
English food gets a bad rap in a lot of areas, but there’s one thing we’re world-class at: nursery puddings. A good bread and butter pudding is a joyous thing; a layer of spongey, custard-dense bread at the bottom, sweetness and flavour from a careful sprinkling of preserved fruit (I like juicy, tea-soaked sultanas and little cubes of stem ginger), and golden, caramelised points of crisp bread decorating the surface.

It’s unfortunate that so many of us were exposed to disastrous variations on the bread pudding theme when we were children. School dinners and rushed grandmothers are responsible for plenty of adult nightmares about gloppy flat puddings, studded with bits of wobbly egg, a nasty rubbery skin stretched over a sheer surface. There are a few things you need to do to ensure you avoid these problems when you’re making your own bread and butter pudding.

Firstly, and all-importantly, the bread shouldn’t be submerged in the custard. Don’t drown everything in custard, and construct your pudding so that points of buttered bread, moistened with the egg and milk and brushed with a little syrup and sugar, caramelise and crisp in the heat of the oven.  And when you make that custard, beat the hell out of the egg. Nothing is more squick-inducing than a gelatinous chunk of eggwhite in the middle of your dessert plate.

For an entirely non-squicky pudding to serve between four and six, depending on greed, you’ll need:

8 slices good white bread, crusts left on
30g softened, salted butter, plus extra to grease the dish
30g caster sugar, plus one tablespoonful
3 large eggs
500ml milk
50g sultanas
50g stem ginger chunks – reserve the syrup
1 strong cup of your favourite tea
Nutmeg to grate over

Preheat the oven to 180°C (350°F). Make a very strong cup of hot tea without milk (make another for yourself) and soak the sultanas in it until you’ve finished buttering the bread and arranging it in the dish.

Cut the slices of bread into quarters diagonally, and butter them on both sides. This is an excellent way to use up stale bread – in fact, you’ll find the stiffer slices of slightly stale bread easier to handle than soft, fresh bread.

Arrange the buttered slices of bread fish-scale style in a buttered rectangular dish measuring about 20x30cm, the crust sides touching the base of the dish and the soft points pointing upwards. The bread triangles should be snug in the dish, but need a little space between them; overlapping three per row works well.

Drain the sultanas and chop the pieces of ginger into sultana-sized dice. Sprinkle them over and between the points of bread.

Beat the egg thoroughly with 30g of sugar in a jug. Use a whisk rather than a fork, to make sure the egg is properly beaten. Pour the milk over the egg and sugar and whisk it thoroughly to make sure everything is properly mixed.

Pour the custard (because that’s what it is now) carefully over the bread, being sure to moisten all of the points with the mixture. Brush the syrup from the ginger pieces over the exposed surfaces of the bread, and sprinkle with another tablespoon of sugar. Finish with a generous grating of nutmeg.

Bake, uncovered, for 35 minutes. The bread points should be golden brown and crisp – if you think they could do with a little more colour, leave in the oven for another 5 minutes before checking again. Serve hot or warm with plenty of cream. This pudding is best on the evening it’s made, when the top will be deliciously crisp.

Bruschetta al pomodoro – tomato bruschetta

Tomatoes and bread have an amazing affinity, from Basque slices of toasted sourdough rubbed with the cut side of a tomato, to British teatime tomatoes on toast. For me, though, a garlicky, herby Italian bruschetta is the very king of bread and tomato preparations.

There is a simple trick in making this sunny, fresh appetiser. You need to marinade the cut tomatoes with the aromatics and a hearty amount of your very best olive oil the night before you mean to eat – but that marinade should contain absolutely no salt. Salting the bruschetta just before serving means that the tomatoes’ texture will remain firm and juicy. The oil will have absorbed a fabulous wallop of tomato flavour (no salt, you see, so the juices of the tomato won’t all run out and separate), the tomatoes will be redolent with fragrant oil, herbs and garlic, and your tastebuds will want to shake your hand.

It’s very important that you select tomatoes with the maximum flavour. If you’ve grown your own, these will be by far the best. Otherwise, buy tomatoes which are ripe and have been kept on the vine after picking. That glorious smell you get in tomato greenhouses is from the green stalk and leaves, and doesn’t seem to make it into the fruit itself. If you buy vine tomatoes, they will be riper, and you can use the stalk in the marinade to inject some of that greenhouse flavour into the finished bruschetta. I’ve used some yellow tomatoes alongside regular red ones because it’s pretty, but you can use any good, ripe tomatoes you can find.

To serve four, you’ll need:

1kg vine tomatoes
2 fat, juicy cloves garlic
1 large handful basil leaves
2 tablespoons chopped fresh oregano
100ml olive oil
Freshly ground black pepper
1 ciabatta
Salt to finish

Chop the tomatoes into small bite-sized pieces, and put them and any juices in a large bowl. Crush the garlic and the herbs, and stir them into the tomatoes with the olive oil and a generous amount of freshly ground black pepper. Add the vines from the tomatoes, mix well, cover with cling film and refrigerate overnight.

When you are ready to make up the bruschetta (don’t do this too far ahead of eating, or they will go soggy) grill slices of slightly stale ciabatta and cool on racks. Fish the stalks out of the marinade and discard. Heap the tomato mixture onto the slices with a tablespoon, sprinkle with fleur de sel or another crystalline salt like Maldon, and serve immediately. There are very unlikely to be any leftovers.

Hot cross buns

I know – hot cross buns are really cheap at the supermarket, so why would you bother making your own at home?

There’s a very easy answer: home-made hot cross buns are unbelievably delicious (unlike the supermarket variety, these are enriched with butter and eggs, and have more in the way of spices and fruit in their dough) – far better than the bought variety. They’re cheap, too. And if you’re interested in cooking something that will make your house smell divine for an afternoon, hot cross buns are just the ticket.

These sweet, yeasty little buns are a treat for Lent. (Pipe a Darwin fish on yours if you do not subscribe to this religious baking stuff.) According to Elizabeth David, the hot cross bun was a cause of great concern among the Protestant monarchs of England – Catholics were rumoured to bake them using communion wafers, and all that doughy symbolism was immensely threatening. The Tudors actually tried to ban them, but the populace would not be fobbed off with toasted teacakes, and eventually Elizabeth I passed a law allowing bakeries to make them at Easter and Christmas.

To make 12 hot cross buns, you’ll need:

Starter
7g (1 sachet) easy-blend yeast
1 teaspoon soft brown sugar
100g strong white flour
200ml blood-hot milk

Dough
350g white bread flour
1 pinch salt
½ nutmeg, grated
2 tsp ground cinnamon
1 teaspoon allspice
Zest of one lemon and one orange
50g salted butter, cut into small pieces
50g light brown soft sugar
90g candied mixed peel
90g sultanas
1 egg

Piping
3 tablespoons plain flour
3 tablespoons caster sugar
Water

Glaze
1 orange
75g caster sugar
100 ml water

Get your yeast going by mixing it with all the starter ingredients in a small bowl, and leave it in a warm place to start working for fifteen minutes while you prepare the rest of the dough for the buns.

Mix the flour for the dough in a large bowl with the spices, pinch of salt and the citrus zests. Rub the butter, cut into small pieces, into the flour and spice mixture as if you are making pastry. When the mixture resembles breadcrumbs, stir through the sugar, peel and sultanas. Check that the yeasty starter mixture has plenty of large bubbles on the surface, and add it and the beaten egg to the dough mixture. Mix well with a wooden spoon, and when everything is amalgamated, start to knead the mixture with your hands.

Knead for ten minutes until you have a soft dough which is no longer sticky, and which stretches easily. (If after five minutes or so of kneading the dough still seems very sticky, add a little more flour – bread doughs will vary enormously in stickiness depending on variables like the humidity outside and the temperature in your kitchen.) Oil a bowl, and put the kneaded dough inside with some oiled cling film or a damp teatowel on top. Leave the dough for about an hour and a half in a warm place until it has risen to double its original size.

Knock the dough down, and make twelve round balls from it. Arrange them evenly in a baking dish, cover again and leave to double in size again in a warm place (between an hour and an hour and a half).

Preheat the oven to 220°C (425°F). When the buns have risen, make a paste for the crosses from flour and caster sugar, adding water until it is stiff and pipable. Using a piping bag or a freezer bag with a hole snipped in the corner, pipe crosses on each bun.

Bake the buns for 15-20 minutes until they are golden. While the buns are baking, take the zest and juice of the orange for the glaze and simmer it with the water and sugar until you have a light syrup. Brush the hot syrup over the hot buns when they come out of the oven.

You can serve these immediately or cool and toast them. Either way, they’re glorious with a big slab of butter.

Cranberry sauce and bread sauce

These two sauces, one American and one thoroughly, thoroughly English, are an essential part of my Christmas dinner – it’s just not Christmas without them. Cranberries are incredibly tart when raw, and I consider them pretty inedible (despite the Finnish habit of eating them raw, with shaved ice and caramel). This recipe is very easy, and it transforms them; cooked until they pop with sugar and a lovely lemony liqueur, a lot of the bitterness vanishes. The sauce is the perfect accompaniment to your turkey or goose on Christmas day, or to some Christmas Eve ham.

If your only experience of bread sauce so far is the stuff you reconstitute from a packet, you are likely to have read the title of this post, pulled a face and sworn never to make it yourself. You’ll be missing a treat – made properly, it’s a creamy, fragrant cloud that you’ll find yourself slathering all over a good roast dinner, potatoes and all. The trick is in infusing the milk with aromatics like bay, shallots and plenty of cloves for a good long time, so that the sauce is rich with flavour. (A bad bread sauce is a bland nightmare.) I make this year-round, and it’s great with any roast poultry or game birds. It’s also extremely good cold as part of a Boxing Day leftovers sandwich.

The cranberry sauce can be made well in advance, and keeps for weeks, covered, in the fridge. All the preparation for the bread sauce (setting the milk to infuse, making the breadcrumbs) can be done the night before you eat, which means that you won’t be in such a rush to pull the different elements of your meal together on Christmas Day.

To make the cranberry sauce you’ll need:

350g raw cranberries
200g sugar (granulated or caster)
30ml Limoncello liqueur
zest of 1 lemon
60ml water

This is hopelessly easy. Just stick all the ingredients in a small saucepan, bring to a brisk simmer and cook for 10-15 minutes, until all the cranberries have popped. You’ll be able to hear the individual berries pop as they heat up, which is somehow rather pleasing. The cranberries are full of pectin, so the sauce will solidify as it cools. Keep it in the fridge until you need it, and stir through briskly before serving so it doesn’t look like a chunk of jelly.

To make the bread sauce, you’ll need:

1l full-fat milk
200g fresh breadcrumbs (just put 200g of crustless white bread in the food processor and whizz)
3 bay leaves
1 sprig thyme
2 shallots
20 cloves
10 black peppercorns
100g salted butter
100ml double cream
1 teaspoon salt

Cut the shallots in halves and press the cloves into them. Put them in a large saucepan with the milk, bay leaves, thyme, peppercorns and salt. Warm the milk to the barest simmer – the milk should be shuddering rather than bubbling. Remove from the heat, cover the pan and leave it in a warm place overnight. (I put mine on top of the boiler.)

About an hour before you plan to eat, sieve the solid ingredients out of the milk and return the liquid to the pan. Bring to a gentle simmer and stir in the breadcrumbs and cream. Remove from the heat again and lay a piece of cling film right on top of the sauce (this stops it forming a skin). The breadcrumbs will swell with the milk, stiffening the sauce. When you are ready to serve the bread sauce, bring it up to a simmer again and stir in the butter. Taste for seasoning, adding more salt if you think it needs it.

Stuffed focaccia with mozzarella, artichokes and smoked ham

Oozy, garlicky, herby, smoky and greasy. What’s not to like? Focaccia is the ideal bread to make this sort of baked sandwich from. It’s oily, so it bakes to a gorgeous crisp, and it’s a relatively flat bread, so works well sliced in two horizontally. I like to make my own focaccia (the feeling of an oil-enriched dough, stretchy, silky and puffy with yeast is obscenely – there’s no other word for it – tactile against your palms), but this should work very well with a bought one.

To serve four at an al-fresco lunch (with other nibbles) you’ll need:

1 focaccia
2 balls mozzarella di bufala
150g char-grilled artichoke hearts in olive oil
½ jar sun-dried red peppers in olive oil
12 slices raw smoked ham (I like Waitrose’s prosciutto affumato)
1 fat clove garlic
1 handful flat-leaf parsley, chopped
1 handful oregano, chopped
1 handful tarragon, chopped
Zest and juice of 1 lemon
100ml extra-virgin olive oil
Salt and pepper

Slice the mozzarella and the artichoke hearts into pieces about ½ cm thick, and put in a mixing bowl. Add the sun-dried peppers, the ham, the garlic, crushed, the herbs, the zest and juice of the lemon and the olive oil with a good grating of pepper (no salt), and mix well so everything is coated with the oil and lemon juice. Cover the bowl and refrigerate for at least an hour (or up to overnight).

Preheat the oven to 180° C (350° F). Use a bread knife to cut the focaccia in half carefully along its equator, creating a top and a bottom for your sandwich. Layer the ingredients on the bottom half of the bread, starting with the mozzarella, then making a layer of the artichokes, peppers and ham, which you can tear into pieces before adding to the sandwich, if you like. Pour the marinade over the ingredients in the sandwich, sprinkle with salt to taste, and put the lid on, pressing down firmly.

Put the stuffed focaccia on a baking tray and bake for 25-30 minutes until the focaccia is golden and crusty on top, and the melting mozarella is oozing out of the sides of the sandwich. Slice and eat immediately.

Focaccia with onion and rosemary

My week was brightened no end yesterday when I discovered that Jean-Christophe Novelli was linking to one of the recipes on Gastronomy Domine. I’m cooking a lot of things like the aubergine caviar he mentions at the moment – it must be the weather. To make the most of the short English summer, it’s lovely to eat a cold al fresco supper with some good, home-made bread. This explains the bread-making binge I appear to be on at this week. Fresh bread tastes great, it makes the house smell fantastic, and there is something strangely soothing about pummelling the hell out of a wodge of dough as you knead it; not to mention the lovely feeling you get from poking your fingers into a baby-soft, freshly-risen batch to knock it down. Bread dough is deliciously tactile, but I shrink from describing the full puffy, silky, stretchy glory of it in case you all decide I’m some sort of dough pervert.

Focaccia is an Italian bread enriched with plenty of olive oil. The oil in the dough makes it a dream to work with, and although it has a long rising time to help it develop its lovely open texture, all you have to do is knead, then wait for the dough to rise a couple of times. I’ve flavoured this focaccia with rosemary and chillies stirred into the dough itself, and a caramelised onion topping slathered on top. It’s lovely cut into squares and served with some Mediterranean-style cold nibbles like caponata, aubergine caviar, hummus or panzanella, and a bowl of olive oil and balsamic vinegar to dip into.

To make one focaccia you’ll need:

Bread
500g strong white bread flour
1 packet instant yeast
275ml tepid water
1 teaspoon salt
4 tablespoons olive oil (plus extra for oiling bowl and dough)
5 tablespoons chopped fresh rosemary
2 teaspoons Italian chilli flakes

Caramelised onion topping
2 large onions
3 tablespoons olive oil
A few sprigs of rosemary to decorate
12 olives
Olive oil to drizzle and salt to sprinkle over

Put 250g of the flour in a large mixing bowl with the yeast, chopped rosemary and chillies, then pour in the tepid water – this should be around blood heat – and the olive oil. Beat with a wooden spoon until the mixture is smooth, then start to stir in the remaining flour, a handful at a time, until you have a soft dough. The dough should not be completely dry – a little stickiness is fine, and should have vanished by the time you have finished kneading because of the magical development of the gluten in the wheat. You may not find you need to add all the flour – the amount you use will depend on the flour you have bought and the humidity and temperature of your kitchen. (I had about 20g left to put back in the bag when I was done.) Knead the dough vigorously for at least ten minutes, until it is very smooth and stretchy. Oil the dough ball and put it inside an oiled mixing bowl, cover with a damp cloth and leave to rise for two hours in a warm place.

The dough should have more than doubled in size. Knock it down to its original size and knead again for five minutes, then spread it out in a baking tin (mine was 25cm x 35cm), making sure the dough is even and pushed well into the edges and corners. Cover with the damp cloth again and let the focaccia rise for 45 minutes, then push the dough flat again and let it rise for a further 45 minutes while you heat the oven to 220° C (425° F) and prepare the onions by sautéing them in the oil over a low heat until they are sweet and golden (about 20 minutes), then putting them aside to cool.

Push 12 olives into the surface of the risen focaccia in a pattern with some rosemary sprigs, and spread the onions gently over the top (don’t push too hard when you spread, so the bread does not deflate). Pour over some more olive oil to fill the olive holes, sprinkle with coarse-grained salt and bake for 20-25 minutes until golden on top, then place on a rack to cool.

Beer-leavened rye bread

Why is rye flour so tricky to get your hands on in the UK? I’ve been craving rye bread ever since we were in Finland, and ended up sending away to Shipton Mill in Gloucestershire, where you’ll find some extraordinary speciality flours. How about mucking around with some Swiss dark flour, organic chestnut flour or something called Emmer wholemeal – an ancestor of modern wheat? There are eight white flours alone, including a specialist cake flour, a French white flour especially for baguettes and an Italian variety for ciabatta. Shipton Mill is fantastic for baking nerds.

I ordered a few kilos of flour, including some dark rye. I’ve not handled rye flour before, so I’ve started here with a relatively easy recipe (no sourdough starters, which need feeding for days), where the rye flour is supported by some strong white wheat flour. The gluten in rye is more fragile than wheat gluten, so you’ll need to treat the bread dough a little more gently than you might with a loaf made entirely from wheat. The beer and brown sugar give the bread a lovely malty quality, and we really enjoyed it with some smoked salmon, capers, diced shallot and crème fraîche. To make two loaves you’ll need:

375 ml beer (use something with some bite – I used an English bitter)
125 ml water
5 tablespoons softened butter
1 tablespoon soft brown sugar
1 teaspoon salt
200g dark rye flour
350g-400g strong white bread flour
1 pack instant yeast

Melt the butter and heat the beer and water together until they are lukewarm. They should be around body temperature – test the liquid on the inside of your wrist. Stir two tablespoons of the butter, the sugar and the salt into the beer and water mixture until the sugar and salt are dissolved.

Sift the rye flour and instant yeast into a large bowl, and add the lukewarm liquid to the bowl, beating with a wooden spoon until the mixture is smooth. Add the strong white bread flour to the bowl a handful at a time, stirring all the time, until you have a soft dough. (You may find you do not need as much as 400g of flour to achieve a soft dough; you will probably need somewhere between 350g and 400g.) Make the dough into a ball and leave in the bowl, covered with a damp tea towel, for 15 minutes. This will help the gluten develop.

When the dough has rested for 15 minutes, knead it for five minutes. (This is less kneading than you would require with an all-wheat bread.) The dough should be soft and no longer sticky. Coat the inside of another large bowl with another tablespoon of butter and put the ball of kneaded dough into it, covering the dough ball with a tablespoon of softened butter too. Cover the bowl with the damp tea towel and leave in a warm (not hot) place for two hours to allow the dough to rise.

After two hours, punch the dough down and knead it gently for one minute. Divide the dough into two and form it into two round, flat loaves on baking sheets covered with greaseproof paper. Allow the bread to rise in a warm place again, this time uncovered, for forty minutes, while you heat the oven to 190° C (375° F). When the loaves have risen, drag a serrated knife across the tops to make a pattern.

Bake the loaves for around 45 minutes (start checking them from about 35 minutes in) until they are golden on top and sound hollow when you knock on the bottom. Glaze the loaves with the rest of the butter, melted. This bread is delicious served while it is still warm, but will keep for a few days in the bread crock.