Crackling pork belly with celeriac and tomato

Pork belly on celeriacWhere other children were visited by fairy godmothers bearing gifts of grace and beauty; the art of detecting peas beneath mattresses; the ability to walk in high heels for more than five yards without getting one stuck in the space between two pieces of pavement; and all that glamorous jazz, mine found that her bag was empty but for the gift of making really terrific crackling. (Seriously. It wins competitions and everything.)

I’m not complaining. It’s better than it could have been; I’ve one friend who swears her only skill is the tidy folding of a broadsheet newspaper once read.

This recipe is reliant on your getting your hands on a really good piece of pork belly, properly reared, and striped thickly with fat. It doesn’t matter whether your piece has attached bones or not, but do try not to use a supermarket slab of meat; the flavour will be much better with a butcher’s belly from a pig raised responsibly, and you’ll probably find the joint will be drier, crackling more effectively. Cooked slowly for several hours, the pork bastes itself from within, leaving you with a gorgeously dense, flavoursome and moist finish.

I’ve used the tomato sauce than I made in a few enormous batches and froze at the end of the summer here, with some additional cream and herbs. If you don’t have any sauce you’ve made and frozen yourself, substitute with a good sun-dried tomato sauce in a jar.

To serve four, you’ll need:

1.5kg pork belly
1 small handful thyme stalks (about 20g, if you’re counting)
1 small handful fresh rosemary
4 bayleaves
100g stupendous tomato sauce, or sun-dried tomato sauce in a jar
3 tablespoons double cream
1 medium celeriac (larger celeriacs can be woody)
1 large handful parsley
2 banana shallots
1 tablespoon butter
Plenty of salt and pepper

Preheat the oven to 140ºC (290ºF). Make sure the skin of the pork is scored properly in regular lines penetrating into the fat but not into the meat, and that it is absolutely bone-dry. Rub the pork all over with a couple of teaspoons of salt, making sure that plenty gets into the scored lines on the skin. Season with pepper, and sit the belly in a roasting pan on top of the thyme, bay and rosemary, reserving a bayleaf and a stalk of the thyme and rosemary to use in the sauce later.

Put the roasting pan in the middle of the oven, close the door and ignore the pork for four hours. Towards the end of the cooking time, cut your celeriac in quarters, peel them with a knife (this is far easier than trying to peel a whole celeriac), and grate them on the coarse side of your box grater. Slice the shallots finely and mix them with the grated celeriac in a bowl.

When the pork has had four hours in the oven, the top will have softened but not crackled. Still in the roasting dish, put the pork about four inches beneath a hot grill. The skin will start to bubble and crackle. Keep an eye on things; once crackled, the skin can burn easily. If you find that one side of your joint is crackling and ready before the other, put a piece of tin foil over the area that has crackled to prevent it from burning. Once the crackling is even, remove the dish from the grill and leave it to rest in a warm place while you prepare the sauce and celeriac.

Sauté the celeriac and shallots in the butter for about eight minutes until soft and sweet. Stir through the parsley and season with salt and pepper. While the celeriac is cooking, bring the tomato sauce up to a gentle simmer with the herbs you reserved earlier, then stir through the cream with any juices from the pork.

Pop a pastry cutter onto each plate, and use it as a template for a serving of celeriac. Top off with some of the herby, velvety pork meat, and a generous slab of crackling. Spoon over some of the sauce and serve.

Black Forest trifle

Black Forest trifleI was sent a lovely big jar full of Kirsch-soaked Griottine cherries to try a few weeks ago. The brand’s new in the UK, and they’re very good – big, boozy, stoned Balkan Morello cherries steeped in a heck of a lot of Kirsch for six months. These Griottines are available online in the UK; you can also use cherries you’ve steeped yourself in this recipe if you do a bit of forward planning in the summer.

I do love a Black Forest cake, but it’s the non-cake bits I enjoy the most: the cherries, the chocolate, a creamy filling. So I decided to use them in a Black Forest trifle, which also gave me the excuse to make a chocolate custard, stick it in a bowl and call it art. There are several stages in making this trifle, and making everything from scratch will, of course, give you the best end results; but you can cheat a bit if you want by buying a chocolate cake rather than making one, or by using a pre-made custard as the base for the two custard layers before you add the chocolate, vanilla and marscapone. I promise not to tell anyone.

To serve eight or thereabouts – this is a party dish – you’ll need:

Cake
85g cocoa powder
170g plain flour
240g caster sugar
1½ teaspoons bicarbonate of soda
¾ teaspoon baking powder
2 medium eggs
180ml milk
60g softened butter
1 teaspoon almond extract

Custard base
2 tablespoons Bird’s custard powder
1 vanilla pod
500ml milk
4 egg yolks
2 tablespoons vanilla sugar

You will also need
75g good dark chocolate
750g marscapone
250ml whipping cream
About 400g (the contents of a Griottines jar) cherries and their very alcoholic soaking liquid. I say “about” because I found myself busily scoffing them as I put them into the trifle, so the resulting dish didn’t contain a whole jarful.

Preheat the oven to 180ºC while you prepare the cake mix. Grease a 25 cm loaf tin.

Sieve together all the dry ingredients in a large bowl, add the eggs, milk, butter and almond extract, and beat with an electric mixer for about five minutes until you have a thick, smooth batter. Scrape the batter into your prepared tin  bake for 1 hour. When the cake is done, a toothpick poked into the middle should come out clean. Cool for a few minutes and invert onto a wire rack to finish cooling.

Make up the custard base, which you will use for both the vanilla and chocolate custards, while the cake is cooking. Some purists abhor Bird’s custard. I love the stuff. If you can’t bring yourself to use it (or if you don’t live in the UK and can’t find any in your local shops), use 2 tablespoons of cornflour instead. Mix the sugar and custard powder/cornflour in a bowl with a little milk taken from the pint until you have a smooth paste. Bring the rest of the milk to a bare simmer (it should be giggling rather than chuckling) and pour it over the mixture in the bowl. Return the whole lot to the saucepan over a low heat and, whisking hard, add the egg yolks and the seeds from inside the vanilla pod to the mixture. Keep cooking until the custard thickens and remove from the heat. Transfer to a jug, lay a piece of cling film directly on top of the custard’s surface, and chill until cool.

When the custard is chilled and the cake is cool, melt the chocolate in the microwave. Pour half the custard into a separate bowl, and beat it with the chocolate and 250g marscapone with your electric whisk until smooth. Beat the other half of the custard with another 250g marscapone and set aside.

In a third bowl, beat the remaining 250g of marscapone with the whipping cream and sugar until the mixture is stiff.

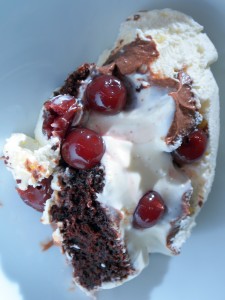
To construct the trifle, cut the cake into slices and line a large glass bowl (mine broke a while ago, which is why the picture at the top of the page is of a single portion of trifle) with it. Sprinkle the liquid from the cherries all over the cake to soak it, and scatter over a quarter of the cherries. Smooth the plain custard layer over with a spatula, adding a few more cherries as you go. Make sure plenty of the cherries are pressed up against the glass sides of the bowl. Add the chocolate custard with some more cherries, and finish with the layer of cream and marscapone, scattering more cherries on top.

Rhubarb Pavlova

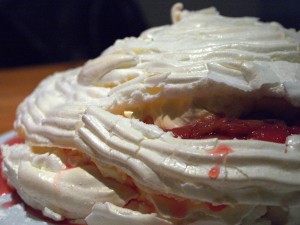
Rhubarb lemon pavlovaFor the last couple of weeks, I’ve been blogging from a Booklet laptop lent to me by the friendly folks at Nokia, who saw me mention on Twitter that my own laptop had died horribly. (It was a long and sad process, the worst part being the fortnight before it gave up the ghost completely, over which period it tried its damnedest to barbecue any lap it was put on.) The Booklet goes back to Nokia today, and I’ll miss it; while the screen’s a bit too small to edit photos and work through piles and piles of text on optimally, its portability has been an eye-opener, and the 3-G-ness is brilliant – it’s been lovely to work on a machine that’s small enough for a handbag, that fits onto one of those pathetic trays on trains, and that I can easily manage in one hand while waving a wooden spoon in the other. Adieu, little Booklet. I shall miss you.

So then. Pavlova. In the dark days of the early 80s, I was set a piece of homework for our “finding out” class, where I was meant to write a short essay on Anna Pavlova. Nobody in the family knew anything more about her than that she was a 1920s ballerina, and so I ended up submitting an essay about meringue instead, which, happily, was something that everybody at home was more than educated about. The Pavlova is a New Zealand dessert which was named after the dancer in the 1920s (a period when naming a dish after a celebrity was a signal honour – like Peaches Melba and Melba Toast, Omelette Arnold Bennett,  Eggs Benedict and other eponymous dishes). Being a reasonably easy recipe which looks so handsome, the Pavlova, with its ballet skirt of meringues, is a favourite at Christmas in NZ – I wish Christmases here were sunny, so we could do away with the leaden puddings and have meringue instead. Tart fruits are best as a filling – I’ve made a lemon cream using some home-made lemon curd (it’s quick to make, and it’s a good way to use up the egg yolks, but shop-bought curd will do the job just as well) and some roast rhubarb from my friend’s garden. I’ve used Polish cherry squash to pink up the rhubarb – if you can’t find any, use grenadine or another reddish cordial.

The inside of a proper Pavlova reaches that lovely marshmallowy texture thanks to the addition of a little vinegar and cornflour to the meringue – when you have meringue, which magically turns itself from yellowish, wet egg-whites into glossy clouds, then into a simultaneously crisp and chewy nest, who needs molecular gastronomy?

You’ll need:

Meringue
2 tablespoons melted butter
8 egg whites
330g caster sugar
1 teaspoon spirit vinegar
2 teaspoons cornflour, plus extra for dusting

Filling
450ml double cream
100g lemon curd
5 fat stems rhubarb
2 tablespoons cherry cordial
200g caster sugar

Preheat the oven to 120°C (250°F). Lay greaseproof paper out on two baking trays, and brush each with melted butter. Dust the buttered paper with cornflour and shake off any excess – this will stop the Pavlova from sticking.

Beat the egg whites with an electric whisk or stand mixer, adding 330g sugar a little at a time, until they form soft, glossy peaks. Add the cornflour and vinegar to the mixture, and beat in gently.

Fill a piping bag fitted with its largest nozzle with the meringue, and pipe in a spiral straight onto the floured paper, starting in the centre, going round and round until you have a solid circle of meringue measuring about 7 inches in diameter. Be careful to leave some room around the meringue, which will swell as it cooks. Repeat on the other sheet of floured paper. You’ll have a little meringue left – use this to pipe a wall of meringue around the edge of one of the circles – this will be the bottom piece, and the lip of meringue will help to hold the filling in place.

Bake for 30 minutes, then turn the heat down to 100°C (210°F). Bake for another 40 minutes – the meringue should now be nice and dry, and should crack when you press it gently. Turn the oven off and cool the meringue in the oven with the door cracked open.

Once the meringue is cool, it can be covered and kept, without the filling, in the fridge – you can also freeze it successfully at this stage.

To prepare the filling, chop the rhubarb stems into pieces about an inch long, and put them in a large roasting tin, sprinkled with the sugar and cordial. (Use grenadine or another red cordial if you can’t find cherry – mine was from the local Polish shop.) Roast at 170°C (340°F) for 20 minutes, until tender and collapsing. Remove to a bowl and chill.

Whip the cream until it forms stiff peaks, and fold the lemon curd in with a spatula. Chill until you are ready to serve.

To assemble the Pavlova, spread half the lemon cream onto the base piece of meringue, leaving a bit of a hollow in the middle so you can really heap up the rhubarb. Spoon over the rhubarb (you won’t use all the juice, but it’s delicious, so keep it to one side to slurp at later), dollop the rest of the cream on top, and put the meringue lid on. Serve immediately.

Salt caramels

It’s funny how quickly we assimilate food ideas. Salted caramel was considered suspiciously French, a kind of extreme sweetie sophistication, when we first encountered it about ten years ago. Now it’s all over the place – you can even buy jars of the stuff in the supermarket.

Salt caramels are still, as far as I’m concerned, a grown-up’s sweet. Buttery, creamy and velvety on the tongue, the addition of some salt to the mixture lifts the flavour, bringing out the dairy smoothness in a way you just can’t achieve in an unsalted caramel. A little extra salt sprinkled on top makes for a tongue-shockingly good contrast between sweet and salty. They’re easy to make at home, and make a great gift. Try them as an after-dinner nibble – they’re especially good with coffee. Home-made salt caramels are also a very good application for any interesting salt you might have lurking in the cupboard (the red salt in the picture here is Hawaiian volcanic salt I was given as a present just after I got married in 2004. Embarrassingly, this is the first thing I’ve used it in).

I like my caramel to have a hint of smoky bitterness. The best way to achieve this is to use an unrefined sugar in the recipe. If you prefer a lighter caramel, you can substitute another 150g of caster sugar for the light brown sugar below.

The usual boiling sugar warnings apply. Do not lick the spoon or dip your finger in the mixture until it has cooled completely. Keep an eye on the pan at all times to ensure it doesn’t boil over. And your life will be made much easier if you use a sugar thermometer – if you don’t have one, caramel at the hard ball stage should form a squishy ball that can hold its shape but can be squeezed by the fingers when dropped into a bowl of cold water.

You’ll need:

150g caster sugar
150g soft light brown sugar
80g butter (choose something with a good flavour – I used an unsalted Beurre d’Échiré)
200g double cream
75ml golden syrup
1tsp salt, plus more to sprinkle at the end

Line a square cake tin (mine measures 20cm on each side) with buttered greaseproof paper.

Combine the caster sugar with 30ml water in a saucepan, and bring to the boil over a medium flame. Swirl the pan every now and then, and keep watching it until the sugar starts to change colour. It will quickly work its way from clear to pale gold through to a reddish brown. As soon as it hits the reddish brown point, remove it from the heat and wait for the bubbles to subside.

While the sugar is cooking, melt the brown sugar, butter, cream, syrup and a teaspoon of salt together in a separate pan and stir well. Pour the mixture into the reddish brown caramel and return to the heat with a sugar thermometer. Stir gently to combine the ingredients.

Bring the mixture to a boil and continue to simmer, swirling occasionally, for between 5 and 10 minutes, until the mixture reaches hard ball stage on your sugar thermometer (125°C, 260°F). Remove from the heat and wait for a few minutes until the bubbles in the pan subside. Pour the mixture into the prepared cake tin and cool for an hour or so until the caramel is solid. Cut into pieces and decorate each piece with a pinch of salt. Flaky Maldon salt is fantastic here – and if there’s any Hawaiian volcanic salt in your cupboard, now’s the time to use it.

Gooseberry fool

We English diners aren’t blessed with much, but we’re pretty blessed when it comes to summer fruits. We’ve been through rhubarb, strawberries, cherries and greengages already this summer: now it’s the turn of the gooseberry.

There are several different varieties of this lovely, fragrant berry, some very sharp and best used for cooking (they’re very good simmered down and served with rich meats like duck and goose), and some so sweet they can be eaten raw. Its flavour character and the texture it cooks down to means that it fits well into the sort of recipes you might cook with rhubarb – and if you don’t have any gooseberries, you can make this fool with rhubarb and emerge happy. I very much like the texture of the soft seeds and flesh of the fruit in the mouth, and don’t sieve the gooseberry puree in this recipe to remove them. Try it both ways, and see which you prefer.

Gooseberries have a fantastic affinity with elderflower. It’s just one of those happy coincidences, like strawberries and black pepper (try it some time). If you made the elderflower cordial I encourage you to make every June (or if you have some from the supermarket in the cupboard), use two tablespoons of it in place of the sugar in this recipe. To serve two, you’ll need:

450g dessert gooseberries
2 tablespoons sugar OR elderflower cordial
400ml whipping cream
400ml custard – make the custard using this recipe or buy some from the supermarket chiller cabinet

Top and tail the gooseberries with a sharp knife, and put them in a small saucepan. Add the sugar or elderflower cordial to them and put over a low heat. As they simmer, the berries will collapse into a thick sauce. Remove from the heat, taste for sweetness, adding a little more sugar or cordial if necessary, transfer to a bowl and put the gooseberries into the fridge to chill for a couple of hours. Make up the custard and put it in the fridge to chill with the berries.

When the gooseberries and custard are nice and cold, whip the cream into soft peaks. In glasses, layer the custard, gooseberries and cream to serve. Some like to swirl them in the glass, but I think this is far prettier served in distinct layers.

English pancakes

Tomorrow is Shrove Tuesday or Mardi Gras, which much of the world celebrates with colourful parades, loud music and women baring their boobs in return for beads. In the UK, we just eat pancakes.

I don’t hold with this giving-things-up-for-Lent business. Pancake Day is meant to be a way to use up all the good things in your larder before embarking on 40 days of mealy-mouthed asceticism. Having given up giving-things-up for Lent myself, I like to eat pancakes year-round, but if you’re one of those for whom this is a once-a-year treat, here’s a recipe for some lovely, lacy pancakes flavoured with orange flower water, which makes them light and delicately floral. In the picture above, I’ve stuffed them with whipped Chantilly cream (whip the cream as usual, but add a tablespoon of caster sugar and a few drops of vanilla essence to every pint) and blueberries, then drizzled them with maple syrup, but there are plenty of other simple fillings you can try:

  • Lemon juice (or lime juice) and sugar
  • A couple of tablespoons of juice straight from an orange with a sprinkle of sugar and a few more drops of orange flower water
  • Melted butter and caster sugar
  • Sweet chestnut purée
  • Maple syrup and bananas
  • Golden syrup
  • Strawberry jam and cream

To make about 12 pancakes, you’ll need:

220g plain flour
½ teaspoon salt
4 large eggs
550ml whole milk
2 tablespoons orange flower water
Shortening or vegetable oil for cooking the pancakes (shortening is best)

Sieve the flour and salt into a bowl, and make a well in the middle. Break the eggs into the well and whisk with a balloon whisk, pouring the milk in gradually. Eventually, you should have a smooth batter about the same consistency as single cream. Stir the orange flower water into the batter. This batter doesn’t need to stand before you use it.

Heat about 1 tablespoon of shortening in a large pan over a high heat. The pan should be as hot as you can get it if you don’t want your first pancake to be a flabby disaster. Swirl about ⅓ of a ladle of the batter around the pan (adjust the amount for smaller pans). You should have not quite enough batter to make it to the edges of the pan if you want to have a lacy pancake with a delicate frilly, crisp edge. Flip the pancake over after about 45 seconds. I always use a spatula for this operation, having experienced a childhood pancake/ceiling incident – if you are brave and strong in the wrist, toss the pancake in the pan. Cook the raw side for another 45 seconds, and slide out onto a plate.

We usually eat these one by one as quickly as I can cook them, but if you want to make a great heap of pancakes and serve them all at once, you can wrap the pancakes in foil and keep them in a very low oven, although this does some violence to the lovely crisp edges. It’s best to eat them straight from the pan for the best texture.

Chocolate fondue

Thanks for all the kind emails – I’m still recovering from the flu and am decidedly wobbly, but a whole lot better than I was at the start of the week. Just as well, because next week I’ll be in Helsinki, on the lookout for reindeer, vendace roe, rye bread and soused herrings.

Cooking’s been beyond me since my encounter with this horrible germ, and my tastebuds are still not giving any kind of sensible feedback to my brain – most things are still either tasteless or, oddly, extremely bitter. Happily, there’s one foodstuff that even the flu can’t ruin for me: chocolate. So it’s out with the new fondue set.

If you’re making your own chocolate fondue, try dipping cantucci, those hard little Italian biscuits; dried pear, marshmallows and fresh, ripe bananas are also great. I’m not a huge fan of strawberries in any chocolatey context; they’re too acid, especially out of season, to work well with chocolate. I’m aware that I’m in a minority here though – if you like strawberries dunked in chocolate, dip away.

To serve four, you’ll need:

250 g good quality dark chocolate
100 ml double cream
2 tablespoons Amaretto
Fruits, biscuits, fresh almonds etc. to dip

Hopelessly easy, this. Put your chocolate in a sealed bag and wallop the hell out of it with the end of a rolling pin, until it’s reduced to little bits. Stir the chocolate bits into the cream in your fondue pot, and melt together with the cream over a low heat on the hob, stirring all the time. Transfer to a low flame on the fondue stand and stir in the Amaretto. Proceed to fight over who gets the pink marshmallows.

Easy chocolate truffles

It’s heartening to realise that the richest, velvety-est, most sinful chocolate truffles you can imagine are very easy indeed to make. There’s no faffing around with tempering or measuring fat/solid ratios – just some melting and chilling.

These dense little balls of silky paradise are full of things that make the animal bits of your brain go tick. The chocolate itself, packed with theobromine, stimulates the release of feel-good endorphins. The creamy, cocoa rush that emerges when they melt fatly on your tongue makes the hairs on the back of your neck stand up. If the way to someone’s heart really is through the stomach, these are the digestive equivalent of a scalpel: precise and potentially deadly.

You’ll need to keep these in the fridge and eat within about three days of making them for maximum freshness. If, unaccountably, you can’t manage to get through this volume of chocolate in half a week, these truffles freeze very well.

To make 50 truffles (depending on how many you find yourself eating as you roll them) you’ll need:

300g good quality, dark chocolate
300ml double cream plus 2 tablespoons
50g salted butter
Cocoa to roll

choc crumbsStart by preparing the chocolate by blitzing it in the food processor until it resembles very delicious-smelling breadcrumbs (see the picture for the sort of texture you’re aiming for). If you don’t have access to a food processor, you can grate it with the coarse side of your grater – this is laborious, but works well. Remove the chocolate to a large mixing bowl.

Using a thick-bottomed pan, bring 300ml of thick cream and the butter slowly to simmering point. I like to use salted butter in a ganache; the small amount of salt is undetectable in the finished product, but it lifts the flavour of the chocolate. Stir the hot cream mixture well and transfer it to a jug.

ganacheTo make the ganache that will form your truffles, pour the hot cream and butter into the bowl full of chocolate in a thin stream, stirring all the time. The chocolate will melt and combine with the cream, and you’ll end up with a very runny, silky, dark brown mixture. Finish by stirring two tablespoons of cold cream into the mixture (this helps to prevent the mixture from seizing, or becoming granular) until the ganache is evenly coloured. Cover the bowl and place in the refrigerator to firm the ganache up.

At this point, you have a choice. You can take the ganache out of the fridge and use an electric whisk to beat it to soft peaks about an hour into the chilling time. Be careful not to overbeat to avoid the dreaded seizing. This will result in soft, airy, fluffy truffles, and will also add volume to your mixture so you’ll have more truffles at the end. (You’ll find that many shop-bought truffles are the beaten kind – you need much less chocolate per truffle, so it works out cheaper for the manufacturer.) I much prefer my truffles dark, dense and silky, so I prefer to leave the ganache without beating.

If you are not whisking the ganache, leave it in the fridge for at least four hours or overnight. You’ll find you now have a nice stiff mixture. If you want to add flavourings or bits of nut, citrus zest, crystallised ginger or other spices, now is the time to do it, using the back of a fork to mush any well-chopped additions into the ganache. (Again, I like my truffles dark, dense and above all chocolatey, so I don’t adulterate them.)

Lay out petits fours cases and put a couple of heaped tablespoons of cocoa on a plate. Use clean hands to mould teaspoons of the ganache into balls, then roll them in the cocoa – this stops them from sticking and makes them look tidy. Place each one in a little case. Those feeling daring can roll their truffles in crushed nuts, shredded coconut or demerara sugar instead of cocoa. Presto – you’re finished. I think these are at their absolute best with a hot cup of freshly brewed coffee.

Celeriac purée

Celeriac pureeThese days, few of the vegetables you’ll find in the supermarket are truly seasonal. We’ve got year-round mange tout peas (I remember the days when my parents grew them in the garden – the season only lasted for about about a month, but my, were we sick of peas at the end of that month); year-round broccoli and year-round cauliflower. Spring cabbage appears in the shops in summer, autumn and winter, and out-of-season asparagus is there whenever you want it. It doesn’t taste of anything, but if you want it, it’s there.

Happily for those outraged by man’s twisting of nature, here are a few season-specific things that you won’t find all year round. Some English root vegetables in particular are only easy to find in the winter (for the most part – there’s always bound to be someone bussing turnips in from Australia in high summer), and they’re wonderful in the cold months. It makes sense really – these roots are the energy store of the plants, and so they’re full of sugars and other nutrients.

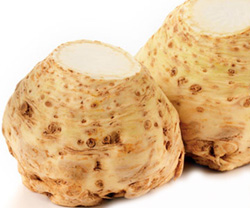
Celeriac is one of my favourite winter roots. It’s the taproot of a celery plant (not the same one you use to dip in your hummus or to stir your Bloody Mary), but tastes much richer, deeper, creamier and sweeter than celery. I know people who can’t bear celery, but who will happily munch on celeriac; they’re really very different flavours. This vegetable isn’t readily found outside Europe, but if you are an American reader and happen upon one in a market, snap it up so you can impress your friends with your cosmopolitan cooking.

Although modern ‘best before’ stickers tend to suggest you can only keep your celeriac for a week or so, the root will actually keep in the fridge for a month or so if wrapped in plastic to keep it nice and humid- inside your fridge it is dark and cold, which fools the root into thinking it’s still underground – the celeriac won’t be any the worse for it.

celeriacThe celeriac is a knobbly, rough-skinned vegetable, and its flesh is very hard. Make sure you have a very sharp knife to remove all the skin and nubbly bits, and to cut through the solid root. It makes a lovely soup (which I really ought to blog some time), and it’s great raw in coleslaw. One of the very nicest of French crudités is simply grated raw celeriac blended with a little home-made mayonnaise. But for my money, one of the best things you can do with a chunk of celeriac is to cook it until soft, mash it with a little potato, push the resulting mixture through a sieve and whip it with butter and cream for a very fine and rich side dish.

To make celeriac purée as an accompaniment for four, you’ll need:

1 large celeriac, about 20 cm in diameter (anything larger than this may be a bit woody)
2 medium potatoes (choose a variety which is good for mashing)
100 ml double cream
2 heaping tablespoons salted butter
2 level teaspoons salt (plus more to taste)

Using a very sharp knife, peel the celeriac and cut it into 2 cm square chunks. As soon as you have cut a piece, put it in a saucepan of cold water to stop it from oxidising and turning brown. Peel the potatoes and cut them into chunks about twice the size of the celeriac pieces, and add them to the pan. Warm a mixing/serving bowl.

Bring the potatoes and celeriac to the boil, put the lid on the pan and simmer for 15 minutes. Poke the vegetables with a fork to check they are soft (if they are not, cook for another 5 minutes). Drain and use a potato masher to mash the celeriac and potatoes until they are as even as you can manage.

Melt the butter and cream together in a milk pan, and bring to a very low simmer as you sieve the purée.

Push the mashed mixture through a sieve using the back of a ladle. You can also use a mouli or food mill if you have one. The resulting purée will be extremely smooth. Put the purée into the warmed bowl and use a hand whisk to whip the butter and cream mixture into the purée with the salt, and serve immediately. This is particularly good with rich meat dishes and roasts.

Golden winter vegetable soup with frizzled chorizo

Golden vegetable soupSoothing, sweet, buttery, winter vegetables are a real blessing when the weather’s cold. Plants keep a store of energy in the form of sugars in their tubers and roots, and those tubers and roots make for some surprisingly uplifting eating. This soup is passed through a sieve after being liquidised to ensure a silky, creamy texture. If you don’t own a food processor you can still make it – at the stage where the ingredients go into the processor bowl you can just mash them with a potato masher for about ten minutes, then pass the resulting mush through a sieve, pressing it through with the bottom of a ladle. You will end up muscular and with a very good pan of soup.

Because of all the plant sugars in these vegetables, you’ll find you need something salty to counter the sweet taste. I’ve cut chorizo into coins and fried it until it’s crisp and friable – a lovely contrast in texture with the silky, creamy soup. The result is a lovely sun-coloured dish at a time of year when the sun is a distant memory.

To serve four as a main course, you’ll need:

1 small celeriac
3 small sweet potatoes
1 small swede
1 small butternut squash
1 small onion
2 shallots
1 parsnip
3 carrots
1 leek
3 tablespoons butter
1 litre chicken stock (vegetarians can substitute vegetable stock and use croutons instead of the chorizo)
200 ml double cream
2 teaspoons salt
½ a nutmeg, grated
10 turns of the pepper mill
2 tablespoons chopped chives

Peel all the vegetables and cut them all into 1-inch chunks. Melt the butter in a large pan with a heavy base (this will help the soup cook evenly – I recommend Le Creuset pans, which are made of enamelled cast iron, and disperse heat beautifully) and sweat the vegetables, stirring regularly, until they begin to soften. You’ll find that the sweet potato pieces may brown a little. Don’t worry about it; they contain so much sugar that it’s hard to prevent a little of it caramelising, and it just gives depth to the soup.

When the vegetables are softening evenly, pour over the hot stock. It’s best if your stock is home-made, but some of the liquid stocks you can buy at the supermarket these days are a good substitute if you don’t have any in the freezer. Bring the stock and vegetables to a simmer, cover with a lid and leave for 20 minutes or until all the vegetables are soft all the way through.

While the soup simmers, slice a chorizo into pieces about the same size as a pound coin and fry over a medium flame in a dry frying pan, stirring and flipping the pieces occasionally. The chorizo will release its fat and the pieces will become crisp. After about 20 minutes, when the chorizo is crisp and dry, remove the pieces and drain on paper towels. Reserve the oil.

Transfer the vegetables and stock to a large bowl and liquidise in batches, passing each processed batch through a sieve back into the large pan. You will find you need to push the soup through the sieve with the back of a large spoon or ladle. Return the pan to a very low heat and stir in the cream, salt and pepper and the grated nutmeg. Bring to a simmer and serve with a drizzle of chorizo oil, some chorizo scattered over (keep some more in a bowl for people to help themselves) and a sprinkling of chopped chives.