Panna cotta with fresh raspberries

Panna cottaPanna cotta is Italian for cooked cream. It’s a light mixture of cream, milk and sugar (along with some honey in my version – I love the combination of milk and honey), set with gelatine and served cold. If you see panna cotta moulds for sale, buy a few – they make the job much easier. If you don’t have panna cotta moulds, ramekins work well too, but you will have to be a bit more patient when it comes to turning the set puddings out.

The vanilla is important here – I’ve used both vanilla sugar (sugar which has been stored with a vanilla pod buried in its jar) and the seeds from a vanilla pod in this recipe. Vanilla is expensive, but there’s nothing like the fragrance of the real stuff in this dessert. If, however, you can’t find any or prefer not to shell out for the real thing, a few drops of vanilla essence will work here too.

To serve six, you’ll need:

1 tablespoon powdered gelatine (from the cake-making shelves at the supermarket)
200 ml whole milk
600 ml double cream
Seeds from one vanilla pod
5 tablespoons honey
1 tablespoon vanilla sugar
Pinch salt
Raspberries or strawberries to garnish

Put the milk in your heaviest-bottomed saucepan and sprinkle the surface with the gelatine. Leave for ten minutes away from the heat for the gelatine to soften.

When the gelatine has softened, put the pan on a low heat and, stirring continually, warm until the milk is heated through and the gelatine dissolved. The milk should not boil at this stage. Add the cream, vanilla seeds (slit the pod down its length and use the handle end of a teaspoon to scrape all the seeds out – you can keep the pod and put it in another sugar jar), honey, vanilla sugar and salt to the pan and stir until the sugar has dissolved.

Divide the mixture between six panna cotta moulds. Cover and put in the fridge until set (it’s best to leave the mixture at least overnight to make sure it’s completely firmed up). To turn out the moulds, dip their undersides in water from the kettle to loosen the mixture and pop a plate over them, then turn the whole assembly upside-down. Decorate with berries and serve chilled.

Janssons frestelse – Jansson’s temptation

Jansson's temptationI’ve three Swedish recipes coming up over the next few days, since I’m pretty sure you’re getting sick of my endless riffing on Malaysian and Chinese things-with-rice. I’ve a soft spot for Scandinavian cuisine, which makes a lovely, hearty change when the weather starts to turn towards autumn. Swedish food is characterised by its use of dairy products, fish of all kinds, large game meats like reindeer, and preserved foods. You’ll find relatively few vegetables in Scandinavian cookery; the long winters preclude much that is green and leafy.

This potato dish, flavoured with onions and anchovy (which ends up surprisingly mild and creamy), is a traditional part of the Swedish smorgasbord, a buffet where cold and hot foods are served up in several courses. I was lucky enough to try an authentic smorgasbord in a manor house in rural Lincolnshire (I’ve lived, I tell you) when I was a teenager. The place was run by a Swedish couple, and offered a glorious and fresh spread of cold, cured or smoked fish (no lutefisk as I recall, but if you’re putting your own together, lutefisk would be very appropriate) as an opener. Sliced meats, cheese and a cucumber salad came next, followed by a third, hot course of those ubiquitous meatballs, stewed red cabbage, a venison casserole and a lovely, savoury gratin – Janssons frestelse. The restaurant is long gone now, but visits I’ve made later to Scandinavia have confirmed that what we ate that night was authentic and very well prepared. (The dish pops up in other countries in the region; I’ve eaten it as Janssonin kiusaus in Finland, and very good it was too.)

Although English recipes tend to use anchovies, spiced and preserved sprats (ansjovis in Swedish – you can see where the confusion came about) are usually used in this dish in Sweden. You can’t find these fat, oily little preserved fish for love or money in the UK, so a really good preserved anchovy is your best bet. Sainsbury’s do some absolutely glorious (and rather expensive) large anchovies preserved in oil with chillies in their world food section. These anchovies are very mild (you can eat them unaccompanied with your fingers, and they’re not too salty, just very, very tasty), and work very well here. Otherwise, any good French brand will do. It’s important that your anchovies are good quality ones, which will tend to have a softer, less fierce flavour – I know anchovy-haters who have been converted by this dish.

Stop press – I have been informed by a reader that Swedish ansjovis are, in fact, available at Ikea, of all places. Buy some next time you pop in for some shelving. Their Swedish meatballs are also fantastic.

I chose King Edward potatoes for their flavour and their ability to absorb the cream. This isn’t totally authentic – you’re more likely to find a more waxy potato in this dish in Sweden (I’ve even had it with new potatoes). I personally find that a floury potato works better for my own tastes, but you should feel free to experiment – if you want a waxier potato in the UK, Vivaldi would be excellent, as would Kestrel.

To make Janssons frestelse as a side dish for four to five people, you’ll need:

4 large potatoes (I used King Edwards)
1 large sweet onion
10 anchovies preserved in oil
1 pint double cream
½ pint milk (you may need a little less)
1 handful breadcrumbs
2 tablespoons grated parmesan
2 large tablespoons salted butter

GratinPreheat the oven to 225° C (475° F). Slice the potatoes thinly and make a layer of slices in a fish-scale pattern in a 2 pint gratin dish. (Some recipes call for potatoes cut in matchsticks; others for grated potatoes; others for thin slices. It doesn’t make any difference to the flavour, and you’re likely to find thin slices more manageable.) Slice the onion thinly and place a layer of slices on top of the potatoes, seasoning with pepper as you layer. You won’t need any salt; there is plenty of that in the anchovies. Lay out half the anchovies on top of the onions. Cover with a layer of potatoes, a layer of onions, more anchovies and a final potato layer. Pour over the cream, and sprinkle the top with the breadcrumbs mixed with the (totally inauthentic, so leave if out if you like) parmesan. Dot the surface with softened butter.

Bake in the oven, uncovered, for 30 minutes. The cream will have been absorbed into the potatoes and some will also have evaporated – top the dish up with some milk. Continue to cook for another 15 minutes, until the potatoes are tender and the breadcrumbs are crisp.

Hokey pokey ice cream

Hokey pokey ice creamIf you made the cinder toffee from last week and have managed to avoid eating it all so far, you’re in for a treat. This ice cream reflects two of my favourite sweeties – Maltesers and Crunchie bars. The cinder toffee (the middle of a Crunchie) is crumbled and blended into a malt-flavoured ice cream, flavoured just like the inside of a curiously creamy Malteser.

I haven’t used any chocolate in this ice cream because I wanted the malt and toffee to stand on their own, but if you would like to make this even more similar to the sweets, add five tablespoons of milk chocolate chips at the same time you add the crumbled cinder toffee to the mixture. To make about two pints of ice cream, you’ll need:

4 egg yolks
½ pint (250ml) milk
1 pint (500ml) double cream
100g caster sugar
2 sachets Horlicks Light (see below)
5 heaped tablespoons roughly crushed cinder toffee

Horlicks is an English malted milk drink. (If any US readers could let me know what the equivalent across the pond is, I’d be very grateful!) The full-fat version is usually stirred into hot milk. Horlicks Light is stirred into water, and I use it here because it contains powdered milk, which makes the ice cream all the more creamy and delicious.

Start by making a custard base for the ice cream. Beat the egg yolks, the milk, the Horlicks and the sugar together in a heavy-bottomed saucepan. Continue to stir vigorously over a very low heat until the custard starts to thicken. You’ll notice that it forms a glossy sheen on the back of a wooden spoon when ready. Be very careful not to allow the custard to boil, or it will separate.

When the custard has thickened, transfer it to a jug and add the double cream. Stir well and put the jug in the fridge until the mixture is chilled.

If you have an ice cream machine, add the mixture to the machine and follow the instructions. Halfway through the freezing time, add the crushed cinder toffee to the drum. (I’ve found the easiest way to crush it is to put it in a plastic freezer bag, knot the top, hold onto the knot and bang the bag against the work surface.) Continue until the ice cream is stiff enough to serve.

If you don’t have an ice cream machine, put the mixture in a Tupperware box and place it in the freezer. After twenty minutes, remove it from the freezer and beat the partially frozen mixture with a whisk. Remove and beat every twenty minutes, breaking up the ice crystals, until the ice cream is frozen evenly but very soft – stir the cinder toffee in at this point. Keep freezing and beating until the mixture is solid. Serve sprinkled with a little extra crushed cinder toffee. And remember to brush your teeth.

Raspberry Eton Mess

Raspberries are one of my favourite fruits. Not only are they great raw, in jam or baked into cakes and puddings; they freeze like a dream, so you can have a ripe, squashy taste of summer all year round.

Strawberries are the fruit traditionally used in Eton Mess, but at this time of year they’re very bland and prohibitively expensive. To be honest, I prefer the tart sweetness you get from raspberries anyway, so this isn’t a hardship. Using defrosted frozen raspberries in this dish will leave a lovely pink swirl in the cream. If you are using fresh raspberries, crush about a quarter of them for the same effect.

Eton Mess originated at Eton College in the 1930s, when something rather like it (a mixture of strawberries and bananas with whipped cream or ice cream) was sold in the school tuck shop. It’s evolved into a lovely flopsome, light desert punctuated with shards of meringue, crisp and chewy all at once. In the spirit of making a very quick, easy dessert, I’ve used supermarket meringue nests – you can make your own if you prefer.

To serve six, you’ll need:

1 pint double cream
1 lb raspberries
8 meringue nests (Waitrose and Marks and Spencer carry meringue nests which are ideal for this – crunchy on the outside with a soft give in the centre)

Crumble the meringues into bite-sized chunks with your hands. Whip the cream into soft peaks and fold in the raspberries and crumbled meringue. Spoon into serving bowls and decorate with a few spare raspberries (sometimes you’ll find mint leaves dressing an Eton Mess – I prefer mine mint-free). Serve immediately.

We ate our Eton Mess with an accompanying glass of Framboise liqueur. I’d planned to fold it into the dessert, but it was so very, very nice that a corporate decision was made among those dining to drink it instead. I think we made the right choice.

Banoffee pie – homemade dulce de leche

Banoffee pie is one of the easiest desserts to make – there’s no real cooking involved, just some butter-melting, some biscuit-smashing, some pre-emptive tin-boiling, some cream-pouring and some banana-slicing. Easy as . . . pie.

No cream in these photographs; I didn’t get that far before the pie was crumbled into bits by enthusiastic lunch guests. (I prefer my banoffee pie with pouring cream, although you’ll read many recipes which call for whipped cream. Follow your own preference.)

The gloriously gloopy toffee stuff in a banoffee pie is dulce de leche, an Argentinian caramelised milk sauce. You can buy it in jars from Merchant Gourmet in most supermarkets, but it’s very easy to make at home. Just cover an unopened tin of condensed (not evaporated) milk with water in a saucepan and boil for an hour and a half, making sure that the water stays topped up. The can won’t come under enough pressure to go pop. When your dulce de leche is finished, it will keep indefinitely in the can; I like to make several cans full at a time and keep some in the cupboard for my emergency pie needs. Use a permanent marker to identify your boiled tins – the paper will have come off them.

Banoffee pie uses a cheesecake base, which is easy to prepare and freezes well. If you make some spares and freeze them, you’ll have a near-instant dessert for the next time you have visitors.

For one pie, you’ll need:

20 digestive biscuits
3 rounded tablespoons butter
1 tin dulce de leche (see above)
5 bananas
Cream for pouring

Line a springform cake tin with greaseproof paper.

Crush the biscuits into crumbs. This takes a few seconds in the food processor, but if you don’t have one you can put them in a sealed plastic sandwich bag and wallop the bejesus out of them with a rolling pin. Melt the butter and combine with the crumbs until you have a stiff paste. Mould the paste in the bottom of the tin until you have a flan base with shallow sides. Don’t worry about being too tidy; you’ll be covering the base up in a while.Put the cake tin in the fridge for about an hour to harden.

When the pie crust is nice and solid, remove it from the cake tin and spread a whole tin of cooled dulce de leche on the base. Top this with chopped, fresh bananas. Pour over gouts of cream and serve.

Coleslaw

“I don’t like coleslaw.”

Mr Weasel really should know better by now. It’s been nearly ten years; surely that’s enough time to realise that saying such a thing could only have one possible result?

I made some coleslaw.

You’ll need:

¼ celeleriac, peeled
5 carrots, peeled
¼ white cabbage
2 tablespoons double cream
2 tablespoons mayonnaise (make it yourself or use Hellman’s – I’ve still not found another I’ll allow fridge space)
Juice of 1 lemon
1 teaspoon toasted caraway seeds
2 teaspoons walnut oil
½ teaspoon sugar
Salt and pepper

Julienne (cut into fine strips) all the vegetables. This will be infinitely easier if you own a mandoline or a food processor with the relevant blade. The rest of the recipe is simplicity itself – just mix the lot together in a big bowl. Taste to see if you need more lemon, salt or sugar. Then serve immediately.

The idea with coleslaw is that it should be creamy and fresh. It’s really not good if you leave it hanging around (like supermarket or fast food coleslaw); it needs its crunch. This means that it doesn’t make for good leftovers. This will make enough for two people. Swap the mayonnaise for Greek yoghurt if you want a slightly lighter texture.

Mr Weasel’s verdict? He finished his bowl in under a minute, wiped his mouth and said:

“Is there any more?”

Pasta alla Medici

Now, while I might rail against Nigella Lawson’s approach to ham in cola, I am full of gratitude for her inclusion in Feast of a recipe for Pasta alla Medici, using any remaining ham you might have from the chunk you boiled the hell out of the day before. I’d last eaten it decades ago, and had been looking for a recipe ever since.

When I was twelve or so, a pamphlet was deposited on our school desks. It came from a company (pre-Internet, this) which would fix you up with a penfriend in a foreign country, depending on which boxes you ticked. (I don’t recall an ‘eating’ box to tick under the ‘hobbies’ heading; I think I ticked something typically precocious along the lines of ‘classical music’ and ‘visiting museums’. It is not surprising that girls on the school bus used to save pockets full of breakfast cereal to put in my hair every morning.)

There were also boxes to tick on the age, nationality and gender of your desired penfriend. Being newly possessed of all kinds of exciting hormones, and also possessed of a very overactive imagination, I decided that the thing every twelve-year-old English schoolgirl required for a full and satisfying life was a seventeen-year-old, Italian, male penfriend.

Fortunately, the penfriend company saw me coming, and allotted me a twelve-year-old girl. She was Italian, though, and she liked reading and music too, so we suited one another rather well, and wrote to each other (in English; my Italian remains limited to deciphering menus and asking the way to the museum) for years.

Eventually, Lisa and I had been writing to one another for such a long time that our parents decided we should visit each other. Her family lived in a beautiful flat in Genoa, where I went to school with her for a couple of weeks and discovered marron glace ice cream (my Mum had sent me to Italy saying sagely: ‘in Italy you can buy ice cream in every colour of the rainbow’, and I must have annoyed the hell out of Lisa’s family by obsessing about finding one in each colour).

Lisa’s Mum was a doctor, and didn’t have much time at home. When she was at home, she was not, in retrospect, a very engaged cook, and the Findus Crispy Pancake was my introduction to an Italian mother’s kitchen. Later that week we ate bollito misto (which translates roughly as ‘mixed boilings’, and was about as appetising as it sounds).

One thing, though, that Lisa’s mother cooked and cooked exceptionally well, was a really fabulous pasta dish, with sweet little peas, ham, and a creamy, buttery parmesan sauce. I asked her what it was called (although not for the recipe; my own mother didn’t like me cooking at home, since I did what I do now and sprayed the walls with food when cooking), and was delighted when she cooked it again twice before I left.

Pasta alla Medici is a very simple recipe, but is also, for some reason, a very hard one to find in books. I had to wait nearly twenty years before I came across Nigella Lawson’s recipe, and I am gushingly, pathetically grateful. She offers this three-person recipe as one which children will enjoy, and her portions are child-sized – make a larger amount if you’re feeding adults.

200g pasta
100g frozen petits pois
150ml double cream
150g diced ham
2 tablespoons grated Parmesan

Cook the pasta following the packet instructions, and after five minutes add the peas to the pasta water. When the peas and pasta are cooked, drain them. Warm the rest of the ingredients through in the pan you cooked the pasta in, then add the pasta and peas, toss to coat, and serve.

I added a few gratings of nutmeg to Nigella’s recipe. I also stripped some of the white fat off the ham I had cooked the day before and dry-fried it until crisp, adding a tablespoon of maple syrup and a pinch of cinnamon at the end, bubbling the syrup down to a caramel. I used this crisp, sweet crackling to dress the pasta. This is, however, mostly because I am greedy; you’ll probably be perfectly happy just eating the pasta on its own.

Mussels with creme fraiche – moules a la creme

There is something horribly primal about cooking mussels. I think it has to do with the elbow-grease you have to put in cleaning them and slaughtering any barnacles they might be hosting, hauling bits of their still-quivering little mussely bodies off, and the suspicion that the dead ones may not be dead, but merely pretending in the hope you’ll throw them back. (Sadly, these fakers are not smart enough to realise they’re 50 miles from the sea.)

I had some very good moules marinere in Wimereux, a town in northern France, in September. Each tiny mussel (smaller than the mussels you might buy to cook at home) had a pea crab living inside its gills (you can see a very graphic video of one found in a mussel here), which, although admittedly mildly creepy on first encounter (Gah! There is a tiny thing in my mussel), made the whole mussel experience about twenty times better, adding flavour and, dare I say it, texture. Lovely, leggy, crispy texture.

The mussels you can find at an English fishmonger will almost certainly be farmed, rope-grown mussels. This means that they’re not as gritty as wild mussels, but they’re also not as flavourful. On the other hand, though, you can really go to town with the flavours you cook them with, so it’s not a total dead loss.

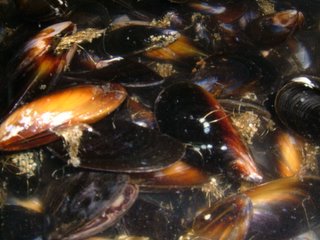
Mussels straight out of the plastic fishmongers’ net are rather unprepossessing. They’re slimy, they have a straw-like, tough ‘beard’ attached (you’re going to have to remove this later, so pay attention), and they offer a home to a myriad of exciting barnacles and other little friends. Some will be open; rap them on the working surface. If they’re alive, they’ll shut. If they’re cracked or dead (or feigning in the hope that you are on a quayside somewhere), they’ll sit there, inert, daring you to look them in the eye. Bin them.

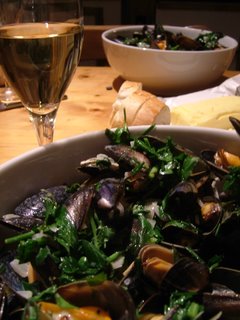
Run a sink of cold water, and drown the sad, live mussels. Give them a good scrub with a little brush, take the beards between your fingers, and yank them off. The larger the mussel, the harder you will have to yank. This beard is not, obviously, a beard, mussels having no weak chins to hide from lady mussels, but is a fibrous mass they grow to attach themselves securely to rocks (or in the case of these guys, ropes). When you pull it off, pull towards the shell’s hinge; you might tear apart the meat of the mussel pulling towards the open end, and this will kill them, prevent you from dealing them the unique, boiling-in-wine death you’re about to offer. The ones in the picture above are cleaned. They look a lot more appetising.

For this recipe, which serves two people, you will need:

2kg mussels, cleaned
1/2 a bottle white wine (I used a chenin blanc)
4 tablespoons creme fraiche
1 tablespoon fresh thyme
2 bay leaves
1 large bunch parsley
1 large bunch chives
5 shallots (or 1 large onion) chopped finely
4 cloves garlic chopped finely
1 large knob butter

Soften the shallots and garlic with the thyme and bay leaves in the melted butter over a medium heat for five minutes. Turn up the heat, then add the wine and creme fraiche. Simmer for five minutes to burn off the alcohol, and, while the wine mixture is bubbling, tip all the cleaned mussels in. Slam the lid on. The mussels, already pretty grumpy that you’ve removed a useful body part, will expire in the steam, giving their salty juices to the sauce – you don’t need to add salt yourself.

(On re-reading this, I realise it sounds positively pornographic. This is half the fun of shellfish.)

Keep the lid on for three minutes, then check the pan. Fish out as many as have opened as you can, and put them in a serving dish (I use large salad bowls – there’s a lot of shell in there). Put the lid back on and steam for three more minutes – they should now all be open. (Discard any closed ones; they were probably dead before you cooked them.) Take the mussels out, leaving the sauce in the pan. Stir the chives and parsley into the hot sauce, leave it for a minute to allow any sand or grit to settle (very unlikely, this, with rope-grown mussels) and spoon it over the open shells.

Make sure you’ve got some good bread to dip in the buttery, juicy sauce, and use your fingers to pull the satiny little mussels from their shells.

I usually end up naming some of my more recognisable mussels. Clint, the very big one with the nigh-unremovable beard, and Fifi, the teeny, beardless one with the barnacle beauty-spot, both died for my supper. It was a worthwhile sacrifice.
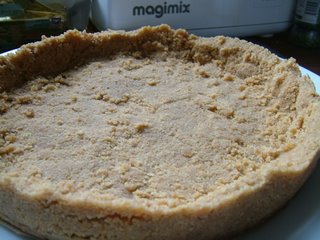
Full of beans – Part 2

After a night and a day of slow steeping, the cream and yolk mixture I made last night has gone a hazelnut-brown. I strain it to get rid of the beans (the mixture was already thick from the warmed-through yolks, and has been made thicker by the acidic coffee beans), and churn it in my new ice cream maker. (This is almost a complete disaster, when I fail to read the instructions properly and get the turning on/adding liquid in the wrong order. A bit of fierce scraping with a silicone spatula sorts things out.)

Until now, I’ve made ice cream in a plastic box in the freezer, beating it with a fork frequently as it freezes. The ice cream churn results in a much softer, creamier texture.

The sweetness of the mixture is toned down a bit once the ice cream has been frozen. We eat it in happy silence – I wish I’d made more.

Full of beans – Part 1

More friends are coming over tomorrow evening. One, Chris, is a man fuelled entirely by caffeine – his heart does not beat; it percolates. I’ll start on some whole-bean coffee ice-cream this evening, which I’ll churn while we’re eating tomorrow. After a day and a night of steeping, the custard the ice cream is based on will be rich and strong.

Why whole beans? Well, the resulting ice-cream comes out very rich, and very smooth, without an acidic edge. An overnight steep means that the ice-cream still has a strong coffee flavour.

I use a whole bag of dark-roast espresso beans, and pour over a litre of whipping cream. God; this already smells fantastic, and I haven’t even done any cooking yet. The cream and coffee beans go in a thick-bottomed saucepan (mine is a Le Creuset pan); make sure yours is thick so the bottom of the cream doesn’t scorch. I bring the cream and coffee slowly to a simmer, and remove the pan from the heat.

While the cream and coffee are warming up, I beat 225g sugar with six egg yolks using a fork, making sure not to beat in too much air. This will make the custard very sweet, but for some reason, ice-creams usually taste less sweet once frozen, so you need to be quite generous with the sugar. The yolks at this time of year are a beautiful orange.

When the cream has been scalded, it is poured over the yolks and sugar, stirring all the time to avoid scrambling them. When everything is well-mixed, it all goes back in the saucepan on a low heat, and is stirred gently until the yolks thicken the cream.

Now the mixture is put in a mixing bowl, and left on the counter until cool. I’ll put it in the fridge before I go to bed, and leave it there until dinner time tomorrow. The beans are already giving up some colour and lots of flavour to the custard – I’m looking forward to tasting the final mixture tomorrow. This one’s going to be good.