Piri-piri prawns

Piri-piri prawns
Piri-piri prawns

Another quick and dirty one today. This recipe’s a great addition to a table full of tapas. Good prawns, sweet, fat and succulent, are at their best when treated simply. Here, they’re just flavoured with garlic, piri-piri chilli peppers and olive oil, and cooked very quickly.

I get a bit repetitive with the following whinge every time I blog about prawns, so skip this paragraph if you must – but the lack of availability of raw prawns with their heads and skins still attached in this part of the country (and, to be honest, in many other parts too) absolutely infuriates me. If you’re in Cambridge, you can sometimes find big, whole tiger prawns at Seatree on Mill Road (a fish and chip shop with a small wet fish counter). I’ve not had great success with the fish stall on the market, which smells far more strongly than a good fish seller should. Aside from this, you’re out of luck for dedicated fish sellers. Get into the supermarkets early and you might get lucky; there are sometimes raw prawns in the freezer cabinet too. Good luck with heads and shells, though; as you can see, I wasn’t able to find prawns with heads although I did get lucky withs shells. Both add flavour – there’s real depth of flavour in those shells, and the squishy bits that some people call brains (actually the prawn’s hepatic organ) are really delicious if you can get around the squick factor. Do not hang out with Chinese families if the squick factor is a problem for you. We tend to crunch those shells and suck the brainy bits out at the table, and it’s only partially because we think they’re totally delicious. At least ten percent of our motivation is to put off the people we’re eating with so they leave some extra prawns.

South African piri-piri peppers are botanically indistinguishable from Thai bird’s eye chillies (cili padi or phrik khi nu if you’re in an oriental supermarket). Use whichever you can get your hands on.

To serve two with crusty bread to dibble in the juices, you’ll need:

750g raw prawns with shells and heads on (500g if, like me, you couldn’t get your hands on heads and shells – mine had shells but had been decapitated.)
5 fat, juicy cloves garlic
2 bird’s eye or piri-piri chillies. These are very hot, but if you’re brave you can add another one.
4 generous tablespoons fruity extra-virgin olive oil
Salt and pepper
1 tablespoon parsley to scatter

If your prawns are frozen, defrost them thoroughly and dry them on paper towels.

Warm the olive oil over a medium flame in a large frying pan and throw in the roughly chopped garlic, Sauté, keeping everything on the move, until the garlic is softening and giving up its scent (about a minute). Add the prawns and chopped chillies to the pan and continue to sauté until the prawns have turned from grey to pink (3-5 minutes). There is nothing as good as the smell of prawns cooking with garlic – your kitchen will smell wonderful.

Season with salt and pepper, transfer to a serving bowl and sprinkle with the parsley. Eat immediately, while they’re still piping hot.

Garlic bread

Garlic bread
Garlic bread

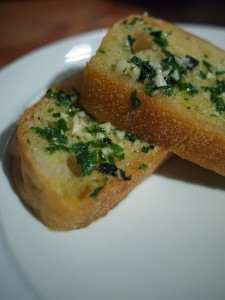
I was tempted to title this post “F***ing fantastic garlic bread”, because when people taste it, they tend to say something along the lines of: “Cripes. This is f***ing fantastic garlic bread.” But my Mum reads this blog and has a habit of looking horrified and exclaiming: “Elizabeth!” if I so much as say “Damn” in her presence, so plain old “Garlic bread” it’ll have to be. Sorry, Mum.

I wooed a boyfriend with this stuff once (and swiftly thereafter wished I hadn’t, but that’s by the bye). It’s powerfully good; you won’t go back to shop-bought garlic bread once you’ve tried it. The trick here is to simmer the garlic in the butter to sweeten it up and release its aroma before you let it anywhere near the bread, alongside the judicious application of some herbs. Use whatever loaf you fancy here. Something reasonably open-textured to soak up all that butter is a good move. This recipe will make sufficient garlic butter to anoint a whole baguette, but you can make a smaller loaf and keep any leftover butter in the fridge for up to a week. There were just two of us eating when I made this, so I used a ciabatta and steeled myself for leftovers – if you put the remains back together into something that resembles a cut-down loaf, rewrap it in the tin foil and refrigerate, you can take the recipe from the point where you put it in the oven again the next day.

You’ll need:

450g butter
2 large, juicy heads garlic
15g fresh chives
15g fresh flat-leaf parsley
15g fresh oregano
½ teaspoon salt
Several turns of the peppermill

Peel the garlic, and use a knife to mince it until you have a heap of garlicky rubble in the middle of your chopping board.

Melt the butter in a small saucepan over a very low heat, and spoon the garlic into it. Allow the garlic to cook very gently in the butter for about ten minutes, until it is soft and fragrant. While the garlic is cooking, chop the herbs and put them with the salt and pepper in a bowl.

Pour the hot butter and garlic mixture over the herbs in the bowl, and stir well to combine everything. Leave at room temperature for ten minutes, then cover with cling film and move to the fridge. Refrigerate until solid. (The butter doesn’t need to be rock-hard – a couple of hours should be sufficient.)

When the butter is stiff enough to spread, warm the oven to 150ºC (300ºF).

Slice the bread and spread each side of each slice generously with the garlic butter. Reassemble the loaf, and wrap it tightly in tin foil. Bake on a metal tray for 20 minutes, and remove from the oven. Unwrap and serve piping hot. You will be unable to avoid getting garlic butter all over your chin as you eat, and possibly on your elbows, so have napkins standing by.

Banh xeo – Vietnamese savoury crepe

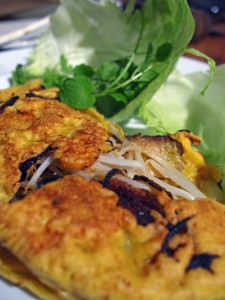
Banh xeoPancake day is coming up on March 8. I’m all for a lovely dessert crepe, but this year, I feel like ringing the changes a bit and making pancakes a savoury course.

I’ve been obsessing a bit about Vietnamese food ever since tasting the best pho I’ve ever had in California last month. Conversations have been had on Twitter (which revealed that your best bet for a Vietnamese meal in London is probably Viet Grill in Shoreditch – I’ve not had a chance to go yet, but I’m assured by a huge number of London diners that it’s as good as you’ll find in the UK), and while mulling over just how well the Vietnamese work soup, sandwiches and other staples, it struck me that they also make a pretty damn fine savoury crepe, just right for Shrove Tuesday.

Banh xeo are a spectacularly tasty plateful, with a scattering of sweet prawns, tender onions and savoury pork – this is another use for any leftover roast belly pork you might not have got through in Monday’s stir fry – and a shatteringly crisp batter flavoured with coconut and turmeric. Rice flour is what glues the whole thing together and gives it its light crispness; despite the visual similarity to an omelette, there are no eggs in this particular pancake, which makes it a good choice if you’ve got someone who can’t eat them visiting at this time of year.

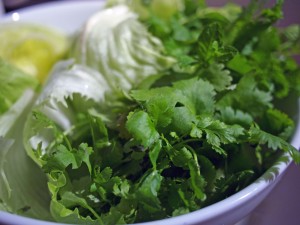
Chunks of banh xeo are traditionally eaten wrapped up in a lettuce leaf with some herbs, then dipped in a bowl of nuoc cham – a spicy, piquant, salty sauce made from fish sauce, limes, garlic and chillies. I’ve included a recipe for the sauce below. This is one of the few occasions on which an iceberg lettuce is a variety I’ll actually recommend – its texture is great here. Take the stem out with the tip of a knife and chop the lettuce in half . You can now separate the large leaves of the lettuce into cups just the right size and shape for wrapping things up in. I’ve suggested you use mint and coriander because they’re easily available in the UK, but if you can get your hands on any other Vietnamese culinary herbs, they’re wonderful here. Try Vietnamese Herbs for pictures and more information on herbs for growing and eating.

I used a 20cm non-stick frying pan to make these, and served two to each person. You’ll be working a bit of a production line, so you’re best off eating in the kitchen – serve each pancake as it comes ready, and be prepared to jump up and down a bit from the table to get the next one ready as you eat. To make eight pancakes, you’ll need:

Banh xeo
375g rice flour
1 heaped teaspoon turmeric powder
400ml coconut milk (1 can)
400ml cold water
1 teaspoon salt
350g roast pork belly
350g raw peeled prawns
300g beansprouts
2 medium onions
Flavourless oil or (preferably) lard, especially if you can save some from roasting the pork, to fry.

To serve
1 iceberg lettuce
1 large handful fresh coriander
1 large handful fresh mint

Nuoc cham
75ml water
2 heaped tablespoons soft brown sugar or palm sugar
75ml fish sauce
Juice of 4 limes
1 tablespoon rice vinegar
2 fresh birds eye chillies
4 cloves garlic

Lettuce and herbs
Lettuce and herbs for wrapping the banh xeo

The pancake batter needs half an hour to rest, which gives you plenty of time to get all the pancake ingredients ready to go. Everything should be chopped and positioned to cook immediately; things move quite fast once your ingredients are in the pan.

Sieve the rice flour and turmeric into a large mixing bowl with the salt. Combine the coconut milk and water in a jug and beat it into the rice flour mixture bit by bit with a hand whisk until you have a smooth batter about the texture of double cream. Set aside at room temperature to rest.

While the batter is resting, slice the pork belly into about 32 thin slices, and halve and slice the onions. To make the nuoc cham dipping sauce, pour the water, straight from the kettle, over the sugar and stir until all the sugar is dissolved. Leave to one side to cook a bit while you chop the chillies and garlic, then pound them in a mortar and pestle. Add the chillies and garlic to the sugar and water with all the other liquid ingredients and put to one side until you are ready to eat. Put the lettuce leaves and herbs in a serving dish in the middle of the table.

When the batter has rested for half an hour (you can leave it for up to four hours if you want), get your frying pan as hot as you can on top of the stove, and melt a tablespoon of lard in it. Throw in four slices of pork, four prawns and a small handful of onion pieces (about a quarter of an onion), and stir-fry for a minute or two until the prawns are pink and the onion is starting to soften off. Use a ladle to pour a thin layer of the batter over the ingredients in the bottom of the pan, and scatter a small handful of beansprouts over the surface of the pancake.

Allow the pancake to sizzle away for 5-7 minutes, until the bottom is golden-brown and very crisp, and the softer top cooked through. Fold in half around the beansprouts and slide onto a plate to serve immediately, to be wrapped in pieces in the lettuce with some herbs, and dipped in the nuoc cham.

Labneh

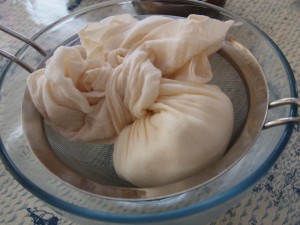
Labneh in a cheesecloth
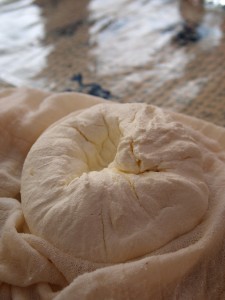
Labneh about to be unwrapped

If you’re anything like me, you’ll be feeling somewhat bloated and liverish after Christmas and New Year, so I’ll hold the roast goose recipe back until later in the week when our gall bladders have all recovered. I was racking my brains for a nice easy recipe to start the year with – something that’s simple to prepare, and has few ingredients, but that tastes great and will impress guests or a picky family. How about labneh, a soft “cheese” from the middle east, made in your fridge from thick Greek-style yoghurt?

Greek yoghurt is thicker than the sloppy variety by virtue of having been strained until much of the whey drains out, leaving you with a richer, thicker product. Labneh takes the process further, continuing to drain until almost all of the whey has gone, and you are left with a thick, sharp-tasting ball that looks like soft cream cheese. It’s not a true cheese because rennet is not used in making it, but I like to use it where you might use something like Philadelphia – and when it’s made by the method below, with fresh garlic, you’ll find that it’s a mighty fine substitute for Boursin, richer, denser and without the dusty dried garlic taste you get in the packaged stuff from the supermarket. Labneh is a great addition to a cheeseboard, either in a chunk on its own or in a bowl, splashed with olive oil. Experiment by adding herbs to the garlic: for a Turkish flavour, try some dill and chillies; chop in some mint with the garlic for a Greek platter.

My Mum made the labneh in the pictures at Christmas as part of a cold supper. It’s fantastic wherever you’d use cream cheese or with crudites, and great crumbled over rich middle-eastern dishes, especially those containing lamb; I’ve got a cheesecloth full going in the fridge at the moment which is destined to be spread on crusty bread and served with a Greek-style lamb shoulder.

You’ll need:

400g Greek yoghurt (make sure that you choose a version without emulsifiers or thickeners; I like Total)
1 large pinch salt
2 cloves garlic, chopped as finely as possible

Labneh
Labneh straight out of the cheesecloth

Line a sieve with a boiled cheesecloth, and put it over a bowl to catch drips. You can also use a boiled kitchen towel if you don’t have a cheesecloth – an old linen one which has been washed many times will be softer and easier to work with.

Stir the yoghurt, salt and garlic well in a bowl to make sure everything is well combined. You can leave the garlic out if you want a plain labneh; the garlic gives a lovely fiery kick to the finished cheese. Pour the yoghurt mixture into the lined sieve, bring the corners and edges up to form a bag around the labneh and twist together. You can secure the twist with string if you like, but it’s not really necessary.

Put the bowl and sieve into the fridge and leave the labneh to drain for between 24 and 48 hours, squeezing the bag every now and then. The cheese will be a pleasant, creamy texture after 24 hours, and leaving it for longer will make it even stiffer, and harder to spread.

To keep your labneh in the fridge, cover it completely with olive oil in a bowl. It will keep for two weeks, but I bet you won’t be able to stop yourself finishing it much sooner than that.

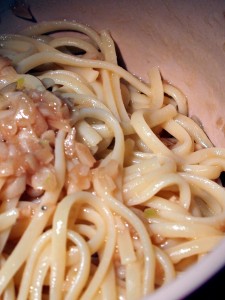
Garlic noodles, inspired by Crustacean

Garlic noodlesThe An family runs a group of Vietnamese restaurants in California. The restaurants have different menus, but the family’s famous garlic noodles are on offer at each of them. I ate a dish of them at AnQi, the group’s newest restaurant in Costa Mesa – a restaurant so swanky it has a catwalk for fashion shows slashing a line through the tables – and discovered that those noodles are justly famous.  (I can also heartily recommend the filet mignon potstickers, the shaken beef and the salt and pepper calamari.)

Those noodles though: stupendous. The An family has cottoned on to this, keeps the recipe secret, and tried to trademark the term “garlic noodles” a few years ago.  Unsurprisingly, this was unsuccessful, but since then they’ve tried again with  “An’s Famous Garlic Noodles”. So I should make the point here that the noodle recipe on this page is not the An family’s jealously guarded secret recipe, but my own (pretty successful) attempt at reverse-engineering the noodles I ate. They’re garlic dynamite, the sort of thing that you should consider eating to repel an unwanted suitor. The garlic is sweet, the buttery sauce gorgeously umami, and the whole arrangement coats the strands of wheat noodle (angel hair pasta is indistinguishable from what the restaurant uses) in a velvet-slick coating of flavour.

The Vietnamese have been working with what we’d now call fusion food for a couple of hundred years, the result of French colonialism. Some of the best Vietnamese food out there is a real mish-mash of cultures; just look at banh mi on rice-flour baguettes, with goose-liver pate spread thickly beneath the Vietnamese roast pork and pickled vegetables. So the use of butter and Parmesan cheese isn’t as barking here as it might look at first glance. This is a very easy recipe, but beware: this dish won’t just make your breath smell of garlic. Your hair, your sweat and the whole of your immediate environment will be curiously pungent for a good day or so after eating. Go with it. It’s worth it.

To make enough noodles to serve four as a side dish, you’ll need:

2 heads garlic
150g salted butter
1 tablespoon oyster sauce
2 heaped tablespoons grated Parmesan cheese
250g angel-hair pasta

Peel the garlic and use a large, sharp knife to chop it into very small pieces. If you hold the tip end of the knife in one hand and the bottom of the cutting blade in the other, you’ll find you can walk the knife up and down your board, chopping as it goes. Melt the butter and, over a very low heat, simmer the chopped garlic in it for about 20 minutes, until the garlic is soft and giving its fragrance up, but not browning. Stir the oyster sauce into the garlic and butter, and remove the pan from the heat.

Cook the pasta according to the timing on the packet, but using just enough water to cover the noodles. Drain, reserving the cooking liquid, and place in a serving bowl. Stir 50ml of the starchy water into the noodles along with the buttery garlic sauce and the Parmesan. Serve immediately.

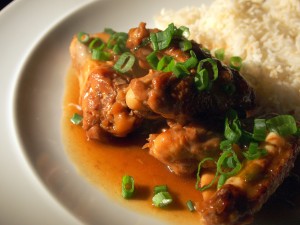
Sesame ginger chicken wings

My Dad always taught us that the best part of the chicken was the wings. The flesh in the wing is sweet from its proximity to the bone, delicate, and lubricated with plenty of flavour-carrying fat from the skin that covers it. Accordingly, we used to fight over the wings every time a chicken appeared on the dinner table, occasionally with our cutlery. Ours was a savage household.

Dad’s Chinese, and this is the kind of comfort food he used to rustle up for us when everybody else’s Dad was frying mince with baked beans. I used to take great pride as a little girl in helping out – slicing the garlic, chopping the ginger, carefully mixing the cornflour into some cold water, and watching, fascinated, as he whirled around the kitchen with a wok and a pair of chopsticks. You can’t beat the cosmopolitan nature of the food education my brother and I got from my parents: Mum’s wonderful meals were from Jane Grigson, the Roux brothers and Elizabeth David, and Dad’s all did something fabulous with soy sauce. Alongside lengthy gastronomic holidays in France, where my brother and I were expected to sit quietly for hours in restaurants with endless cutlery and a million cheeses while Mum and Dad bibbed and tucked (and we did – there’s still little I find as fascinating as my very own slab of foie gras), there were the frequent visits to Malaysia, where food is as important to the national psyche as football is in Britain. Back in the UK, there were regular and keenly looked forward to family trips to London’s Chinatown, which, at the time, was the only place you could find ingredients like sesame oil, chilli sauces and tofu – even ginger was sometimes hard to find in 1970s Bedfordshire. There were bribes of candied winter melon and sesame caramels for the kids, and Dad swiftly made friends with all the local Chinese restaurateurs. We met Kenneth Lo once at a garden party when I was about six. Dad didn’t stop talking about it for weeks.

While most wing recipes you’ll find will have you grill or fry the wings so they are crisp, this Chinese method will have you simmering them in an aromatic, savoury sauce. You’re best off eating these with a knife and fork; fingers will be a bit messy. The popularity of chicken breasts and legs, all neatly pre-jointed, means that there are a lot of surplus wings kicking around out there, and you’ll likely find that you can buy them very cheaply (I prefer the butcher’s wings to the boxes from the supermarket, because I’m more confident about their origin) – this is a good budget dish for the end of the month.

I like to remove the wingtips, which don’t yield any meat, with a pair of poultry shears, and use them to make stock. This isn’t absolutely necessary – if you’re in a hurry, leave yours on. And although my Dad would use a wok to make this, I find a large casserole dish a bit easier, not least because it’s an even depth and comes with a lid.

To serve two, you’ll need:

800g chicken wings
1 teaspoon sugar
½ teaspoon freshly ground black pepper
½ teaspoon salt
2in piece of ginger
2 cloves garlic
12 spring onions, chopped and separated into green and white parts
75ml sesame oil
100ml soy sauce
Water
2 teaspoons cornflour
Groundnut oil to fry

Half an hour before you start to cook, sprinkle the salt, pepper and sugar over the chicken wings, mix well, and set aside.

Heat a couple of spoonsful of oil in your pan, and brown the wings on each side. You may need to do this in a few batches, depending on the size of your pan. When they are browned, return them to the pan with the chopped garlic, the ginger, cut into coins, and the white part of the spring onions. Keep stirring carefully for a minute until the garlic, ginger and onions start to give up their aroma – be careful not to break the skin on any of the wings.

Pour over the sesame oil and soy sauce, and reduce the heat to a low flame. Add water to cover the wings, stir to combine everything, and bring slowly to a simmer. Put a lid on the pan and cook, stirring occasionally, for 12 minutes.

Combine the cornflour with a little cold water. Remove the lid and stir the cornflour mixture through the dish. Continue to simmer until the sauce thickens. Stir through the green part of the spring onions, reserving a little to scatter over the finished dish, and serve with steamed rice and a stir-fried vegetable.

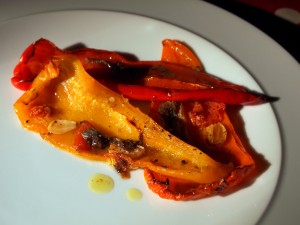
Piedmont peppers

Piedmont peppersThis recipe is based loosely around an Elizabeth David one my Mum used to serve up regularly as a cold antipasto when my brother and I were tinies. We couldn’t get enough of it, and I know he has his own version of the recipe too.

These peppers must be served at room temperature, when they are, unaccountably, much sweeter and juicier than they are when warm. The original version calls for bell peppers, but I’ve found that pointed Romano or Piquillo peppers tend to contain more in the way of fruit sugars and taste far better. (It goes without saying that the peppers you choose should be ripe – red, orange and yellow ones are all find, but avoid the green peppers when you go shopping.) If you have guests whose stomachs are made sensitive by peppers, advise them to peel the indigestible skins off before they eat, which should prevent any upsets.

This is a recipe it’s worth trying out on anchovy-haters, several of whom I’ve brought round using these peppers – not necessarily to a whole-hearted embracing of the anchovy, but at least to a whole-hearted embracing of it in this particular dish. The final result isn’t a fishy one, rather a deeply savoury, umami dish, full of sweet and buttery juices (you’ll use a lot of butter here – it’s worth it) to dip some good crusty bread into. If you love the sweet, fruity bite of a roast pepper (god knows, I do), you’ll find this is one of the best ways to showcase that flavour.

To prepare six peppers as an antipasto (how many you’ll eat depends on how much else you prepare, but you’ll find these disappear quickly) you’ll need:

6 Romano or Piquillo peppers
12 anchovies
3 plump tomatoes
6 plump cloves garlic
100g butter
olive oil to drizzle
Salt and pepper

Preheat the oven to 180°C (350°F). Cut the peppers in half lengthwise, discard any seeds, and chop each half into half again across the short edge. Lay the peppers out in a large baking tray (use two if you have to), the skin side down.

Chop the tomatoes into quarters and put a piece in each little pepper boat. Cut each clove of garlic into four fat slices and put one in each pepper, along with half an anchovy fillet. Cut the butter into small pieces and scatter them all over the dish. Sprinkle everything with a generous amount of salt and pepper, drizzle a few tablespoons of olive oil over the whole dish and put everything, uncovered, in the oven for between 45 minutes and an hour until the edges of the peppers are browning. (The cooking time is imprecise here because a riper pepper will cook faster than a less ripe one – I find this recipe performs differently at different times of year and with different peppers, so you’ll have to use your judgement here.)

Remove the dish from the oven and leave it on the side, covered with a teatowel, until the peppers are at room temperature. Serve with plenty of the juices from the bottom of the dish drizzled over, and lots of crusty bread to soak them all up.

Game chips

There are occasions on which a roast potato will not do. (I’ll admit that these occasions are few.) For those days, these game chips are very easy to make, deliciously crispy, and packed with flavour from crispy garlic, crushed chillies, and plenty of fresh oregano.

I’ve used smoked Maldon salt here. It’s a relatively recent arrival in UK supermarkets (and I actually saw some speciality delis selling it in Lille, which made me smile), and I’ve been using it in place of ordinary salt in a few recipes. It’s very good here, but if you can’t find some just use ordinary flaky salt. If you can find some, you can make an excellent Martini by adding a pinch of the smoked salt with a teaspoon of lavender honey and a sprig of lavender to a couple of shots of iced Grey Goose.

To serve two as a generous accompaniment, you’ll need:

4 good-sized King Edward potatoes
1 large handful (about 20g) oregano
2 large pinches (use all your fingers when you pinch, not just your forefinger) smoked salt
1 teaspoon crushed Italian chillies
4 fat cloves garlic
Pepper to taste
Olive oil

Pour a generous amount of oil (enough to cover the bottom) into your largest frying pan. Slice the potatoes into eight wedges each. Bring the oil up to a high temperature and lay the potatoes in the pan for about 10-15 minutes, until they are turning gold and crisp. Flip them over and cook them on the other side for another 10-15 minutes.

While the potatoes are cooking, chop the oregano finely and crush the garlic. As always, I’d recommend you use a Microplane grater to deal with the garlic – it’s the fastest, most mess-free way I’ve found to reduce garlic to a pulp, and you won’t get the stringy bits you get with a dedicated garlic crusher.

When the potatoes are crisp and gold on both sides, stir the garlic through them vigorously with a wooden spoon or spatula, until the sticky garlic is distributed properly throughout the pan. Keep moving it around the pan with your spoon until it too is golden – the crispy garlic bits should adhere nicely to your potatoes. Scatter over the chilli, salt and some pepper straight from the grinder, then the oregano. Toss with your wooden spoon and serve immediately. Hopelessly easy, and much nicer than a chip.

I rather like these game chips drizzled with a bit of lemon juice.

Bagna cauda

A miracle! The English summer actually seems to be taking itself seriously this year – we have blissy sunshine, bone-loosening heat and, in my village at least, a lovely smell of hay in the air. These conditions do not lend themselves well to lots of roasts and meaty things, so I looked to Provence and Piedmont for today’s recipe – a bagna cauda, rich with garlic and anchovies, for dipping hunks of bread, crudités and hot, steamed artichoke petals into. (There have been some fabulous and enormous artichokes kicking around the market in Cambridge this week – if you’re local, go and grab a few now.)

This bagna cauda has a texture a lot like mayonnaise, and it’s made in a similar way, but without any eggs. (The proteins in the cooked garlic and anchovies help to emulsify the oil and butter in the way that an egg yolk does in mayonnaise.) Like mayonnaise, it keeps well in the fridge and works amazingly well in sandwiches, so if you don’t polish off the whole lot in one go, just treat it as a flavoured mayo for next week’s packed lunches.

To make enough to serve six as a robust dip with bread, carrots, cauliflower, peppers, tomatoes, artichokes, asparagus, new potatoes…or anything else you can think of, you’ll need:

1 fat bulb garlic
Milk
1 tin anchovies
300ml extra-virgin olive oil
350g unsalted butter

Start by peeling the garlic. Choose the sweetest, fattest kind you can find – the Really Garlicky Company grow Porcelain garlic, which I think is the among the most reliable and delicious in the UK. They supply Waitrose, but if you don’t have a local branch, they also sell their garlic online. Pop the peeled cloves in a little pan, cover them with milk and simmer for ten minutes, until the garlic is soft and cooked through. Discard the milk.

Put the anchovies in a bowl with a cover and nuke in the microwave for 45 seconds. They should cook down to a paste. Scrape the anchovies into a saucepan (not the milk pan, which will have milky bits stuck to the bottom) with the garlic, and use the back of a fork to squish them together.

Chop the butter into little cubes about the size of the top joint of your thumb. Put four of the cubes into the saucepan with the garlic and anchovy mixture, and turn the heat on as low as possible under the pan. As soon as the butter starts to melt, start to whisk the contents of the pan with a balloon whisk. When the butter cubes are nearly melted, add four more, still whisking, and continue until all the butter is incorporated. As you continue to whisk, drizzle the olive oil very gradually into the warm mixture as if you were making mayonnaise. Eventually, you’ll have a thick, glossy bagna cauda. Remove to a bowl, plonk it down in the middle of the table, and get dipping immediately.

Portobello and prosciutto open sandwich

A quick and dirty supper dish: with the help of a food processor, this one will only take you half an hour to make. I’ve set fat Portobello mushrooms, roasted with a garlic and herb butter and covered with crisp crumbs, on top of sweet slices of brioche, with a few paper-thin slices of prosciutto draped over the top. Easy as anything, and cooking mushrooms like this really brings out their curious meatiness.

I’ve used panko breadcrumbs, which are gorgeously malty and crisp, to add some crunch to the mushrooms while soaking up some of the herby, buttery juices. If you can’t find any, just use some crumbs you’ve whizzed up from stale slices of bread in the food processor.

Look to serve each diner two open sandwiches. For each sandwich, you’ll need:

1 plump Portobello mushroom
1 clove garlic
1 small handful (15g) parsley
1 small handful (15g) chives
1 small handful (15g) oregano
30g salted butter
1 tablespoon lemon juice
1 teaspoon Japanese panko breadcrumbs
1 thick slice brioche (make sure you get a variety without vanilla essence)
2 slices prosciutto
Salt and pepper
Dijon mustard to spread

Preheat the oven to 200°C .

Put the herbs, garlic, butter and lemon juice in the bowl of the food processor and whizz until everything is chopped and blended with the butter. Place the mushrooms, gill side up, in a baking tray, and dollop the herb butter mixture evenly on them. Season with salt and pepper and sprinkle with the panko crumbs, and roast for 20 minutes.

Toast the brioche and spread each slice with a little Dijon mustard. Lay a roast mushroom on top, drizzling over some of the pan juices, and top with two paper-thin slices of prosciutto. This is oddly delicious with a very cold glass of Pinot Gris.