While recovering from flu, I’ve found myself turning to the wok even more than usual. It’s the perfect cooking implement when I’m feeling under the weather; there’s not too much washing up, you can get dinner on the table very quickly (you should be able to prepare this stir fry in under half an hour). Stir frying invites the use of powerful aromatics and savoury, fiery ingredients like soy and the chilli bean sauce I’ve used below – just what you need if you’re feeling a bit bunged up.
If you’re in a Chinese restaurant in the UK, you’re most likely to see cashew nuts paired with chicken. I prefer them with pork, which gives you a denser and more interesting flavour, and to my mind works much better with the sweet cashews. You’ll need raw, unsalted nuts. Most supermarkets seem to sell them these days, but if you can’t find any there, your local health food shop should stock them.
To serve three, you’ll need:
500g pork fillet
75g raw, unsalted cashew nuts
10 spring onions
3 tablespoons Chinese rice wine
2 tablespoons light soy sauce
1 tablespoon chilli bean sauce (I like Lee Kum Kee’s sauce, which you’ll be able to find in any oriental grocer)
2 fresh red chillies
1 tablespoon caster sugar
1 tablespoon sesame oil
1 teaspoon cornflour
2 tablespoons ground nut oil
Salt and pepper
Chop the cylindrical pork fillet into bite-sized slices measuring about 4 cm by ½ cm. Put the slices in a bowl and stir in 1 tablespoon of the rice wine, 1 tablespoon of the light soy sauce, the sesame oil, the cornflour, a large pinch of salt and several grinds of the peppermill until everything is well mixed. Leave to sit on the working surface to marinade quickly 15 minutes while you put together the rest of the ingredients and have a cup of tea.
Cut the white parts of the spring onion into thin coins, and put in a bowl. Chop the green parts finely and set aside. Chop the chillies finely, and make sure that the other ingredients are all within easy reach of the stove top.
Heat the oil to a high temperature in your wok, and stir fry the pork for three minutes. Remove the pork to a bowl with a slotted spoon. Add the cashew nuts to the wok and stir fry until they are turning gold (about one minute). Now add all of the other ingredients except the green parts of the spring onions. Return the pork to the pan and stir fry everything for another two minutes. Serve immediately, sprinkled with the green parts of the spring onions.
I’ve held off for couple of weeks post-Christmas on this, because I am assuming that today is approximately the day when most of you will be getting sick of your New Year’s resolution to avoid crispy skin, potatoes softened beautifully with goose drippings, and tender forkfuls of breast meat. Everybody else should herewith bookmark this page for Christmas 2011, by which time things festive will no longer cause your gorge to rise.
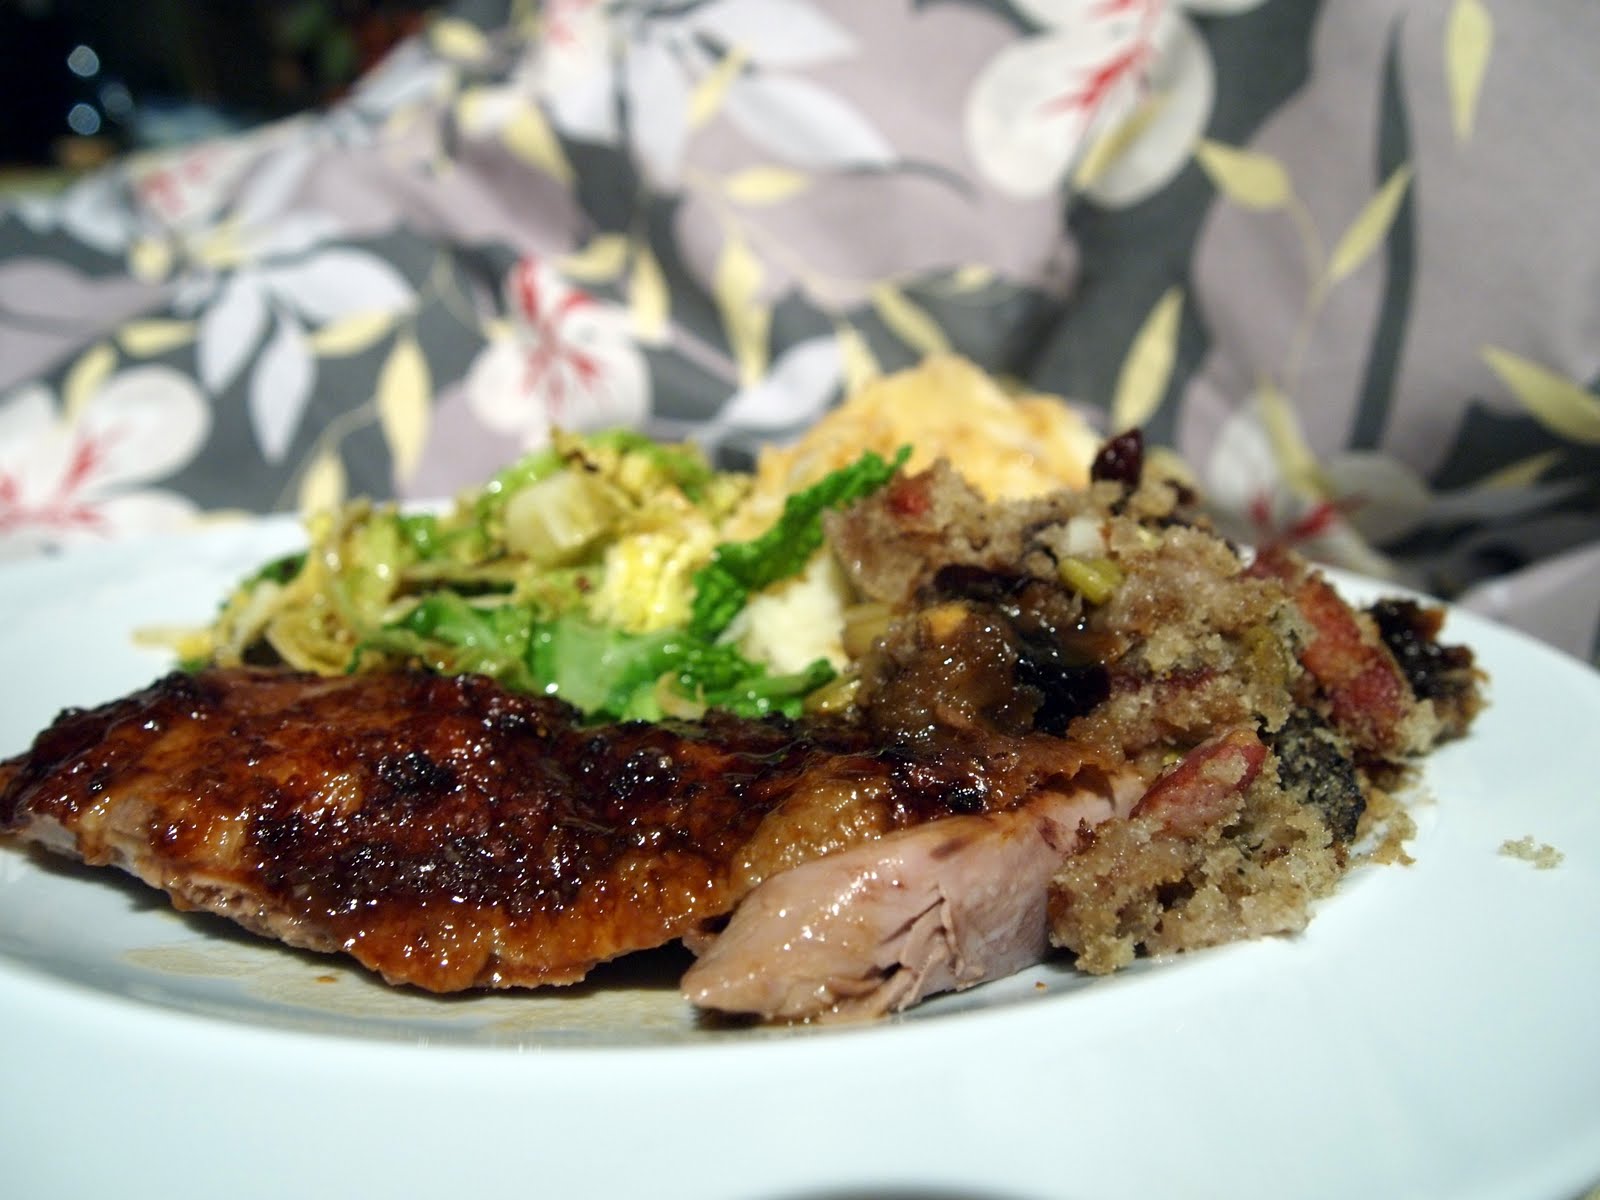
A goose this large will feed six or more, although you won’t have the great buckets of leftovers that turkeys generate. (All the better, to my mind.) And it turned out superbly; I’m not sure whether this goose or the obscenely juicy brined turkey from Christmas 2008 would win in a fight. Our goose was tender and moist, filled near unto bursting (you can see the straining of the gap where it was sewed shut in the picture) with one of the best stuffings I’ve ever made, all wrapped up in a golden, crispy skin. If you do end up cooking this for a family occasion, you’ll also find yourself the proud possessor of a massive tub of goose fat to pop in the fridge. My Mum suggested turning it into a fatball for the poor starving robins in the snow. I said pshaw, and chilled it in jam jars for future potatoes.
Geese were, of course, the upper-class Christmas comestible of choice in England until being supplanted by the filthy heathen turkey from America, which Dickens did a lot to popularise by putting one on the Cratchit’s table. Medieval swanks would spend a day’s wages on a fat goose (and they are fat, even if not raised for foie – be sure to remove the lumps of poultry fat from the body cavity before you begin cooking, and render them down in a pan over a low heat for the lovely drippings), which they would roast on a spit over a fire, the skin coloured with saffron in butter for a chi-chi golden tone. The goose tradition carried on until Dickens all but killed it with A Christmas Carol. These days, we all have ovens, and you can buy Heston’s gold leaf at Waitrose instead and poke at it gently all over the bird with a soft brush, if your family is the sort that really needs impressing, but I think the skin is perfectly golden enough if you cook it using the method below.
Potato stuffing is the perfect choice for a bird as fatty as a goose. Use a fluffy, floury potato; I chose King Edwards. The potato will soak up the bird’s delicious juices in a way that will astonish you, and takes on flavour from the sage, onion and pancetta it’s mixed with, which flavours also impregnate the flesh of the goose. A couple of sweet eating apples cut into small chunks and stirred into the mixture will collapse on cooking to give the whole stuffing a very gentle background sweetness which is glorious against the rich meat. Buy the best goose you can afford; the way your bird is raised, killed and butchered really does make a difference. We had a beautiful free-range goose, good-smelling even when raw, from Franklin’s Farm, which supplies my parents’ local farmers’ market.
To serve about six people you’ll need:
A goose weighing between 5 and 6kg
1 kg King Edward potatoes
100g pancetta
100g butter
3 onions
2 Granny Smith apples
3 bay leaves
1 teaspoon thyme leaves
Leaves from 1 stalk fresh rosemary
1 large handful (about 25g) sage leaves, chopped finely
1 teaspoon salt
Sauteeing stuffing ingredients
Your goose should start off at room temperature, so make sure it’s out of the fridge for long enough to lose any chill.
Peel the potatoes, chop them into pieces about 1 inch square, and simmer them until soft (about ten minutes from the time they come to the boil if you start them off in cold water). While the potatoes are cooking, peel and core the apples, and chop them into small pieces. Peel and dice the onion.
Melt the butter in a large, heavy frying pan, and saute the onion, apple and pancetta together with the thyme and bay until the onion is soft and sweet, but not coloured (about 8 minutes – see the picture for the sort of texture you’re aiming for). Remove from the heat to a very large mixing bowl with the buttery juices.
When the potatoes are soft, drain them and add them to the mixing bowl with the rosemary, sage and salt. Stir the stuffing mixture well to make sure all the ingredients are blended.
Remove any poultry fat from inside the bird’s cavity – if you’re lucky there should be at least a couple of fist-sized white chunks in there. You can use scissors to snip it into pieces and dry-fry it over a low heat to render it down for a jar of goose fat for the fridge if you like. It goes without saying that you should remove the packet of giblets too – if you want giblet stock, simmer them without the liver (which does not make good stock) in some water. You can use that liver – my Dad and I have a bit of a tradition of chopping it up and cooking it along with some good curry paste in a little bowl sat in some water, covered with some tin foil, then spreading it on toast for Boxing Day breakfast.
Heat the oven to 225ºC.
Spoon all of the stuffing into the bird, and use stout cotton and a thick needle to sew the gap shut. If you can’t face it, you can also use skewers to secure it, but this will be much less neat. Weigh the stuffed bird and put it on a rack in a large baking tray.
Cook the goose at 225ºC for half an hour, then bring the heat down to 180ºC, taking the opportunity to pour off the fat that will have rendered out of the bird in that first hour – save it for spuds. After the initial 30 minutes at 225ºC, cook the goose at 180ºC for 30 minutes per kg stuffed weight, pouring off the fat regularly.
Check that the juices run clear by poking a skewer behind the thigh. The juices should run clear. Rest the goose for ten minutes before carving.
I’m blogging from my new MacBook Pro, an anniversary present from the inestimable Dr W. I’m still getting used to it; there are all kinds of PC keyboard shortcuts hard-wired into my brain that I’m having to relearn, and I don’t have any photo-editing software on here yet. In short, if anything looks a bit funny in today’s post, please be gentle with me – things should be better next week when I’ve got to grips with the various things the command button does!
Is there anybody out there who doesn’t love a big chunk of well-aged, grass-fed roast beef? This joint was a present from my in-laws, who have amazing taste in gifts. It’s from Lishman’s butcher’s in Ilkley, and had been sitting in the freezer for a few months, waiting for the weather to turn in a roasty direction.
If you’re not into turkey at Christmas, a beef rib is a fantastic substitution; it’s traditional but rather special, and there are very, very few Brits of a certain age out there who don’t have happy childhood memories of family occasions centred around a pre-BSE joint. To my mind, it’s the best of the roasting joints; the meat is rich and savoury from its proximity to the bone, and there’s a perfect amount of fat for lubrication and flavour in there. As a rule of thumb, you can count on each rib in the joint being sufficient to serve two people, so it’s easy to work out how large a chunk of meat to buy. I like to cook a rib nice and rare; if your uncle Bert likes his meat cooked until there’s not a trace of pink, just give him a slice from one end of the joint.
The gravy I served with this is a bit special; it’s intensely dense and savoury, and rich with the flavour of red wine and caramelised onion. Don’t use one of those undrinkable £3 bottles marketed as cooking wine here; while I don’t want you raiding the cellar for the Burgundy your Dad laid down in the 1980s, you should make this gravy with something you’d be happy to drink. If you can get hold of some real beef or veal stock made with a roasted bone, that’ll be fantastic here. The gravy has so much other flavour supporting it, though, that you can happily use some decent chicken stock instead. (And your freezer is full of home-made chicken stock, right?)
I served this with a huge, rustling pile of roast potatoes and parsnips, and a shredded spring cabbage sauteed in a little butter with some peeled chestnuts; these are all great for soaking up the gorgeous gravy. To roast a rib of beef rare (add five minutes per 500g if you want it medium, and ten if, for some unaccountable reason, you want it well-done), you’ll need:
Beef A rib of beef
1 teaspoon salt
1 teaspoon mustard powder
1 teaspoon plain flour
Gravy
1 red onion
250ml red wine
1 tablespoon balsamic vinegar
300ml good beef or chicken stock
2 tablespoons plain flour
Juices from the joint
Salt and pepper to taste
Roast beef
Take the beef out of the fridge in plenty of time, so it’s at room temperature when you come to cook it. Preheat the oven to a blistering 240ºC (460ºF). Pat the joint dry with kitchen paper. Mix the salt, flour and mustard in a small bowl, and use your fingers to rub the mixture all over the fatty surface of the joint.
Put the beef in a roasting dish and slide it into the oven for an initial 20 minutes, then bring the temperature down to 180ºC (360ºF) and cook the joint for 15 minutes per 500g. (See timings above for a medium or well-done roast.)
While the rib is cooking, start on the gravy. Slice the onion finely, and fry it in a little beef dripping (goose fat is good if you don’t have any) until it starts to brown. Tip the balsamic vinegar into the pan and cook, stirring, until the onions start caramelising and the mixture becomes sticky.
Pour the red wine over the onions and bring to a simmer. Add the stock, bring back up to a simmer and allow the whole thing to bubble away gently with the lid on for half an hour. Remove from the heat, and strain the contents of the pan through a sieve into a jug. Discard the onions, which will have given up all their flavour, and leave the jug to one side until the beef is finished.
When the beef is ready to come out of the oven, remove it from the roasting pan to a warmed dish in a warm place to rest for 20 minutes, covered loosely with a piece of tin foil. This will give you time to finish up the vegetables and finish the gravy while the muscle fibres in the meat relax and the juices start to flow. Finish the gravy by putting the roasting pan you cooked the meat in on the hob over a medium flame. Sprinkle the flour into the pan and use a whisk to blend it well with any flavour-carrying fat from the joint. Pour a ladle of the stock from the jug into the pan and whisk away until everything is well blended, scraping at the sticky bits on the bottom. Repeat, a ladle at a time, until everything is combined, then return to a saucepan and simmer away without a lid for five minutes, stirring as you go, before tasting to adjust for salt and pepper, and transferring to a gravy boat just in time to serve up the whole roast.
Where other children were visited by fairy godmothers bearing gifts of grace and beauty; the art of detecting peas beneath mattresses; the ability to walk in high heels for more than five yards without getting one stuck in the space between two pieces of pavement; and all that glamorous jazz, mine found that her bag was empty but for the gift of making really terrific crackling. (Seriously. It wins competitions and everything.)
I’m not complaining. It’s better than it could have been; I’ve one friend who swears her only skill is the tidy folding of a broadsheet newspaper once read.
This recipe is reliant on your getting your hands on a really good piece of pork belly, properly reared, and striped thickly with fat. It doesn’t matter whether your piece has attached bones or not, but do try not to use a supermarket slab of meat; the flavour will be much better with a butcher’s belly from a pig raised responsibly, and you’ll probably find the joint will be drier, crackling more effectively. Cooked slowly for several hours, the pork bastes itself from within, leaving you with a gorgeously dense, flavoursome and moist finish.
I’ve used the tomato sauce than I made in a few enormous batches and froze at the end of the summer here, with some additional cream and herbs. If you don’t have any sauce you’ve made and frozen yourself, substitute with a good sun-dried tomato sauce in a jar.
To serve four, you’ll need:
1.5kg pork belly
1 small handful thyme stalks (about 20g, if you’re counting)
1 small handful fresh rosemary
4 bayleaves
100g stupendous tomato sauce, or sun-dried tomato sauce in a jar
3 tablespoons double cream
1 medium celeriac (larger celeriacs can be woody)
1 large handful parsley
2 banana shallots
1 tablespoon butter
Plenty of salt and pepper
Preheat the oven to 140ºC (290ºF). Make sure the skin of the pork is scored properly in regular lines penetrating into the fat but not into the meat, and that it is absolutely bone-dry. Rub the pork all over with a couple of teaspoons of salt, making sure that plenty gets into the scored lines on the skin. Season with pepper, and sit the belly in a roasting pan on top of the thyme, bay and rosemary, reserving a bayleaf and a stalk of the thyme and rosemary to use in the sauce later.
Put the roasting pan in the middle of the oven, close the door and ignore the pork for four hours. Towards the end of the cooking time, cut your celeriac in quarters, peel them with a knife (this is far easier than trying to peel a whole celeriac), and grate them on the coarse side of your box grater. Slice the shallots finely and mix them with the grated celeriac in a bowl.
When the pork has had four hours in the oven, the top will have softened but not crackled. Still in the roasting dish, put the pork about four inches beneath a hot grill. The skin will start to bubble and crackle. Keep an eye on things; once crackled, the skin can burn easily. If you find that one side of your joint is crackling and ready before the other, put a piece of tin foil over the area that has crackled to prevent it from burning. Once the crackling is even, remove the dish from the grill and leave it to rest in a warm place while you prepare the sauce and celeriac.
Sauté the celeriac and shallots in the butter for about eight minutes until soft and sweet. Stir through the parsley and season with salt and pepper. While the celeriac is cooking, bring the tomato sauce up to a gentle simmer with the herbs you reserved earlier, then stir through the cream with any juices from the pork.
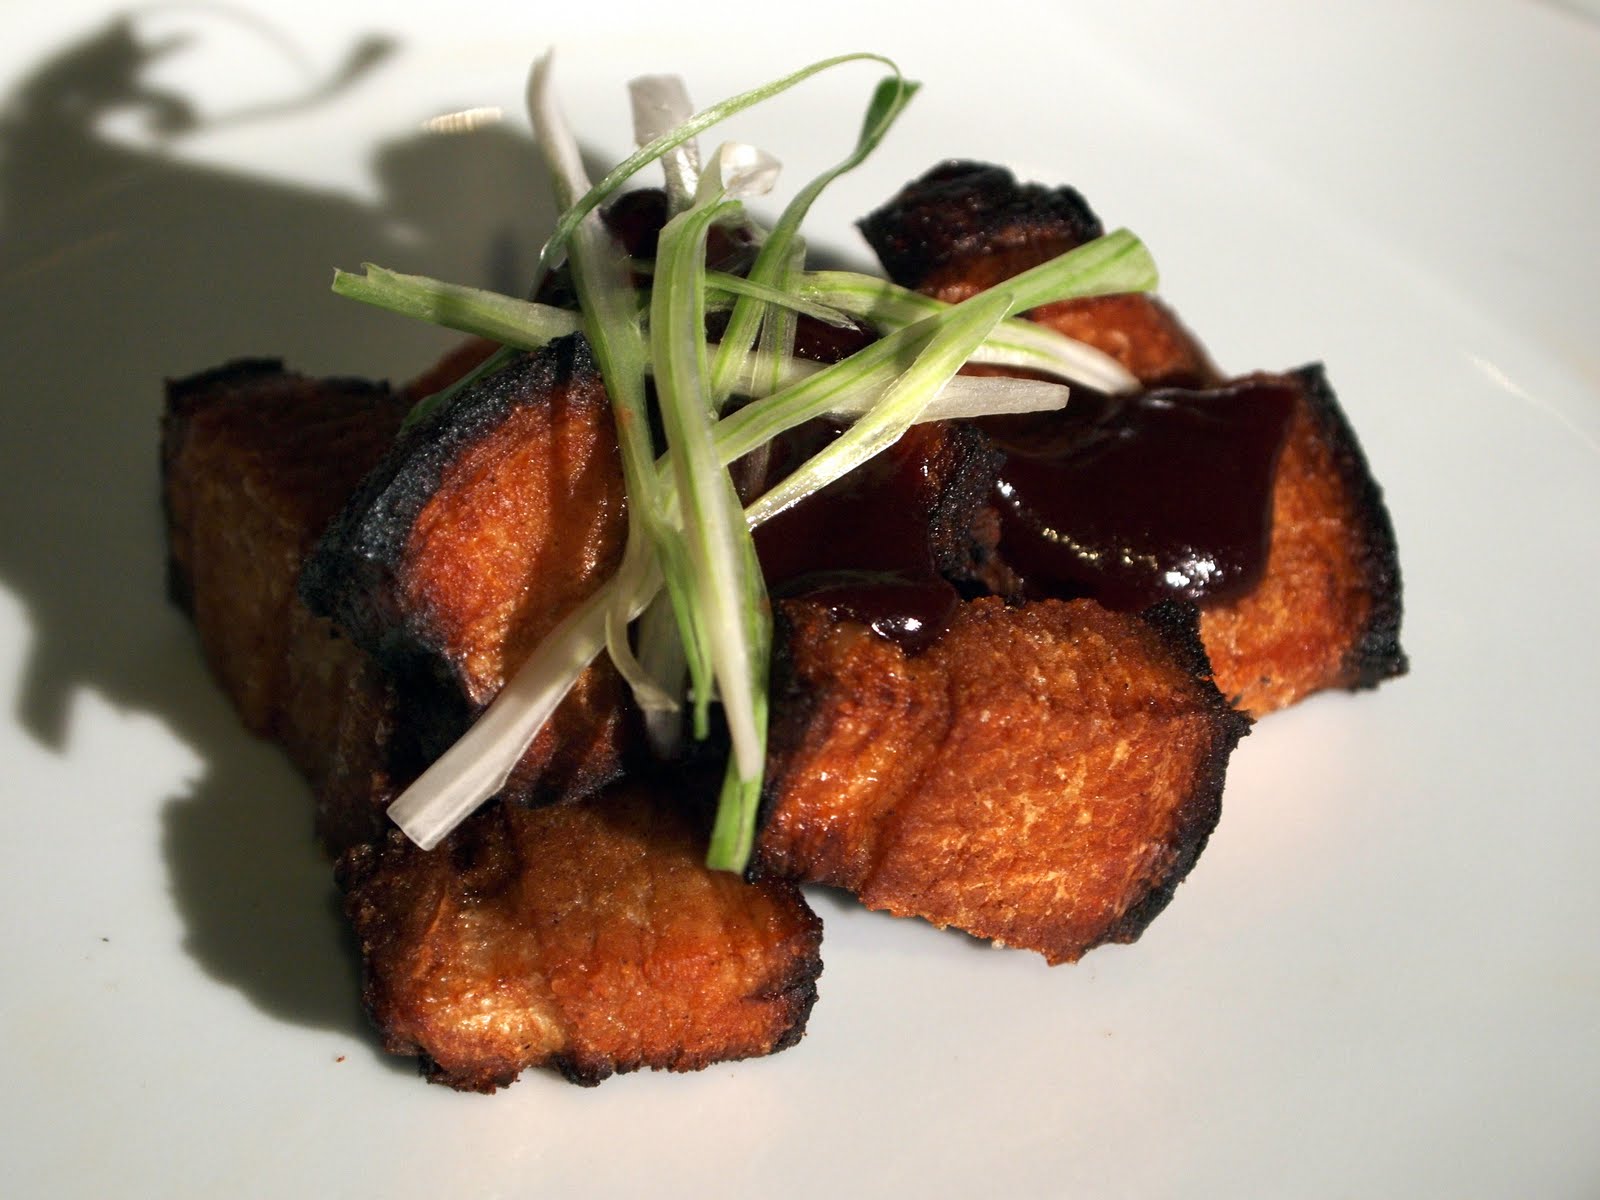
Pop a pastry cutter onto each plate, and use it as a template for a serving of celeriac. Top off with some of the herby, velvety pork meat, and a generous slab of crackling. Spoon over some of the sauce and serve.
I’ll be frank here: my fear of caramel can’t really be described as healthy. I’m scared silly of the stuff and won’t cook it without gauntlet oven gloves, my biggest pair of glasses, an apron and long sleeves. So I like to think of this recipe as a sort of delicious therapy – and it tastes so good that I’m finding myself forced to cook it regularly. (Mostly by Dr W, who likes it so much that he’s insisted we have it again tonight.)
This way with caramel is a traditional Vietnamese saucing. You’ll end up with a surprisingly low-fat dish which, just to scotch any diet ambitions you had, contains five tablespoons of sugar. The caramel itself is available as a ready-made sauce in bottles in Vietnam, but if you’re cooking this dish at home you’ll have to make your own. The ready-made caramel will only save about ten minutes of your time, so this isn’t really much of a hardship.
The sauce is sweet, but not overwhelmingly so; with a bowl of white rice, you’ll find the balance between salt from the fish sauce, sweetness from the caramel and sour from the lime juice works beautifully to create a very aromatic, rich sauce. If you’re not a chilli-head, you can reduce the amount in the recipe below – but if you are, you’re in for a treat. This recipe comes together quickly, so make sure all your ingredients are chopped and prepared before you start to cook.
To serve two, you’ll need:
450g pork fillet
5 tablespoons caster sugar
2 tablespoons fish sauce
Juice of 1 lime
10 spring onions, white parts only
3 cloves garlic, crushed
2 bird’s eye chillies, chopped finely
25ml chicken stock
1 teaspoon sesame oil
1 handful fresh coriander (about 25g) and some of the green parts of the onions to sprinkle
Chop the pork into bite-sized pieces, and set aside in a bowl. Chop the spring onions and separate the white and green parts. Crush the garlic (I use a Microplane grater for garlic; it’s quicker, easier and much easier to clean than one of those garlic-squashing devices), chop the chillies, and combine the fish sauce, lime juice and chicken stock in a mug.
Put five tablespoons of sugar in the bottom of a dry saucepan, and place over a medium heat. Keep an eye on the sugar as it turns into caramel without stirring. When all the sugar has melted and is the colour of strong tea, throw the pork into the pan. Stir well to coat the pork as much as you can (the caramel will start to solidify, so you may not be able to coat all the pork), and pour in the wet ingredients. Continue to cook, stirring, for two minutes. The caramel should be dissolving in the sauce; if some solid bits are left at this stage, don’t worry about it. They’ll dissolve into the sauce as the dish continues to cook.
Throw in the spring onions, garlic and chillies with a teaspoon of salt, the sesame oil and a few turns of the peppermill. Stir to combine. Bring the sauce to a simmer and continue cooking and reducing the sauce until most of the liquid has gone, and the pork has a sticky coating of sauce.
Serve the pork over rice with a generous sprinkling of fresh coriander leaves and some of the green parts of the spring onions. This dish works very well with a cooling vegetable stir-fry – look out for a recipe later this week.
I’ve never been completely clear on why we class cheeks, ox and pork both, as offal. There are no interesting organs here; they’re just muscle and fat, like every other cut of meat on the butcher’s counter. Perhaps it’s because they’re from the head of the animal, inciting a squicky reaction in some – a squicky reaction which I can guarantee those same people wouldn’t apply to a sausage, because they’re not very imaginative. The lengthy ban on the sale in the UK of any cuts from the head or on the bone during BSE made this inexpensive cut disappear for several years, which didn’t do anything at all for its popularity when it returned. You may have to order cheeks in specially at the butcher, but he should be happy to help you.
The meat in an animal’s cheek is tender, rich and basted from within with plenty of flavour-carrying fat. The same goes for fish; when I was a kid, uncles in Malaysia taught me and my brother that the finest bit of a large steamed fish is the cheeks, which we’d pop out with chopsticks and fight over. (A fish-head curry is a fine, fine thing.)
I’ve braised this cheek for hours in a very dense stock-based sauce, and sprinkled some crisp crumbs with herbs and lemon zest over to lift the texture and flavour. Eagle-eyed readers will realise that I’ve nicked the star anise idea, which also brightens the flavour profile of this dish very handsomely, from Bob Bob Ricard. The stock you use is very important, and should absolutely not come from a cube. A good home-made beef stock is essential here. You may find some ready-made alongside the dripping at your butcher’s, but it’s worth making a large pot of your own, some of which you can freeze, and including a roasted marrow bone, some shin or some tail to thicken and beef the stock up. (Sorry.)
To serve four, you’ll need:
1 carrot
1 stick celery
1 large onion
4 star anise
2 bay leaves
4 ox cheeks
500ml passata
500ml beef stock
500ml red wine
1 handful (about 25g) tarragon, leaves picked from tough stalks
1 handful (about 25g) parsley
Zest of 1 lemon
250g white breadcrumbs
Olive oil
Chop the onion, carrot and celery into rough dice. In a large casserole with a lid, sweat the vegetables in a couple of tablespoons of olive oil until the onion and celery are becoming translucent, but not taking on colour. Pour over the liquid ingredients and stir well. Slide the ox cheeks into the casserole with the bay and star anise, season generously, and bring to a gentle simmer.
Set the timer to 3 hours, and continue to simmer with the lid off until the liquid has reduced by about half. Pop the lid on and continue to simmer until the timer goes.
While the cheeks are cooking, prepare your crumbs – for maximum crispiness, do it towards the end of the cooking time. In a large frying pan, sauté the crumbs, moving all the time, in two tablespoons of olive oil until they are golden brown. Remove them to a small bowl. Chop the tarragon and parsley finely and zest the lemon. Stir the herbs and zest into the crumbs with a large pinch of salt and set aside until it’s time to serve the cheeks.
Skim any excess fat off the top of the casserole. Remove the star anise and bay, and discard. Use a skimmer or slotted spoon to fish the cheeks out of the casserole and rest somewhere warm while you pass the sauce through a sieve, using the bottom of a ladle to push the soft vegetables through. Bring the strained sauce back to a simmer.
To serve, ladle a generous puddle of sauce onto a plate, sit a cheek in the middle of the puddle and sprinkle the crumbs over the top. Mashed potato is the perfect accompaniment to this rich dish – you’ll need lots to mop up the delicious sauce. I also served some purple sprouting broccoli (it’s that time of year) dressed with lemon juice and butter, and sprinkled with some toasted pine nuts.
It’s that stodge-craving time of year, and very few things fit the bill better than a handsome cottage pie. This one has an intense and rich filling, and it’s blanketed with a generous layer of lovely, fattening mash. (In less apocalyptic weather, I’d use a bit less topping, but right at the moment I am mindfully using mashed potato as internal insulation from the biting cold.)
I’ve used veal mince here, from non-crated calves. It has a lighter flavour than beef, and it’s less fatty, but you can substitute beef mince if you prefer it. The root vegetables add sweetness and earthy depth – this is a wonderfully wintery pie. To serve four, you’ll need:
Filling 450g veal mince 1 large onion 1 large carrot 1 large parsnip 1 tablespoon smoked paprika (use unsmoked paprika if you can’t find any) 2 bay leaves 1 thyme leaves, stripped from stalks 100ml vermouth 2 tablespoons tomato purée 2 tablespoons Worcestershire sauce 200ml good beef stock 2-3 tablespoons olive oil
Mash 800g floury potatoes (I used King Edwards) 150ml whole milk 1 large knob butter Generous grating of nutmeg
Chop the onion, carrot and parsnip into small dice. Take a large, heavy-based pan, and sweat them over a low heat in the olive oil until soft; the onions should be starting to take on some colour. Add the paprika, bay and thyme, and keep cooking, stirring all the time, for two minutes. Tip the meat into the pan and turn the heat up to medium. Stirring and scraping the bottom of the pan all the time, cook until the meat is browning nicely.
Pour the vermouth into the pan and let it bubble up. Add the Worcestershire sauce and tomato puree, then stir in the stock and a large pinch of salt (use all the fingers of your hand to pinch, not just finger and thumb). Bring the mixture up to a simmer and turn the heat down low again. Continue to simmer with the lid on for an hour, then remove the lid and continue to simmer for 20 minutes. Taste and adjust for seasoning.
At this point, you can put the pie filling in the fridge overnight if you have time. As with so many casseroled and simmered dishes, the flavour improves if allowed to settle and develop for 24 hours.
When you are ready to make up the pie, peel the potatoes and cook them as you usually would for mash. When mashing, add the butter, the milk and the nutmeg with a generous amount of salt. Put the filling in a pie dish and spread the mash on top. I like it spread in a sort of thatched roof arrangement, which is pure posing, but does look good. Make sure you mark your topping with a fork – this will ensure you get some nice crispy bits when the pie is cooked.
Bake at 180°C (350°F) for 30 minutes or until golden brown on top.
With what, you say? Bak kut teh. It’s a Hokkien Chinese term which translates roughly as “meaty bone tea”, and it denotes a particular herbal, scenty soup spicing which is traditionally meant to warm you from within. It’s got yang, this stuff. So much so that my mother and brother won’t eat it, because it makes them turn bright red and start sweating.
In a period when my village is only accessible over a hump-backed bridge coated with half a foot of sheet ice (it’s been like this since before Christmas), red and sweating is exactly what I’m after. Hurrah for yang.
You’ll find bak kut teh served regularly in Malaysia and southern China. Bak kut teh mixtures are available in the UK in oriental supermarkets, in sealed packs containing a couple of tea-bag style sachets. These sachets are preferable to the whole spices, which you also see sometimes in neat plastic packs – the whole spices can make your recipe a bit gritty. If you’re making the traditional stew, just pop a bag in a crockpot with some rib bones, simmer for a few hours, and serve with rice or as a noodle soup with a generous slosh of soya sauce. It’s hearty stuff – the traditional mixture includes star anise, angelica, cinnamon and cloves. This mixture is, somewhat eccentrically, close to what you’ll find in a British Christmas cake.
The recipe below is not a traditional use of a bak kut teh sachet, but it’s none the worse for that. Here, you’ll be combining those spices with rice wine, several gloppy Chinese sauces, honey, spring onions and garlic, and using this stock to perfume a slab of pork belly. The belly meat is pressed under weights overnight in the fridge, then chopped and fried in a wok until it’s crispy. I know, I know: but the long simmering will render a lot of the grease out of the meat, and sometimes the weather just calls out for fatsome, sticky pork.
I served mine with some sticky hoi sin sauce to dip, alongside a little of the stock, thickened with cornflour, to moisten the rice we ate with it. Hang onto the stock – you can freeze it and treat it as a master stock. I poached a couple of hams in mine, leaving them spiced and savoury but not overtly Chinese-tasting; it’s back in the freezer now, and I have plans to poach a chicken in it next. This procedure may sound overly parsimonious to those used to stock cubes, but it’s a method that produces a stock with an incredible depth of flavour, and you can keep using it indefinitely as a poaching liquid, adding a bit more water or wine and some more aromatics every time you cook, and making sure that every time it comes out of the freezer the stock gets boiled very thoroughly. There are restaurants in Hong Kong which claim that their master stock has been on the go for more than a hundred years.
To poach one boneless pork belly (enough for four, but be warned, this is very moreish) you’ll need:
1 boneless pork belly, with rind 1 bak kut teh sachet Water to cover the belly (about a litre) 150ml Chinese rice wine 5 tablespoons light soy sauce 3 tablespoons dark soy sauce 3 tablespoons oyster sauce 2 tablespoons hoi sin sauce 3 tablespoons honey 2 anise stars 1 bulb garlic 6 spring onions, tied in a knot Groundnut oil to fry
Stir the liquid ingredients together in a saucepan that fits the pork reasonably closely, and slide the pork in with the star anise, garlic and spring onions. Bring to a gentle simmer, skim off any froth that rises to the surface with a slotted spoon, cover and continue to simmer gently for two hours.
Remove the pork from the cooking liquid carefully and place it on a large flat dish with high enough sides to catch any liquid that comes out of the meat as you press it. Strain the poaching liquid if you plan on using it as a master stock. Place a plate or pan lid large enough to cover the whole belly on top of the meat (the skin side) and weigh it down. I used a heavy cast-iron pan lid and all the weights from my kitchen scales. Cover the whole assembly with a teatowel and leave it in the fridge for 24 hours.
When you are ready to eat, remove the pressed meat to a chopping board and use a sharp knife to cut it into bite-sized pieces, about 2cm square. Bring about 5cm depth of groundnut oil to a high temperature in a wok, and fry the pieces of pork in batches of five or six pieces until golden (this should only take a couple of minutes per batch). Serve with shredded spring onion and some hoi sin sauce with steamed rice and a vegetable.
I’ll admit it – one of the motives in coming up with this recipe was in ensuring that the first word I typed on Gastronomy Domine in 2010 could be “Spatchcocked”, a word which hasn’t got any less fun since I last typed it.
It being just after the festive season, the shops are still full of meats a little beyond the ordinary, so my local supermarket has shelves full of lovely fatty bacon collars (three are in the fridge at the moment, waiting for a little boiling swim in some Chinese aromatics which will turn them into interesting hams); veal mince (superb in a cottage pie); turkey crowns (I walked straight past these grimacing); pheasant and venison mixtures for stewing; and poussins, ready-spatchcocked.
I really enjoy cooking a bird prepared like this. Cooking times are reduced massively by flattening a bird out, so the meat can be passed very quickly under the grill, leaving you with wonderfully moist meat. If your poussin hasn’t been spatchcocked, it’s very easy to do it yourself – there are instructions here for spatchcocking a full-sized chicken.
I just couldn’t bring myself to go outside into the freezing winter with the barbecue, so I’ve cooked this under the conventional grill rather than over charcoal. If you’re in a position to use charcoal here, please do – it’ll be delicious.
Reckon to serve one poussin per person (try saying that after a glass of post-festive Prosecco – incidentally, Prosecco is a very nice match to this dish with its Italian aromatics). Some packaging will suggest that one bird will serve two. It won’t. They’re small, they’re bony and they’re fiddly to eat. Much better to serve a generous whole poussin to each person than to find yourselves squabbling over too little food. To marinade two flattened-out baby birds, you’ll need:
75ml extra-virgin olive oil Juice and zest of 2 lemons 1 bunch (about 15g) fresh oregano, chopped finely 3 tablespoons capers, chopped finely 4 fat cloves garlic, crushed 1 heaped teaspoon Italian chilli flakes (use more or less according to how spicy you fancy it) 1 teaspoon salt A generous grinding of pepper
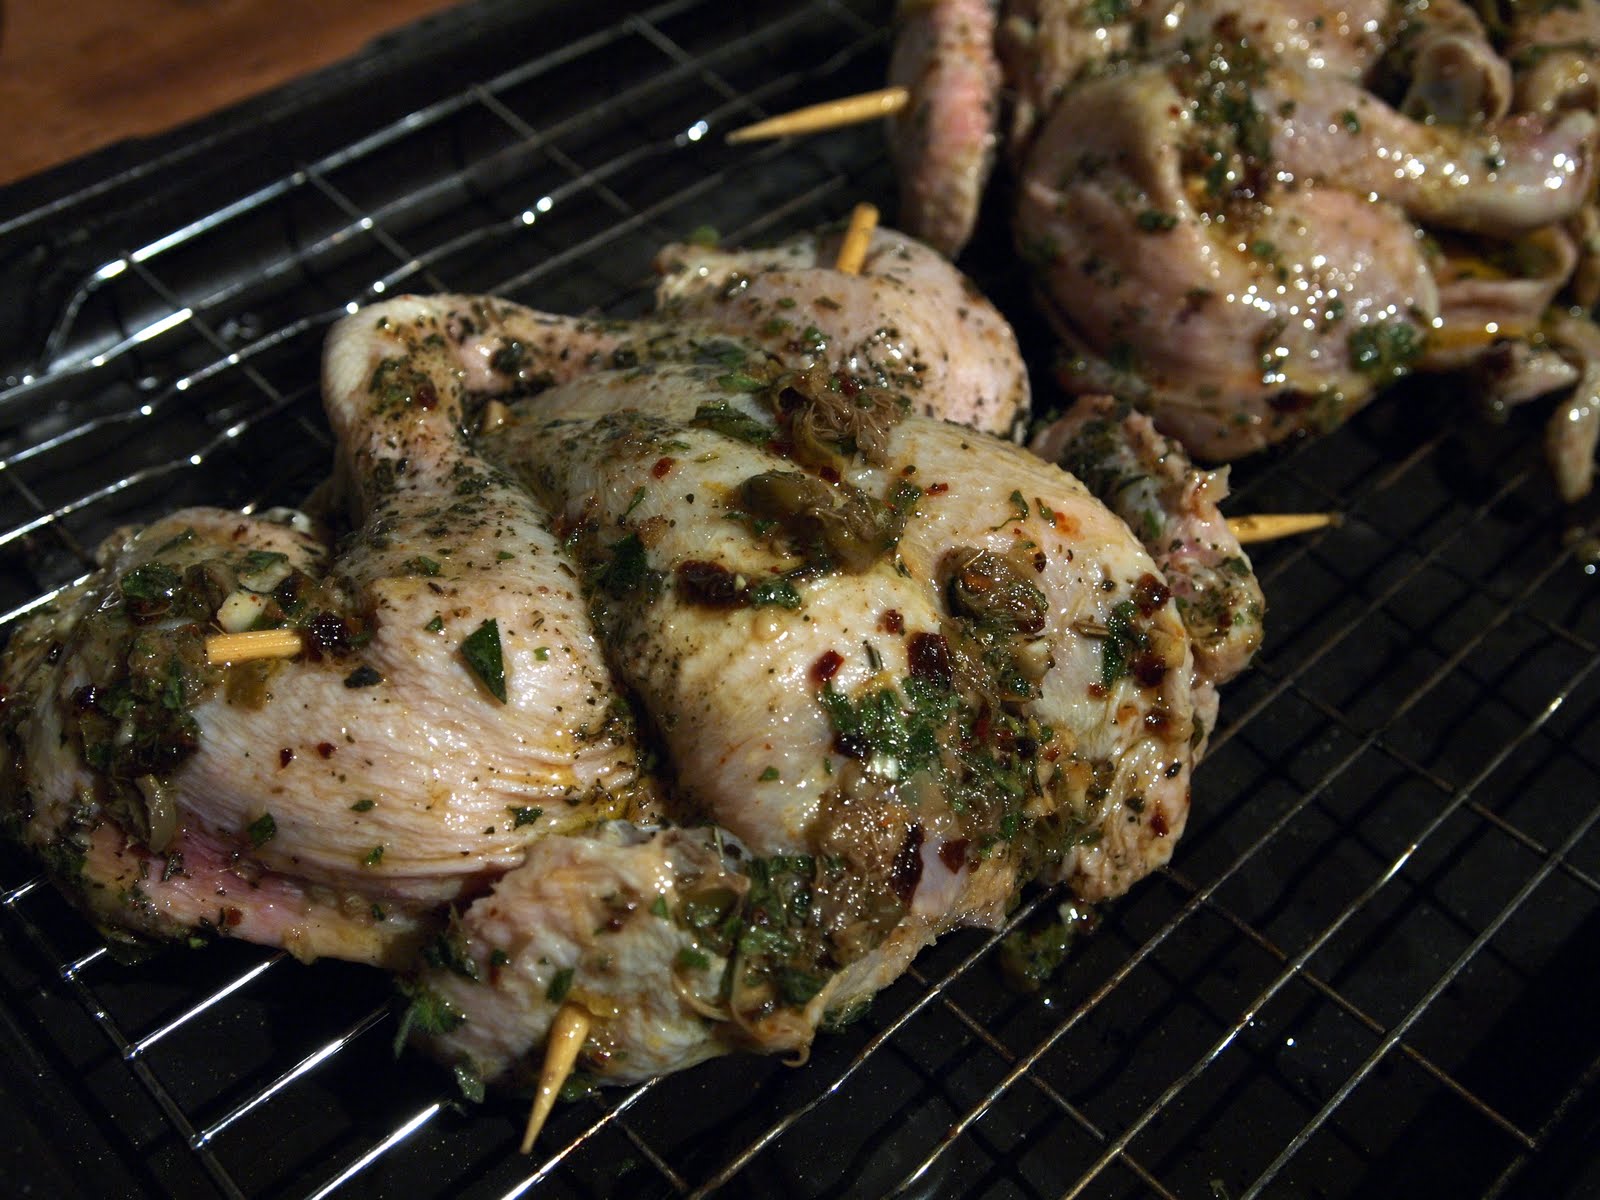
Mix all the marinade ingredients and smear them all over the poussins in a large bowl. Refrigerate for 24 hours with a cover, turning a few times.
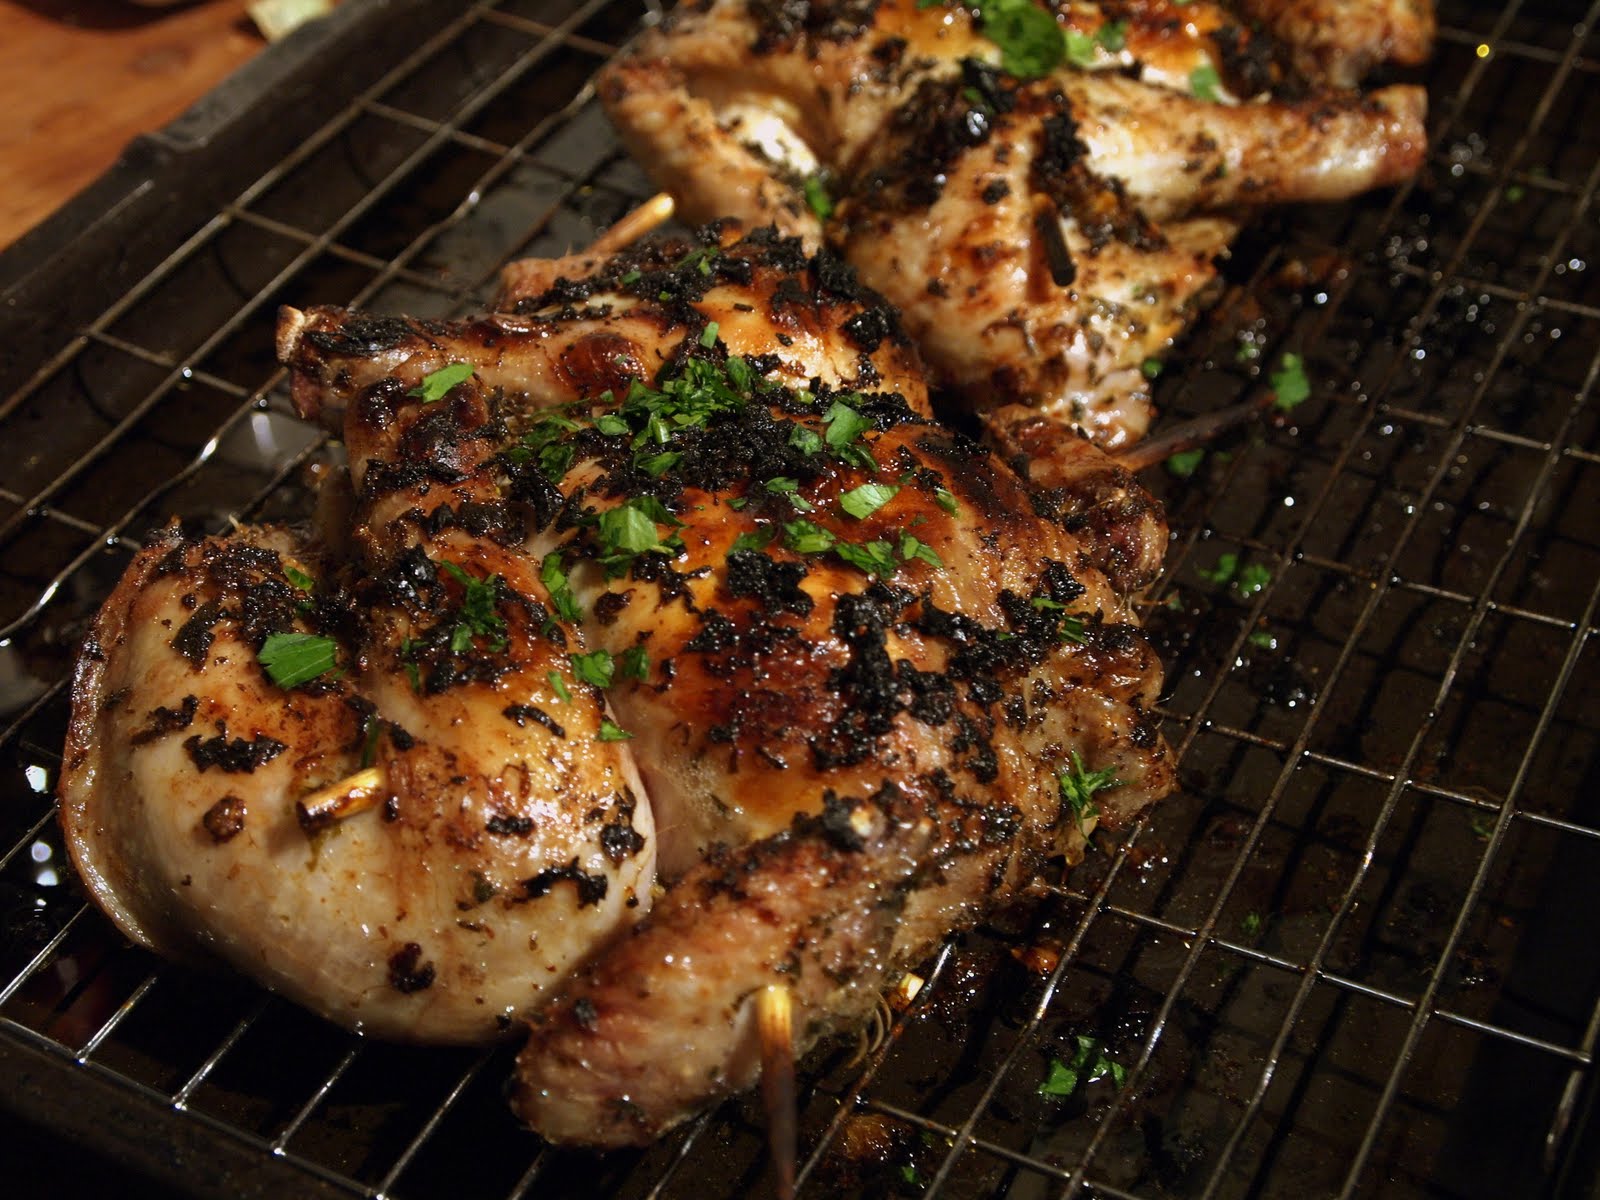
When you are ready to cook, position the birds on a rack under a hot grill, as far from the element as possible, skin-side down. Spoon over some of the marinade and grill the non-skin side for about 12 minutes. Flip the poussins over so the skin is uppermost, baste with some more marinade, and cook for another 12 minutes, until the skin is golden brown. Check the meat is cooked through by piercing a thigh at the thickest part – the juices should run clear. if the juices are bloody, leave the birds under the grill for another five minutes and repeat the test.
Sprinkle the cooked poussins with a little more oregano, and serve with buttered rice and a sharp salad.
If you ever find yourself doing a Christmas dinner for just two people, you’ll find you could do a lot worse than to roast a duck. It must be the weather and the dark evenings, but I’ve got a lot of time for some of the more Christmas-tending ingredients at the moment, which is how I came to stuff this bird with prunes, pancetta and allspice, alongside some Savoy cabbage lightly sautéed in bacon fat with chestnuts fried to a crisp on the outside (very easy – use vacuum sealed chestnuts or roast your own, fry them in bacon fat until gold and starting to crisp on the outside, then throw in the cabbage, stirring for a few minutes until it’s all wilted and coated with fat), a great mound of mashed potatoes spiked with nutmeg, and a cherry and port gravy. Apologies for the picture quality. I’d been at the port.
If you are feasting, one medium-sized duck split between two people makes a spectacular and plump-making meal. The bird might look big when you buy it, but it’ll lose a lot of mass when you roast it and its layers of fat render off. A duck’s breasts are also much less muscular than a chicken’s, so there will be less meat than you might expect – but you will end up with a nice big jar of duck fat that you can put in the fridge when you’ve finished, so it’s not all bad.
I’ve stuffed the bird’s cavity with a sweet and spicy breadcrumb mixture. It looks a bit dry when you pack it into the duck, but the bird will baste the stuffing with fat and juices as it roasts, and you’ll find you have a savoury and tender stuffing at the end of the cooking time. We ate the lot in one go. This is a special meal for a special occasion – but I found that it’s also perfect for an ordinary winter’s Wednesday night when you’re feeling all loved-up.
To serve two, you’ll need:
Duck and stuffing 1 medium duck with giblets 100g soft white breadcrumbs 10 soft prunes 10 spring onions 150g pancetta cubes 1½ teaspoons ground allspice A generous amount of salt
Gravy Duck giblets 500ml water or good chicken stock 200ml port 200ml cherry juice 1 tablespoon plain flour 1 tablespoon soft butter A grating of nutmeg Salt
Preheat the oven to 220°C. Remove the giblets from the inside of the duck along with any poultry fat in the cavity – you can just pull the fat away from the body using your fingers. Use it to make gratons for a cook’s treat if you fancy.
Saute the pancetta cubes (use lardons of bacon if you can’t find any pancetta) in a dry pan until they have given up their fat and are turning crispy. In a mixing bowl, stir the cooked pancetta, with any fat, into the dry breadcrumbs, and add the raw spring onions, chopped small, with the prunes, quartered, and the allspice. You won’t need any salt; there is plenty in the pancetta.
Stuff the mixture into the cavity of the duck, packing it in firmly, and seal the open end. Some sew their ducks up; I like to use a few toothpicks to keep the cavity closed, which is quicker and less messy.
Prick the duck’s skin all over with a fork, rub the whole bird with about a tablespoon of salt and put on a rack in a roasting tin. (The rack is there to stop the duck from sitting and cooking in its own fat. If your rack is a very shallow one, be prepared to drain the fat from the bird a couple of times as it cooks.) Put in the hot oven, turning the temperature down to 180°C after 20 minutes. Continue to roast for an additional 35 minutes per kilo (15 minutes per pound). Rest for 15 minutes in a warm place, uncovered, before carving.
While the duck roasts, prepare the gravy. Begin by making a giblet stock (I used a home-made chicken stock as the base for the giblet stock, which might be overkill, but it did taste fantastic) by simmering the giblets very gently in 500ml water or good chicken stock for 1 hour in an open, medium-sized saucepan, skimming off any scum that rises to the top. Strain the resulting stock – it should have reduced by about a quarter.
Add the cherry juice and port to the saucepan, and bring the heat up a bit – it should be chuckling rather than giggling. Reduce the mixture in the pan by about half. When the duck comes out of the oven to rest, mix the flour and butter together until you have a smooth paste, and whisk it into the gravy in the pan over a medium flame. Keep whisking until the gravy becomes thicker and glossy. Grate over some nutmeg and taste for salt and pepper.
The duck will have a crisp skin and a light, savoury spiced stuffing. Slosh the gravy all over your plate and get tucked in.