Peas keema – keema mattar

Since I made that rice pudding, Indian food, and especially the Indian food I used to eat at friends’ houses when I was a kid, has been much on my mind. Here in the UK, the cuisine of India has embedded itself into the national consciousness – the Victorians were currying things from their new empire with glee, thrilled to discover a way to disguise the flavour of last week’s mutton; surveys done nowadays have demonstrated that the nation’s favourite dish is a Chicken Tikka Masala (something you’d never find in India – it’s a dish that’s evolved over here all on its own); my parents’ fridge was never innocent of at least one jar of Sharwood’s or Patak’s chutney in the 80s. I remember with great pleasure visits to my schoolfriend Gayatri’s house, where her Mum, an outstandingly good home cook, would make us saucepans full of sweet, milky masala tea, sneak us sticky, sugary halva while we played in the garden, and serve up about five different curries with rice when it came to mealtime, all different and all wonderful.

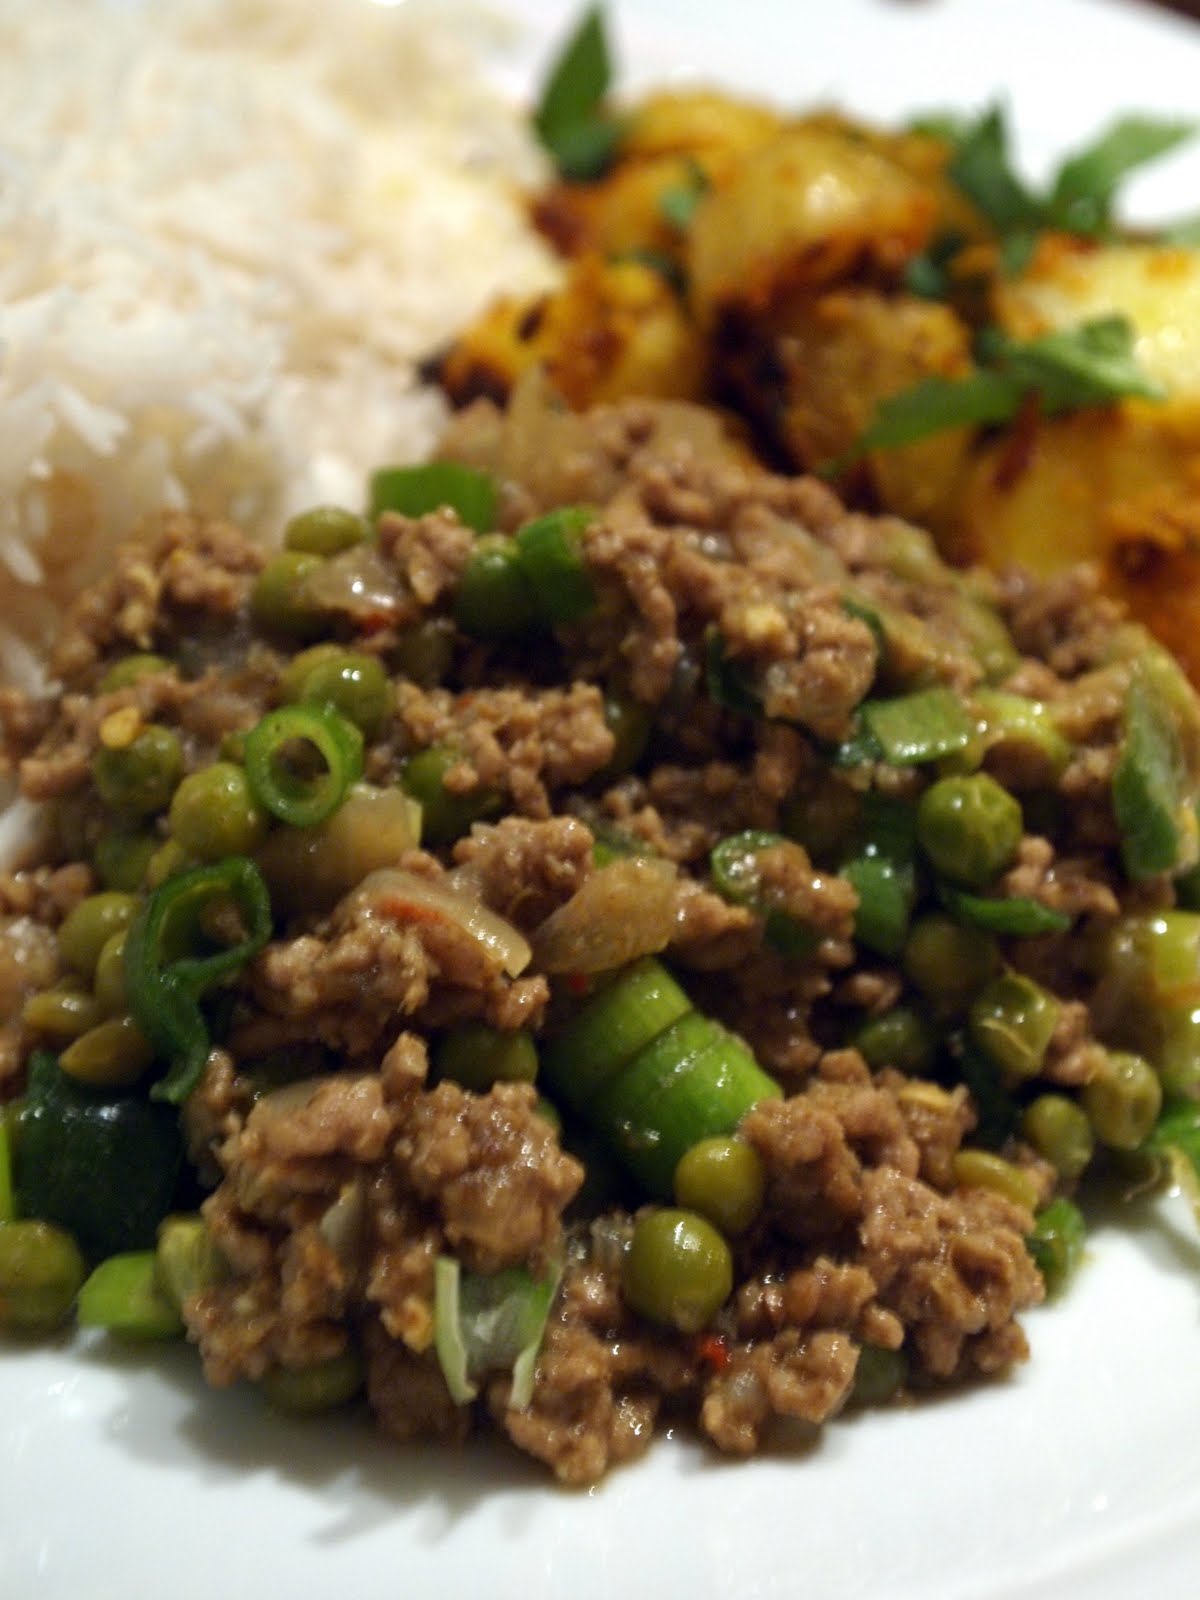
Peas keema was a regular feature on the lunch table. It’s delicious – make plenty, because it freezes very successfully. I’ve made a curry paste which serves (with the addition of different spices) as the base for both this and the Bombay potato recipe I’ll post on Monday, so hold out until then before you make this, or reduce the ingredients of the wet paste by half if you plan on cooking it over the weekend.

To serve four, you’ll need:

1 bulb garlic, peeled
10 spring onions
1 fat piece of ginger, about 5cm long
4 green chillies (I used Thai bird’s eye chillies – adjust amount and variety according to your taste – this amount is pretty spicy)
2 teaspoons coriander seeds
2 teaspoons cumin seeds
750g minced lamb
300g frozen petits pois
300ml stock
2 teaspoons garam masala
1 large handful fresh coriander (about 20g, if you’re measuring)
Salt
Juice of 1-2 lemons
Flavourless oil or ghee to fry

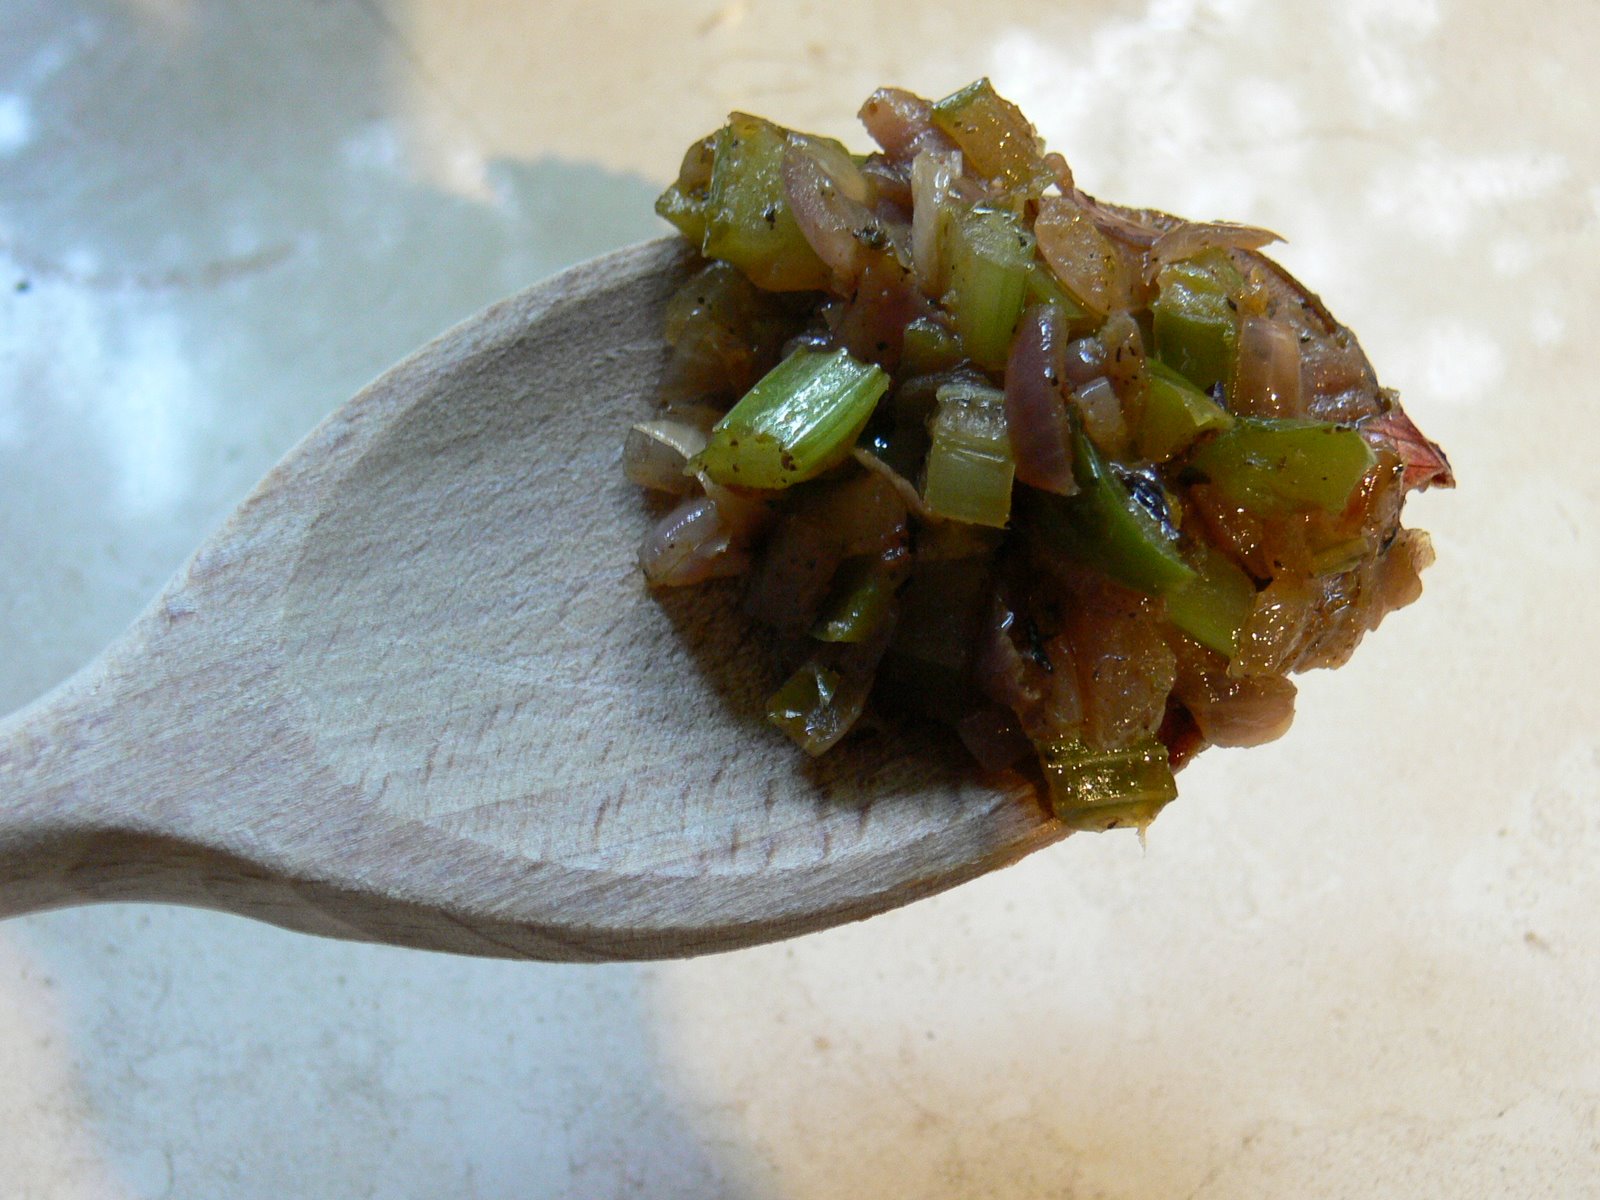
Begin by reducing the white parts of the spring onions (reserving the green), the ginger, the chillies and the garlic to a paste in the food processor. Reserve half of this mixture to form the base for the Bombay potatoes, which go very well with this dish.

Crush the cumin and coriander finely with a mortar and pestle, and stir them into the half of the paste you are using for this recipe with a generous pinch (use all the fingers of one hand for this) of salt.

Heat some oil over a medium flame and fry the paste for a couple of minutes until it is giving up its fragrance. I like to use a wok with a lid or a large Le Creuset casserole dish for this dish, which allows you plenty of room to work in. Add the minced lamb and fry, stirring continuously, until it is browned evenly (about 5 minutes). Add the stock, turn the heat down to a very low simmer, and put a lid on. Leave to simmer for 30 minutes while you chop the green parts of the onions into pea-sized pieces and mince the coriander.

At the end of the 30 minutes, taste for salt and add more if you need it (you probably will – this dish can take quite a lot of salt). Stir in the garam masala, the peas and the chopped green parts of the spring onion. Continue to simmer for a moment until the peas are no longer frozen, and add the juice of one lemon. Taste again – you may prefer more lemon juice (I like mine very sharp and usually use the juice of two lemons). Cover and cook for another 10 minutes until the peas are soft. They turn a slightly unfortunate colour with all this cooking, but they taste fabulous.

Take the pan off the heat skim off any fat. Stir in the chopped coriander and serve immediately.

Roast chicken quarters with chorizo stuffing

I’m a big fan of the sorts of stuffing you can push into pockets underneath the skin of a chicken, leaving the skin to crisp up beautifully over the savoury filling. Stuffings like these should be fatty enough to baste the chicken from beneath the skin, leaving the meat moist and juicy; flavoursome enough to give their character to every bite of the meal; and reasonably dense, so they don’t swell and leak out of the sides of the skin when you cook them. This one’s an absolute doozy.

I’ve used chicken quarters here rather than a whole chicken – they cook a little faster, you’ll get more nice nibbly crispy bits, and it’s a bit easier to distribute the stuffing evenly this way. To serve four (or in our case two, with some left over for sandwiches), you’ll need:

4 chicken quarters
125g chorizo (use half of one of those dry looped sausages, and choose a good-quality one)
75g fresh white breadcrumbs
Juice and zest of ½ lemon
1 teaspoon coriander seeds
1½ teaspoons fennel seeds
Olive oil
Salt and pepper

Preheat the oven to 220°C (420°F).

If you don’t have any breadcrumbs in the freezer (I usually pop the stale ends of any white loaves in the Magimix and whizz them into crumbs, then freeze them – it means there’s usually a decent supply of breadcrumbs kicking around if I need them), blitz them in the food processor before you deal with the other ingredients.

Put the chorizo in the food processor bowl and reduce it to a rubbly texture, like fine gravel. (You’re aiming for little chunks, not paste.) In a separate bowl, use a spoon to mix the chorizo rubble with the crumbs, the juice and zest of half a lemon and the coriander and fennel seeds, which you will have ground up roughly in a mortar and pestle.

Use your fingers to poke little pockets under the skin of the chicken quarters, and push a quarter of the stuffing mixture into each pocket, pressing so it is firmly packed. Season each chicken piece on both sides with salt and pepper. Heat some olive oil in a large frying pan and brown the stuffed chicken quarters, skin side down, for 5-7 minutes, until the skin is taking on some colour.

Transfer the chicken pieces, skin side up, into a large baking dish. You don’t need to add any more oil – there’s plenty in the chorizo. Roast at 220°C (420°F) for 15 minutes, then turn the heat down to 180°C (355°F) for half an hour. Rest the chicken pieces for a few minutes before serving. We ate this with some halloumi sautéed with red peppers and sweet onions, and some rice, the savoury chicken juices spooned over.

Crispy Thai lime chicken with fresh chilli sauce

I am currently all a-tizz about kaffir lime leaves. They’re hard to find out here in the sodden fen; not all oriental grocers stock the fresh leaves (which are very pretty and look like a pair of leaves growing on the same central rib). When I have spotted them in shops, they have often been a bit elderly, and not as aromatic as you’ll want them to be for cooking. Happily, you’ll find them shredded and frozen in some supermarket freezer cabinets; there are currently a couple of packs in my freezer at home. They have a wonderful citrus fragrance, almost as if you were sniffing fresh lime zest through an olfactory magnifying glass. (The zest of a kaffir lime is astonishingly good stuff, but sadly I’ve only seen the fruit for sale in Malaysia, which isn’t much help for UK home cooks.)

In most cooking, we use kaffir lime leaves in a similar way to bay leaves – as an aromatic to be infused in a wet mixture like a curry, then discarded before eating. The shredded leaves gave me an idea, though – how about using them to make a crispy crust with panko breadcrumbs for a neutral-tasting meat like chicken? Paired up with a fresh Thai chilli and ginger sauce, this turns out to be exactly how summer eating should be.

I’ve butterflied the chicken breasts and beaten them flat with a rolling pin to give them a bigger crispy surface area; this also helps them to cook really fast, preserving all the lovely lime flavour. I would like to believe that one per person is a sensible helping, but these were so good we ended up eating two each. To make four breaded, butterflied chicken breasts, you’ll need:

Chicken
4 skinless, boneless chicken breasts
4 heaped tablespoons flour
1 egg
8 heaped tablespoons panko breadcrumbs (if you can’t find Japanese panko crumbs, just use slices of white bread and whizz them to shrapnel in the food processor. Panko has a brilliant crispiness, though, and is worth seeking out.)
4 tablespoons shredded kaffir lime leaves (frozen or fresh – don’t get the dried ones, which will leave you feeling as if you are cooking with cardboard)
Peanut oil or a flavourless oil for frying

Fresh Thai chilli sauce
1 piece of ginger the length of your thumb
Juice of 2 limes
4 fat, juicy cloves garlic
½ stalk of peeled lemongrass
2 birds eye chillies (reduce amount if you don’t like your sauce too hot)
4 tablespoons Thai fish sauce
4 tablespoons palm sugar (most supermarkets seem to be stocking this now) or soft light brown sugar
1 small handful mint

It’s easiest to make the sauce before you start on the chicken, which will need your attention for the very short time you’ll be cooking it. Just put all the sauce ingredients except the mint in a mortar and pestle or (easier) a food processor or liquidiser, and process until you’ve a slightly chunky, wet sauce. Unlike commercial sauces, it won’t be red – but it’s none the worse for that. Chop the mint and sprinkle it over the sauce.

Start work on the chicken by butterflying your chicken breasts. This is far easier than you may have been expecting – just lay them flat, push a small, sharp knife into the thicker side of the chicken breast and make a horizontal cut almost all the way through to the other side. You should be able to open your chicken breast out like a book, with the fatter edge of the breast acting as the book’s spine. Place the butterflied chicken breast between two pieces of cling film on a chopping board (the cling film stops them from sticking) and wallop the hell out of them with your rolling pin, until the chicken is a thin, even escalope, about half a centimetre thick. Don’t worry about raggedy edges – the breading you’re about to apply is amazingly forgiving.

Put the flour, seasoned with some salt and pepper, in one bowl, the beaten egg in a second and the crumbs, mixed well with the lime leaves, in a third. Dip the chicken in the flour, then the egg, then the crumbs, making sure it’s coated well at every stage. Fry over a high heat for 2-3 minutes per side, until the crumbs are golden and crisp, and serve with the sauce, a salad or some stir-fried veg, and your choice of rice or noodles.

Chicken with smoked oyster stuffing

I was meant to be going to New Orleans early next month, but unfortunately that trip’s been postponed until next year (chiz chiz chiz). I’m meant to be writing about the place, and about its unique food culture; New Orleans is the least American of American cities, and has a cuisine unlike anything else you’ll find in the US. That cuisine is influenced by the fertile land and sea surrounding the city, and also by the mix of cultures and ethnicities that called the city home – African, French, Acadian (or Cajun) and Creole flavours coming together to create something you simply won’t find elsewhere.

To console myself over my postponed trip, I decided to invent a chicken stuffing along the lines of something you might see in Louisiana (if you squint a bit). This stuffing is gorgeous – it employs the so-called “holy trinity” of green bell peppers, celery and onion as a base, with garlicky, cheesy bread croutons which retain their crunch through the cooking, some typical Louisiana spicing, and a little tin of smoked oysters, chopped finely, to give the whole dish a warm, smoky background. You may think you don’t like smoked oysters – they look pretty unprepossessing, and they can taste a bit strong when used on toast or as canapés – but in this dish they just give the stuffing and the meat of the bird a wonderfully rich, umami smokiness. Surprisingly (totally) un-fishy. The recipe will make enough to stuff a 1.5kg bird and to prepare a separate tray of the stuffing to serve with the meal – you’ll want a separate tray, because it’s totally delicious.

To serve 4 (with some leftovers for sandwiches tomorrow, if you’re lucky), you’ll need:

1 plump chicken, weighing around 1.5kg (use a larger bird if you like – there will be enough stuffing, but you’ll need to adjust the cooking time)
½ loaf white bread (unsliced)
4 grated cloves garlic
20g grated parmesan
4 tablespoons olive oil
3 medium onions
1 green pepper
2 sticks celery
1 large knob butter
2 teaspoons paprika
1 teaspoon fennel seeds, ground
1 teaspoon cumin seeds, ground
1 teaspoon ground chipotle peppers (use cayenne pepper if you can’t find chipotles)
1 large handful (25g) parsley
Zest and juice of 1 lemon
1 small tin smoked oysters
3 tablespoons light soy sauce
Salt and pepper

Take the chicken out of the fridge a couple of hours before cooking to allow it to come to room temperature. Dry the skin well and snip any fat you find inside the cavity out of the bird – either discard it or render it down in a dry frying pan to make schmaltz to use for another recipe. Preheat the oven to 200°C (400°F) for the croutons.

Remove the crusts from the bread and chop the white part into cubes about 2cm on each side (a large-ish crouton is nice here, the outside turning crisp and the inside retaining a bit of squashiness). Arrange the croutons on a baking sheet – they should cover the bottom in one layer. If you find you have more space, chop a few more croutons out of the remains of the loaf. Grate the garlic into the olive oil, mix well and drizzle over the croutons. Toss them well in the oil so every side is covered with the garlicky mixture, then sprinkle over the parmesan and toss again. Bake in the hot oven for ten minutes until golden, but start checking after eight minutes – these are quite easy to burn. Turn the oven temperature up to 230°C (450° F) and set the finished croutons aside.

You can start on the other stuffing ingredients while the croutons are cooking. Chop the celery, onions and pepper finely and fry off in a generous knob of butter with the spices, keeping everything in the frying pan on the move, until the onions are turning golden, as in the picture. Remove the contents of the pan to a large mixing bowl, and add the chopped parsley, the juice and zest of the lemon, the drained and finely chopped oysters and the soy sauce. Fold the croutons into this mixture and taste it for seasoning – you may not find you need any salt, but a generous amount of pepper is good here. Stuff the chicken with the mixture, using toothpicks to hold the flaps of skin at the end of the chicken closed. There will be plenty of stuffing left over; put it in a small baking dish and keep to one side until the end of the chicken’s cooking time.

Rub the chicken with plenty of salt and roast it, covered with a piece of tin foil, for 1 hour and 20 minutes, removing the foil and adding the stuffing dish for the last 15 minutes. Prick the chicken at the fattest part of its thigh at the end of the cooking time to check it’s done – the juices should run clear. If they are pink, get the stuffing tray out of the oven and keep it in a warm place, and give the chicken another 10 minutes in the oven, repeating the prick test at the end of this time. Make gravy from the pan juices and a splash of stock and white wine if you fancy some lubrication, and scatter the chicken and stuffing with fresh herbs of your choice – I used some Cypriot basil and some parsley. The stuffing and chicken are fantastic with a tart salad, sautéed potatoes and lemon wedges.

Caramelised onion, horseradish and blue cheese crusted steak

Sometimes, you might find yourself in possession of a less-than-handsome steak. Now, if your steak is richly marbled, fat and nicely aged, I wouldn’t recommend you do more than rub it with olive oil, salt and pepper – maybe a little garlic too – and grill it briefly. The pieces of topside I found myself with needed a bit more help, so I came up with this recipe.

I’ve been spending lots of time hanging out at the Polish deli in Newmarket recently – I’ve already told you about the salt pork and cherry juice, and I’m really enjoying the smoked sausages and pickled herring. I decided to sample some Polish horseradish (chrzan) after reading an extremely enthusiastic hymn to it in a book I was editing a few weeks ago, and found that if anything, the author wasn’t giving it all the love it deserves. English creamed horseradish can be a bit wet and insipid, but this Polish stuff is fiery, sweet and intensely fragrant – just sniffing the jar caused hallucinatory roast sirloins of beef to parade before my eyes. Look out for it in your local Polish deli – some supermarkets now have a Polish aisle too. You might also be able to find a variant called cwikla, which is horseradish with sweet red beets. It’s delicious, but it’ll make the crust here an alarming pink.

The crust on this steak is soft and light under its buttery, crisp surface, and is full of flavours which make the very best of your steak. To make enough to crust four steaks, you’ll need:

1 large onion
3 heaped tablespoons Polish horseradish sauce (or whatever you can find)
3 heaped tablespoons crumbled blue cheese (choose something strong – I used an elderly Bleu d’Auvergne)
100g fine, fresh breadcrumbs (just whizz white bread in the food processor)
100g butter
1 bunch (about 15g) chives
Salt and pepper
Olive oil

I also made some garlic-lemon green beans, which used the meat juices. If you want to make these too, you’ll need:

100g green beans
2 fat cloves of garlic
Zest and juice of one lemon
Salt and pepper

Get the steaks out of the fridge well before you want to cook them to allow them to come to room temperature. Rub them with olive oil, salt and pepper, and set them aside. While the steaks are coming up to temperature, prepare the crust.

Cut the onion into very fine dice, and fry over a low heat in two tablespoons of the butter, stirring regularly, until the onion is a lovely golden caramel colour. Put the cooked onion with its butter into a large mixing bowl, and melt the rest of the butter in the onion pan. While the butter is melting, use the back of a fork to blend the onion in the bowl with the cheese – try to distribute the cheese as evenly as you can. Stir through the horseradish, then stir the breadcrumbs into the mixture, adding the melted butter bit by bit until you have a mixture that is still loose, but that holds together when pressed. Stir the chives through the crust mixture, taste and season. (If your cheese is particularly salty, you may not need any extra salt.)

Cook the steaks for a minute per side in olive oil in a very hot frying pan – just enough to sear them on each side. Remove to a plate, keeping the oil in the pan. Divide the crust mixture into four and press it into the top of each steak. (If you find you have some left over, you can just make it into a little rectangle and grill it along with the steaks for a cook’s treat.) While you are working, some of the steak juices will come out of the steak onto the plate. Hold onto these for the beans, which cook very quickly, so you can do them as the crust grills.

Transfer the steaks with their topping to a grillpan and put under the grill for 6-8 minutes (or as long as you find your topping takes to go golden and crisp on top). Transfer to warm plates to rest for a few minutes before serving. I served this with some roast potatoes and more of that lovely horseradish.

To make the beans, warm the olive oil you seared the steaks in, and fry the garlic in it for a few seconds before tipping the topped, tailed and chopped beans in. Toss the beans around the pan until they start to turn bright green, then pour over the lemon juice mixed with the zest and the steak juices. Allow the liquid to bubble up and reduce a little, check the seasoning, then remove to a hot serving dish.

Duck confit

Confit de canard, the French way with duck which is cooked and preserved in its own fat, is unequivocally delicious. French tins of the stuff are scrumptious, and although pricey, not too hard to get hold of. But making your own at home turns out to be surprisingly easy, and it tastes even better than the store-bought variety (the magic is all in the herbs you use to cure the duck before cooking). Making your own also means that even when you’ve finished eating, you end up with lots of herby, aromatic duck fat to use in potato dishes, or even in another confit.

Because the meat is simmered very gently under duck fat, it remains extremely moist and tender, with a skin that crisps up deliciously at the click of a finger. I like mine served, totally unhealthily, with a great big heap of pommes Sarladais and a dollop of quince jelly. Redcurrant, cherry and the other duck-friendly fruits also work really well to cut through the richness of the confit.

To confit six duck legs (with thigh attached) you’ll need:

6 duck leg joints, with thigh
3 heaped teaspoons salt
2 bay leaves
1 tablespoon thyme leaves
1 tablespoon herbes de Provence
1 teaspoon black peppercorns
Duck fat (enough to completely cover the duck legs when melted in a saucepan)

Crush the bay leaves, thyme, herbes de Provence and peppercorns very thoroughly with the salt in a mortar and pestle, and rub the pieces of duck all over with the mixture. Put the duck in a large bowl and refrigerate for 48 hours to achieve a very mild cure.

When you are ready to cook the duck, heat the oven to 150°C and melt the fat in an oven-proof casserole dish on the hob. Slide the duck into the fat as it liquefies, and when it starts to shudder (not boil), move the casserole to the oven. Cook for two and a half hours, or until the duck is tender.

Spoon the cooked duck and its hot fat into a large sterilised jar or crockpot, making sure that the meat is completely covered by the fat, which will stop oxygen and bacteria getting in. Seal and refrigerate. The duck will keep for a few weeks in the fridge (it is, after all, preserved) – it will also be tender, sweet and moist from being poached in that fat.

It’s worth leaving the duck in the fat for a few days before you eat it, in order to allow the flavours to develop. To serve and cook to a crisp, remove the confit from the fat and fry over a medium heat in a saucepan for about 7 minutes per side, with a heavy pan lid weighing the meat down as you fry.

Chinese chicken with cashew nuts

I’ve lost the magic USB string for my camera. No matter – I did take some pictures of this recipe, and will put them up as soon as my magic string makes an appearance. In the meantime, here is a placeholder botanical print of a cashew nut borrowed from Wikipedia.

Chicken with cashew nuts pops up on Chinese restaurant and takeaway menus the world over, all with slightly different saucing and attitudes to things like batter and breading. Where I come from, we neither batter nor bread our chicken in this preparation, but if you can’t bear missing out on the missing cholesterol, feel free to bread/batter and deep-fry your marinaded chicken before you add it to the stir-fried sauce and vegetables.

The sauce here is made up from hoi sin with smaller amounts of chilli bean and black bean sauces – all from jars, and all from your local Chinese supermarket. If you don’t have access to these ingredients locally, try the excellent Wai Yee Hong, whom I’ve found to be superbly reliable and well-stocked over the last year or so. Unsalted cashews are no longer very hard to come by – most supermarkets will stock them in their whole foods section. It’s very important that you don’t use salted cashews here; all the above sauces, and the soy sauce in this recipe, are pretty salty, and salted cashews will be overpowering.

To serve four, you’ll need:

800g chicken breast, chopped (some Chinese people prefer dark meat, but breast is commoner in restaurants)
2 glasses Chinese rice wine
4 tablespoons light soy sauce
4 teaspoons cornflour
4 teaspoons sesame oil
150g unsalted cashews
4 fat cloves garlic
10 spring onions (scallions)
2 sweet peppers (I used one yellow and one orange)
2 teaspoons chilli bean sauce
2 teaspoons black bean sauce
2 tablespoons hoi sin sauce
2 birds eye chillies
Ground nut oil for stir-frying
Water

Start by preparing all the ingredients for stir frying. Marinade the chicken pieces in 1 glass Chinese rice wine, 2 teaspoons cornflour, 2 tablespoons light soy and 2 teaspoons sesame oil for half an hour while you chop the garlic finely, dice the peppers and chop the spring onions on the diagonal into chunky pieces. In a hot frying pan without oil, toast the cashews for a few minutes, keeping them on the move with a spatula, until they are browning nicely but not burned.

Heat the ground nut oil in a wok until it begins to smoke. Stir fry the garlic for a few seconds, then tip in the chicken and its marinade, and stir fry until the chicken is half cooked through. Add the spring onions and peppers, and continue to stir fry until the chicken is cooked and the vegetables are softer. Add the hoi sin, chilli bean and black bean sauces, stir well and then add the remaining glass of rice wine. Simmer the chicken and vegetables in the sauce and add two teaspoons of cornflour made into a paste with a little cold water to thicken the sauce. Cook for another minute, stir through the cashew nuts and two teaspoons of sesame oil, and serve immediately. Totally delicious and – dare I say it – probably nicer than what’s on offer at your local take-out.

Star anise chicken wings

I’ve been trying very hard to find a silver lining in this economic collapse. The best I’ve been able to manage is in the fact that supermarkets are suddenly stocking more of the cheaper cuts of meat – and those cheaper, nubbly cuts, like pork belly and hock or breast of lamb, are great. They’re often fattier, tastier and altogether more fun to cook with than the clean, boneless slabs of muscle supermarkets usually fall back on.

Chicken wings are among my favourite of the nubbly bits – all that lovely, crisp skin, and the sweet little nuggets of meat, full of flavour from nestling up against the wing bone. The nice chaps at SealSaver (keep this up, fellas, and you’ll become my very best friends) have recently sent me a couple of new SealSaver vacuum canisters, which, besides increasing the storage life of foods make marinading an absolute breeze. Stick the meat and marinade mixture in a Sealsaver, pump the air out, and some magical process occurs, making the meat marinate in a fraction of the usual time. If you don’t have a SealSaver (and you should – they make life in the kitchen very easy), marinate these wings for 24 hours in the fridge. In the SealSaver, they only needed two hours – brilliant.

To make 16 wings (enough for two as a main course or four as a starter) you’ll need:

16 chicken wings, tips removed
5 tablespoons dark soy sauce
8 tablespoons light soy sauce
2 tablespoons molasses
8 tablespoons Chinese cooking wine or dry sherry
3 heaped tablespoons soft dark brown sugar
3 tablespoons sesame oil
8 star anise, 4 kept whole, 4 bashed to rubble in a mortar and pestle
Spring onion to garnish

Prick the chicken wings all over with a fork. Mix all the ingredients except the chicken wings and spring onion in a bowl, and combine the marinade with the chicken wings. If you’re using a SealSaver, marinate, refrigerated, for two hours – otherwise, marinate in the fridge for 24 hours.

Remove the wings, reserving the marinade. Bring the marinade to a low boil for two minutes. Grill the wings (use the barbecue if you possibly can – the only reason I didn’t was that it was snowing) over a slow heat for about 15-18 minutes, basting regularly with the cooked marinade and turning regularly until they are mahogany brown and crisp. Serve with more of the hot sauce and sprinkle with spring onion.

Garlic butter roast chicken

I’m back in Portland for the week (and I’m spending the next few weeks in the US too, so look forward to some restaurant reviews). I’ve a couple of recipes from last week to post, and in the meantime I am applying myself assiduously to Portland’s fantastic cafés, in order that I can supply those of you who visit the city with a good round-up of places to pootle around in an intellectual fashion, getting caffeinated and taking advantage of free wireless internet.

Anyway. The chicken. This is a chicken flash-cooked at a very high temperature with a garlic butter under the skin. This technique results in a moist, juicy bird which you don’t need to baste or turn, and a gorgeously crisp, garlicky skin. The pan juices are fantastic for making a gravy with, but they’re also delicious just drizzled over the carved chicken as they are.

The cooking time below will be good for a bird weighing about 1.5kg (3lb) – enough to serve three or four people. To roast one chicken, you’ll need:

1 chicken weighing about 1.5kg
5 large, juicy cloves of garlic
Zest of 1 lemon
125 g softened salted butter
2 tablespoons finely chopped parsley
1 tablespoon olive oil
Salt and pepper

Preheat the oven to 230°C (450° F). Crush the garlic (I used something called a Garlic Card – a little grating device the size of a credit card which my mother-in-law Santa gave me for Christmas), zest the lemon and chop the parsley, and blend them with the butter using the back of a fork.

Starting at the neck of the chicken, use your fingers to loosen the skin from the breast. You should be able to separate it from the flesh by pushing with your fingertips until you’ve made a pocket that covers the whole breast. Take the softened garlic butter mixture and push it into the pocket you’ve made, making sure it covers the breast evenly. Reserve two teaspoons of the butter, and push them into the space between the bird’s legs and body. Salt the outside of the bird generously and drizzle it with olive oil.

Put the chicken on a baking tray high in the hot oven, and roast for one hour. Check that the chicken is cooked by pushing a skewer into the fattest part of the bird, just behind the thigh. The juices should run clear; if they are still pinkish (which is highly unlikely), roast for another ten minutes and repeat the test.

Rest the bird for ten minutes before carving. I served this with Pommes Sarladaise, a wonderful garlicky French potato dish – watch this space for the recipe!

Christmas stuffing and chipolatas

I mentioned the other day that you’re best off not stuffing the cavity of a turkey or, for that matter, a chicken – it increases the cooking time to an unacceptable length, and quite honestly, stuffing is just nicer prepared outside the bird, where it has a chance to go crispy on the outside. The trimmings are one of the most important parts of a Christmas dinner, but they can be a bit of a faff to prepare, so I like to assemble and cook mine on Christmas Eve, and heat them up at the last minute on Christmas Day – you really can’t tell that the stuffing and chipolatas have been reheated, and they’re absolutely delicious.

Buy the very best chipolatas you can find. I was in Yorkshire for Christmas, and went to Booths, which is a simply fantastic supermarket. Quality and choice here is better than at any of the supermarkets we have here in Cambridgeshire (even Waitrose); I ended up with a pack of chipolatas flavoured with chestnut purée which were as good as any butcher’s sausage. Unfortunately, Booths only operates in Lancashire, Cheshire, Cumbria and Yorkshire, so the rest of us are stuck with having to make a trip to the butcher’s for the chipolatas and for the sausage meat which goes in the stuffing, which should be of the best quality you can find.

For Christmas trimmings (or trimmings for any poultry or game you happen to be roasting for a non-Christmas occasion) you’ll need:

Stuffing
85g Paxo sage and onion stuffing mix (I know, I know – bear with me here)
250g good-quality sausage meat
1 Braeburn apple
2 banana shallots
1 pack vacuum-sealed chestnuts
1 tablespoon finely chopped fresh sage
75g butter
Boiling water
Salt and pepper

Chipolatas
16 chipolata sausages
16 strips pancetta

Paxo stuffing mix? Well, despite the memories you may have of childhood Paxo made up by your grandmother to the packet instructions (dusty, squashy and very little fun), it works really, really well when you combine it with sausage meat. The recipe for Paxo is more than a hundred years old; it was invented by a Manchester butcher in 1901. I’m using it here because the wheat and barley rusk that forms the crumbs contains a bit of raising agent, which will make the texture of your stuffing very light, with a crisp outside – and the dried sage and onion are actually really good against a porky background.

Put the stuffing mix in a large mixing bowl with the butter, and pour over boiling water, according to the packet instructions. Stir well and cover with a teatowel while you chop the apple, shallots and chestnuts into small, even dice, and chop the sage finely. When you’re done, the stuffing mix should be cool enough to handle. Use your fingers to mix the sausage meat very thoroughly with the stuffing mix, then add the chopped apple, shallots and chestnuts and sage with a little salt and some pepper, and mix with your hands until everything is evenly distributed. Form into spheres about the size of a ping-pong ball and lay on well-greased baking trays. (The stuffing balls will almost certainly stick a bit, but you can prise them off relatively easily with a stiff spatula.)

Preheat the oven to 180°C (350°F). Wrap each sausage in a strip of pancetta. You don’t need to secure these with a toothpick (as well as saving you time, this also avoids any Christmas day toothpick-embedded-in-palate accidents). Arrange the sausages on another well greased tray.

Bake the sausages and stuffing balls for between 35 and 45 minutes (the cooking time will depend on the characteristics of the sausages and sausage meat you have chosen). The stuffing balls should be browning and crisp on the outside, and the pancetta crisp and golden. Remove from the trays when cooled, and move the stuffing balls and wrapped sausages to oven-proof bowls. When you come to serve them, just reheat at 180°C (350°F) for 12 minutes.