Roast rib of beef with red wine gravy

Roast rib of beef
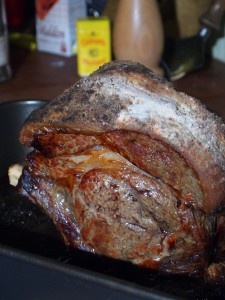
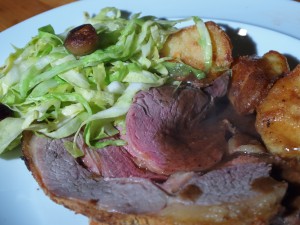
Roast rib of beef, straight out of the oven

I’m blogging from my new MacBook Pro, an anniversary present from the inestimable Dr W. I’m still getting used to it; there are all kinds of PC keyboard shortcuts hard-wired into my brain that I’m having to relearn, and I don’t have any photo-editing software on here yet. In short, if anything looks a bit funny in today’s post, please be gentle with me – things should be better next week when I’ve got to grips with the various things the command button does!

Is there anybody out there who doesn’t love a big chunk of well-aged, grass-fed roast beef? This joint was a present from my in-laws, who have amazing taste in gifts. It’s from Lishman’s butcher’s in Ilkley, and had been sitting in the freezer for a few months, waiting for the weather to turn in a roasty direction.

If you’re not into turkey at Christmas, a beef rib is a fantastic substitution; it’s traditional but rather special, and there are very, very few Brits of a certain age out there who don’t have happy childhood memories of family occasions centred around a pre-BSE joint. To my mind, it’s the best of the roasting joints; the meat is rich and savoury from its proximity to the bone, and there’s a perfect amount of fat for lubrication and flavour in there. As a rule of thumb, you can count on each rib in the joint being sufficient to serve two people, so it’s easy to work out how large a chunk of meat to buy. I like to cook a rib nice and rare; if your uncle Bert likes his meat cooked until there’s not a trace of pink, just give him a slice from one end of the joint.

The gravy I served with this is a bit special; it’s intensely dense and savoury, and rich with the flavour of red wine and caramelised onion. Don’t use one of those undrinkable £3 bottles marketed as cooking wine here; while I don’t want you raiding the cellar for the Burgundy your Dad laid down in the 1980s, you should make this gravy with something you’d be happy to drink. If you can get hold of some real beef or veal stock made with a roasted bone, that’ll be fantastic here. The gravy has so much other flavour supporting it, though, that you can happily use some decent chicken stock instead. (And your freezer is full of home-made chicken stock, right?)

I served this with a huge, rustling pile of roast potatoes and parsnips, and a shredded spring cabbage sauteed in a little butter with some peeled chestnuts; these are all great for soaking up the gorgeous gravy. To roast a rib of beef rare (add five minutes per 500g if you want it medium, and ten if, for some unaccountable reason, you want it well-done), you’ll need:

Beef
A rib of beef
1 teaspoon salt
1 teaspoon mustard powder
1 teaspoon plain flour

Gravy
1 red onion
250ml red wine
1 tablespoon balsamic vinegar
300ml good beef or chicken stock
2 tablespoons plain flour
Juices from the joint
Salt and pepper to taste
Roast beef
Roast beef

Take the beef out of the fridge in plenty of time, so it’s at room temperature when you come to cook it. Preheat the oven to a blistering 240ºC (460ºF). Pat the joint dry with kitchen paper. Mix the salt, flour and mustard in a small bowl, and use your fingers to rub the mixture all over the fatty surface of the joint.

Put the beef in a roasting dish and slide it into the oven for an initial 20 minutes, then bring the temperature down to 180ºC (360ºF) and cook the joint for 15 minutes per 500g. (See timings above for a medium or well-done roast.)

While the rib is cooking, start on the gravy. Slice the onion finely, and fry it in a little beef dripping (goose fat is good if you don’t have any) until it starts to brown. Tip the balsamic vinegar into the pan and cook, stirring, until the onions start caramelising and the mixture becomes sticky.

Pour the red wine over the onions and bring to a simmer. Add the stock, bring back up to a simmer and allow the whole thing to bubble away gently with the lid on for half an hour. Remove from the heat, and strain the contents of the pan through a sieve into a jug. Discard the onions, which will have given up all their flavour, and leave the jug to one side until the beef is finished.

When the beef is ready to come out of the oven, remove it from the roasting pan to a warmed dish in a warm place to rest for 20 minutes, covered loosely with a piece of tin foil. This will give you time to finish up the vegetables and finish the gravy while the muscle fibres in the meat relax and the juices start to flow. Finish the gravy by putting the roasting pan you cooked the meat in on the hob over a medium flame. Sprinkle the flour into the pan and use a whisk to blend it well with any flavour-carrying fat from the joint. Pour a ladle of the stock from the jug into the pan and whisk away until everything is well blended, scraping at the sticky bits on the bottom. Repeat, a ladle at a time, until everything is combined, then return to a saucepan and simmer away without a lid for five minutes, stirring as you go, before tasting to adjust for salt and pepper, and transferring to a gravy boat just in time to serve up the whole roast.

Beef rendang

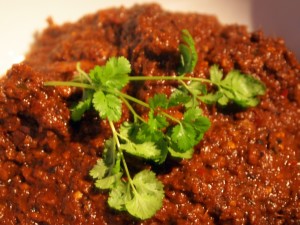
Beef rendangIt’s my firm belief that every culture in the world has at least one dish which looks like something the cat dragged in, ate, digested, and left as a gift on the hall carpet twelve hours later. Beef rendang is Malaysia’s offering to this noble pool.

I’ve not come across a dish like rendang anywhere else in the world. Beef is simmered in a thick mixture of spices, browned coconut and coconut milk until nearly dry, soaking up huge amounts of flavour during the simmering process; the cooking method turns from simmering to frying as the mixture reduces and the oils from the coconut leach out. You end up with a thick, rich, dark brown sauce, packed with herbs and sweetness from shallots and roasted coconut. It’s a dish that takes a while to prepare, so make plenty and freeze what you don’t eat immediately.

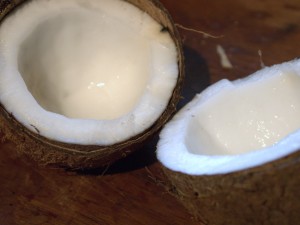
CoconutYou’ll need to tackle a raw coconut for this recipe. Opening coconuts doesn’t have to be anything like the palaver we seem to make of it in the UK – all that business with towels and hammers. As you can see from the picture, my coconut was bisected neatly. All you need to do to achieve the same thing from yours is to hold it over a bowl, and, using a meat cleaver or large knife (cleavers are available very cheaply at Chinese supermarkets, if you have one in the neighbourhood), tap hard with the blunt edge along the equator of the coconut – the pointy tuft at one end and the three “eyes” at the other are your north and south poles. Keep tapping with the blunt side, not the blade, as hard as you can, turning the coconut as you go, and once you’ve circled it about five times (by which point you will be sweating and swearing that all this work hasn’t made a blind bit of difference) the coconut will split neatly in half, the juice inside falling into your cleverly pre-positioned bowl. It’s magic. Give it a shot.

A word on that coconut juice. It’s not the same thing as coconut milk (the stuff you find in a can), which is the grated white flesh of the coconut, moistened and squeezed. Coconut juice is very pleasant on a beach somewhere when your coconut is green and straight off a tree, a nice man has sliced the top off it with a machete, and you have a few shots of rum and a straw; but once your coconut has turned brown and been shipped to the UK, it will be bitter and horrid. Drink it if you must. If you’re smart, you’ll pour it down the sink.

Coconut milk is a different matter. For this recipe, it’s more important than ever that you buy some without emulsifiers – you’ll be using the thick, creamy part of the milk separately from the more watery part. I always buy cans of Chaokoh, a Thai brand. If you’ve difficulty tracking it down locally, you can find it (and a paradise of other Chinese, Malaysian, Korean and Japanese ingredients) at Wai Yee Hong, an oriental supermarket in Bristol with an internet shopping arm – I order from them every couple of months, and they’re super-reliable.

To serve four, you’ll need:

1 coconut
600g beef topside
1 tablespoon soft dark brown sugar
1½ teaspoons tamarind block (surprisingly enough, I found some at Tesco)
10 blanched almonds OR 2 candlenuts, peeled
2 teaspoons turmeric powder
2 Kaffir lime leaves
2 stalks lemongrass
1 in piece galangal
1 in piece ginger
10 small shallots
3 fresh red chillies
8 dried red chillies (look for Malaysian cili kering in an oriental grocer)
2 cloves garlic
1½ tablespoons palm sugar (or soft dark brown sugar)
2 tablespoons dark soy sauce
1 can coconut milk
Salt and pepper
Boiling water

Open the coconut according to the instructions above. Pry the white flesh away from the shell, and use a sharp knife or a vegetable peeler to remove the brown skin from the flesh. Grate the white flesh and dry-fry, stirring regularly, until dry and dark brown but not burned.

While the coconut is frying, soak the tamarind in enough boiling water to cover, poking with a fork until the tamarind is soft. Pick out the seeds.

Cut the beef into pieces and marinade in all but 2 tablespoons of the toasted coconut, the tamarind and its liquid, two teaspoons of sugar and a teaspoon of salt. Set aside while you prepare the other ingredients.

Put the remaining toasted coconut in the bowl of the food processor with the almonds, turmeric, lime leaves, lemongrass, galangal, ginger, peeled shallots, chillies and garlic. Whizz until everything is reduced to a fine paste. Put the paste in a thick-bottomed saucepan with the runny, milky part of the coconut milk, 100ml boiling water, the palm sugar, another teaspoon of salt, a generous grating of pepper and the dark soy sauce. Stir well and bring to the boil over a moderate heat. Add the meat with any juices, and bring back to a simmer. Continue to cook, without a lid, for an hour, stirring frequently to prevent burning. Most of the liquid will have reduced away by this point.

After an hour, add the creamy part of the coconut milk to the mixture and stir well. Add a lid and continue to cook over a reduced heat for another hour, stirring occasionally. The finished rendang should have a thick, dense sauce, and look oily, the fat having come out of the coconut, almonds and coconut milk to fry off the other ingredients.

Beef goulash with nokedli

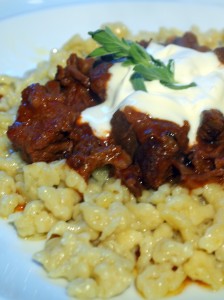
Goulash and nokedliA complicated set of circumstances saw me having to leave China after a week and flying straight to Hungary. Budapest is a beautiful city, but it’s not somewhere I’d recommend for those of you who travel to eat; menus around the city bear identical lists of paprika-heavy casseroles, and there’s not much in the way of haute cuisine. I found two standout restaurants, one in Buda and one in Pest. Café Pierrot, up in the castle district in Buda, is a pricey cellar restaurant with a pretty garden and a French chef, where you’ll find the best foie gras preparations we ate in the city (and Hungary is the biggest producer and consumer of the stuff per capita in the world). And Café Kör, down in Pest by the basilica, has a menu of Austro-Hungarian classics with a really charming wine bar atmosphere.

I really don’t mean to slam paprika-heavy casseroles above (and given that I’ve made one here, you can probably see that I’m actually rather fond of them) – they only get tired after a week or so. I became horribly addicted to nokedli, a spaetzle-ish kind of tiny dumpling, while we were in Budapest. They’re a perfect accompaniment to these rich, dense casseroles, so I swiped a nokedli recipe off the back of a nokedli maker in a Buda craft market (stupidly, I didn’t buy the nokedli maker, which would have meant an easier time for my and Dr W’s ladling arms when it came to making this) and made up a goulash to go with them. If you don’t fancy nokedli with your meal, the casserole is very easy and will go beautifully with rice or with mashed potatoes.

A note on goulash and etymology. The word comes from the Hungarian gulyás (pronounced as we in the UK pronounce goulash – Hungarian is one of those languages where none of the consonants and very few of the vowels do what you think they will), which means cow-herd. If you order a goulash in Hungary you’ll either get a a beef or veal soup, which may or may not contain paprika, or an un-thickened stew with beef, veal and vegetables. The paprika casserole which we in the UK call a goulash is called a papricás (pronounced “paprikash”) or pörkölt – it’s also a dish which originates with Hungarian herdsmen, but somehow the word goulash has come to embrace it over here. I know at least one Hungarian out there (hello Andras) who will probably find something horribly inauthentic about the casserole I’ve made here, but I think you’ll like it nonetheless.

To serve six (it’s worth making plenty – this is an easy recipe which freezes well), you’ll need:

Goulash
1kg beef braising steak, chopped into pieces
3 tablespoons plain flour
4 onions
2 tablespoons sweet paprika
1 teaspoon hot paprika
1 teaspoon sugar
4 cloves garlic
2 bay leaves
1 teaspoon caraway seeds
3 tablespoons tomato purée
250ml white wine
750ml stock (vegetable, chicken or beef)
Zest and juice of 1 lemon
Soured cream/creme fraiche to dollop
Olive oil/bacon fat to brown the meat

Nokedli
4 eggs
1 teaspoon salt
350ml cold water
500g plain flour

Preheat the oven to 160ºC (320ºF).

Dust the meat with the flour and a generous seasoning of salt and pepper. Bring the olive oil or bacon fat to a high heat in a large, thick-bottomed pan, and brown the meat all over (you’ll probably need to do this in a few batches to avoid crowding the pan), removing the browned meat to a bowl.

Reduce the heat to a medium flame, and in the same pan, sauté the onions until they are translucent. Tip the paprika, tomato purée, sugar, garlic, bay and caraway seeds into the onions and continue to sauté for a minute. Return the meat and any juices to the pan.

Pour the wine over the contents of the pan, and using a wooden spoon, scrape away to deglaze any flavoursome brown bits that have stuck to the bottom. Pour over the stock, and bring to a simmer. Cover with a well-fitting lid and put the casserole in the oven for two hours. Check and stir occasionally, and top up with a little water if you think the stew is becoming too dry.

After the two hours are up, add the juice and zest of a lemon, and taste for seasoning. Set aside and heat up when you are ready to eat.

To make the nokedli, put the eggs, salt and water in a large bowl and use a hand whisk to beat the mixture thoroughly. Add the flour a couple of tablespoons at a time until it is all incorporated. You will have a thick, wet dough.

Bring a large pan of water to a rolling boil. If you have a spaetzle or nokedli maker, now’s the time to bring it out. If you don’t, don’t panic; just get a colander out, spoon a ladleful of the mixture into the bottom of the colander, and use the ladle to push the mixture through the colander straight into the boiling water. It will snake out of the colander’s holes in little pieces, which will swell as they hit the water. The colander process can take a fair amount of elbow grease (this is why you might want to buy yourself a nokedli maker), but I like to think I’m mindfully burning off calories in advance of eating far too much. Most of the calories that got burned off here belonged to the chivalrous Dr W, who was probably getting tired of the swearing coming from the kitchen, and took over after a few minutes.

The nokedli are ready as soon as they float to the top of the boiling water. Fish them out with a slotted spoon and keep them in a bowl in a warm place as you work your way through the mixture. You can serve the finished nokedli as they are, or warm them through in a knob of butter in a frying pan, without browning.

Serve the goulash over the nokedli, with a generous splodge of soured cream spooned on top. A sprinkling of oregano and parsley can give this dish a lovely lift, but you may well find you don’t need it.

Braised ox cheek with gremolata crumbs

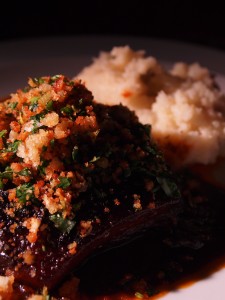
Ox cheek with gremolata crumbsI’ve never been completely clear on why we class cheeks, ox and pork both, as offal. There are no interesting organs here; they’re just muscle and fat, like every other cut of meat on the butcher’s counter. Perhaps it’s because they’re from the head of the animal, inciting a squicky reaction in some – a squicky reaction which I can guarantee those same people wouldn’t apply to a sausage, because they’re not very imaginative. The lengthy ban on the sale in the UK of any cuts from the head or on the bone during BSE made this inexpensive cut disappear for several years, which didn’t do anything at all for its popularity when it returned. You may have to order cheeks in specially at the butcher, but he should be happy to help you.

The meat in an animal’s cheek is tender, rich and basted from within with plenty of flavour-carrying fat. The same goes for fish; when I was a kid, uncles in Malaysia taught me and my brother that the finest bit of a large steamed fish is the cheeks, which we’d pop out with chopsticks and fight over. (A fish-head curry is a fine, fine thing.)

I’ve braised this cheek for hours in a very dense stock-based sauce, and sprinkled some crisp crumbs with herbs and lemon zest over to lift the texture and flavour. Eagle-eyed readers will realise that I’ve nicked the star anise idea, which also brightens the flavour profile of this dish very handsomely, from Bob Bob Ricard. The stock you use is very important, and should absolutely not come from a cube. A good home-made beef stock is essential here. You may find some ready-made alongside the dripping at your butcher’s, but it’s worth making a large pot of your own, some of which you can freeze, and including a roasted marrow bone, some shin or some tail to thicken and beef the stock up. (Sorry.)

To serve four, you’ll need:

1 carrot
1 stick celery
1 large onion
4 star anise
2 bay leaves
4 ox cheeks
500ml passata
500ml beef stock
500ml red wine
1 handful (about 25g) tarragon, leaves picked from tough stalks
1 handful (about 25g) parsley
Zest of 1 lemon
250g white breadcrumbs
Olive oil

Chop the onion, carrot and celery into rough dice. In a large casserole with a lid, sweat the vegetables in a couple of tablespoons of olive oil until the onion and celery are becoming translucent, but not taking on colour. Pour over the liquid ingredients and stir well. Slide the ox cheeks into the casserole with the bay and star anise, season generously, and bring to a gentle simmer.

Set the timer to 3 hours, and continue to simmer with the lid off until the liquid has reduced by about half. Pop the lid on and continue to simmer until the timer goes.

While the cheeks are cooking, prepare your crumbs – for maximum crispiness, do it towards the end of the cooking time. In a large frying pan, sauté the crumbs, moving all the time, in two tablespoons of olive oil until they are golden brown. Remove them to a small bowl. Chop the tarragon and parsley finely and zest the lemon. Stir the herbs and zest into the crumbs with a large pinch of salt and set aside until it’s time to serve the cheeks.

Skim any excess fat off the top of the casserole. Remove the star anise and bay, and discard. Use a skimmer or slotted spoon to fish the cheeks out of the casserole and rest somewhere warm while you pass the sauce through a sieve, using the bottom of a ladle to push the soft vegetables through. Bring the strained sauce back to a simmer.

To serve, ladle a generous puddle of sauce onto a plate, sit a cheek in the middle of the puddle and sprinkle the crumbs over the top. Mashed potato is the perfect accompaniment to this rich dish – you’ll need lots to mop up the delicious sauce. I also served some purple sprouting broccoli (it’s that time of year) dressed with lemon juice and butter, and sprinkled with some toasted pine nuts.

Cottage pie

It’s that stodge-craving time of year, and very few things fit the bill better than a handsome cottage pie. This one has an intense and rich filling, and it’s blanketed with a generous layer of lovely, fattening mash. (In less apocalyptic weather, I’d use a bit less topping, but right at the moment I am mindfully using mashed potato as internal insulation from the biting cold.)

I’ve used veal mince here, from non-crated calves. It has a lighter flavour than beef, and it’s less fatty, but you can substitute beef mince if you prefer it. The root vegetables add sweetness and earthy depth – this is a wonderfully wintery pie. To serve four, you’ll need:

Filling
450g veal mince
1 large onion
1 large carrot
1 large parsnip
1 tablespoon smoked paprika (use unsmoked paprika if you can’t find any)
2 bay leaves
1 thyme leaves, stripped from stalks
100ml vermouth
2 tablespoons tomato purée
2 tablespoons Worcestershire sauce
200ml good beef stock
2-3 tablespoons olive oil

Mash
800g floury potatoes (I used King Edwards)
150ml whole milk
1 large knob butter
Generous grating of nutmeg

Chop the onion, carrot and parsnip into small dice. Take a large, heavy-based pan, and sweat them over a low heat in the olive oil until soft; the onions should be starting to take on some colour. Add the paprika, bay and thyme, and keep cooking, stirring all the time, for two minutes. Tip the meat into the pan and turn the heat up to medium. Stirring and scraping the bottom of the pan all the time, cook until the meat is browning nicely.

Pour the vermouth into the pan and let it bubble up. Add the Worcestershire sauce and tomato puree, then stir in the stock and a large pinch of salt (use all the fingers of your hand to pinch, not just finger and thumb). Bring the mixture up to a simmer and turn the heat down low again. Continue to simmer with the lid on for an hour, then remove the lid and continue to simmer for 20 minutes. Taste and adjust for seasoning.

At this point, you can put the pie filling in the fridge overnight if you have time. As with so many casseroled and simmered dishes, the flavour improves if allowed to settle and develop for 24 hours.

When you are ready to make up the pie, peel the potatoes and cook them as you usually would for mash. When mashing, add the butter, the milk and the nutmeg with a generous amount of salt. Put the filling in a pie dish and spread the mash on top. I like it spread in a sort of thatched roof arrangement, which is pure posing, but does look good. Make sure you mark your topping with a fork – this will ensure you get some nice crispy bits when the pie is cooked.

Bake at 180°C (350°F) for 30 minutes or until golden brown on top.

Oxtail casserole

With the collapse of the global financial system, I notice my local butcher is displaying some less expensive cuts, like lamb shanks, oxtail and pork hock, more prominently than usual. The meat in this dish, which would have comfortably served four, cost £3. (That pork hock is in the freezer, and it cost £2.30 – I think I’ll cook it in a Chinese style later this week.)

Oxtail has a very distinctive, rich, dense flavour, unlike other cuts of beef. It’s well worth making good friends with in winter – slow-cooked, it’s one of the most warming dishes I can think of. A casserole made with oxtail will be pleasingly dense without adding any thickening agents; the gelatin in the meat thickens the sauce with no need for flour.

Cooking on a budget needn’t mean a life of porridge and baked beans. I cooked this delicious oxtail until its meat became meltingly soft in a red wine and beef stock sauce (cheap red wine, home-made stock – buy a tub from the supermarket chiller section if you don’t have your own), with some new potatoes I’d walloped with the side of the rolling pin and roasted with some whole, unpeeled garlic cloves and plenty of salt and pepper. There was sauce left over, gelatinous and rich, and studded with vegetables and butter beans. I warmed it through and spooned what was left over a baked potato for lunch the next day.

To serve four, you’ll need:

1kg oxtail, joints separated
150g smoked lardons
2 medium carrots
1 large onion
4 stalks celery
5 cloves garlic
1 bouquet garni
1 bottle red wine
150ml beef stock
2 generous tablespoons tomato purée
1 teaspoon Worcestershire sauce
1 tablespoon balsamic vinegar
1 can butter beans
Salt and pepper
Parsley to garnish
Olive oil

Dice the onion, carrot and celery into small, even cubes, and slice the garlic finely. Set aside. Heat some olive oil in a large, heavy-bottomed pan, and brown the oxtail carefully all over. Remove the oxtail to a plate. Fry the lardons in the pan until they start to crisp and release their fat. Lower the heat to low/medium and add the diced vegetables and garlic to the pan. Sauté, moving around vigorously, until the onions and celery are softening and have turned translucent. Return the oxtail and any juices to the pan, stir well to mix, and pour over the wine and stock with a teaspoon of salt and a generous amount of pepper. (You are allowed to subtract a glass of wine from the bottle before you add it to the pan if you really want: cook’s privilege.) Add the bouquet garni, tomato purée, Worcestershire sauce and vinegar to the pan and bring to a gentle simmer, turn the heat right down, pop the lid on and leave to cook gently for four hours, stirring every now and again.

At the end of the cooking time, reduce the sauce with the lid off a little if you’d like it even thicker and richer. Drain the can of beans, and add them to the casserole, simmering for fifteen minutes. The meat will be falling away from the bone easily. Serve with plenty of starchy potatoes to soak up all the delicious sauce.

Spaghetti bolognese

Four hundred-plus posts on this blog, and there are still some really basic, popular things I’ve not written about. Would you believe that I haven’t cooked a spag bol since 2005? I spent yesterday evening remedying the problem – here’s a recipe for a rich, savoury, gorgeously gloppy version, full of wine and herbs.

As any self-respecting Italian will tell you, if you ordered what we call spaghetti bolognese in Italy, you would get a funny look. In Italy, this sauce is called ragù or ragù alla bolognese, and it’s not usually served with spaghetti – you’re more likely to find your ragù as a layer in a lasagne or served with tagliatelle.

Back in 1992, the folks in Bologna decided that they had had enough of the world’s bastardisation of their hometown sauce, and the Bolognese chapter of the Accademia Italiana della Cucina issued a proclamation. From that point on, bolognese sauce would be defined strictly, and could only be called ragù alla bolognese if it was made with a limited set of ingredients: beef, pancetta, onions, carrots, celery, passata, beef stock, red wine and milk.

Inevitably, I’ve strayed away from the strict letter of the Accademia’s law here in (cough) a few details, but I don’t think you’ll be too saddened by this, because what results is damn tasty. Please use the anchovies even if you don’t usually like them – they add a subtle depth to the sauce, but they don’t make it taste fishy.

To make enough spaghetti bolognese to serve four, you’ll need:

500g ground or minced steak (ground steak is more authentic here, but if you can’t find it, mince is fine)
4 banana shallots
5 anchovies
2 bay leaves
2 carrots
2 sticks celery
500g passata (pressed tomatoes)
1 tablespoon dried oregano
4 cloves garlic
5 sundried tomatoes in oil
¼ bottle red wine
1 ladle beef stock
1 tablespoon balsamic vinegar
1 tablespoon Worcestershire sauce
1 large handful fresh oregano
1 large handful fresh basil
Salt and pepper
Olive oil
Parmesan to garnish

Chop the shallots finely and sweat in a large, heavy-bottomed pan with a lid over a low heat in a couple of tablespoons of olive oil for about 20 minutes, until translucent but not colouring. Add the anchovies and bay leaves to the pan and continue to cook, stirring, until the anchovies disintegrate into the shallots. Turn the heat up to medium-high and add the beef to the pan, cooking, stirring occasionally, until the meat is browning all over. Add the finely diced carrot and celery with a tablespoon of dried oregano and the chopped garlic and chopped sundried tomatoes. Sweating off these vegetables will add some moisture to the pan – keep cooking and stirring until the pan is nearly dry again.

Pour the wine into the beef mixtures, bring up to a simmer and add the passata and beef stock with the Worcestershire sauce and balsamic vinegar. Season with salt and pepper. Simmer gently with the lid off until the sauce has reduced to a thick texture (20-30 minutes), and continue to simmer with the lid on for as long as possible, checking occasionally and adding a little water if things seem to be drying out. Mine was on the hob for four hours – if you have time to leave yours even longer, feel free – the longer the better.

Immediately before serving, stir through the chopped fresh herbs. Cook 100g spaghetti per person according to the packet instructions, and serve with the sauce and parmesan cheese.

Chilli con carne

It is with a degree of trepidation bordering on downright terror that I post a chilli con carne recipe. Chilli is one of those dishes which people have very set ideas about – your family chilli will probably differ from mine, the canonical chilli recipe from your town will differ in some subtle and important way from the canonical chilli recipe from the town next door, and I fully expect howls of outrage in the comments section because there’s some detail in my chilli which you think is downright barbaric in comparison to yours. Howling makes me nervous. Let me know what makes your own chilli recipe special – and if you can do it without the howls I will be super-grateful.

This is one of those recipes which rewards you for making extra. Like all casseroles, it’s best eaten when it’s had a night in the fridge for the flavours to meld, and I like to freeze several portions for those lazy evenings when you just can’t pull together the energy to cook from scratch.

I’ve used Ancho peppers here – compare them to the fresh Poblanos (their non-dried cousins) from the crema earlier this week. If you can get the fresh peppers, it’s really worth making the crema to accompany this dish. The Anchos and another two varieties of chilli work with the bell peppers to achieve a gorgeously rounded, fruity base to the dish, packed with chilli heat.

To make between eight and ten portions, you’ll need:

1kg lean steak mince
2 large onions
6 fat cloves garlic
6 stalks celery
3 yellow, orange or red bell peppers
3 Ancho peppers
2 teaspoons cumin
1 teaspoon fennel seeds
1 cinnamon stick
2 bay leaves
2 teaspoons cayenne pepper
2 tablespoons Chipotle peppers in adobo
1 litre passata
1 large glass red wine
2 tablespoons tomato puree
Juice of 1-2 limes
2 x 400g cans kidney beans
Olive oil
Salt and pepper

Dice the onions, celery stalks and bell peppers into even pieces, and use scissors to chop the Anchos (seeds and all) into bits about the same size. Chop the garlic into small pieces. Take a large, heavy-based casserole dish, and blanch the diced vegetables with the cumin, fennel, cinnamon stick, cayenne and bay leaves in a couple of tablespoons of olive oil, stirring all the time, until they are turning soft, but not taking on any colour.

Add the steak mince to the casserole dish and cook over a medium heat, stirring well, until the meat is browned. Pour over the passata and the wine, stir the Chipotle peppers and their sauce, the tomato puree and a large teaspoon of salt into the mixture and bring up to a simmer. Turn the heat down low and put on the lid, and leave to simmer for 1½ hours, stirring regularly.

At the end of the cooking time, stir the drained beans in and continue to cook for ten minutes. Taste for seasoning – you will probably have to add a little more salt. Add the juice of one of the limes, taste again and judge whether you will need the other one. (Limes vary in sharpness and juiciness, so you may be able to use just one.) Decorate the finished chilli with chopped coriander – I like to have a bowl on the table so diners can add as much as they like.

If you haven’t made the crema, a bowl of sour cream on the table will be tasty and will help take the heat of the chillies down a little. There are plenty of easy Mexican recipes on Gastronomy Domine you can pep this up and add interest with – it’s great for an informal party – try one of the salsas, some guacamole or a gorgeous corn and squash puree. You can serve your chilli on rice, as I have here – it’s also great in tortillas, on a baked potato or even with chips for dipping.

Corned beef hash

This breakfast recipe is subject to another of those language difficulties that occasionally pop up when writing about American food in Britain. Here in the UK, when we say corned beef, we always mean the fatty stuff in trapezoidal tins that your Mum used to put in sandwiches with Branston pickle for your packed lunch. In America, corned beef can refer to the stuff in the cans, but usually means something more like what we in the UK call salt beef – a slab of beef brisket which is salted and preserved. (‘Corned’ means treated with corns, an archaic word for coarse grains of salt.) You can make this recipe with either kind of corned beef, but if you have the ‘fresh’ sort (from a deli, and not out of a tin), you’ll need to chop it finely before you begin.

Those trapezoidal tins have a long history – they were originally produced as military supplies, and British soldiers were eating corned beef in the Boer war. I wonder how handy bayonets are for opening tins. These days, tins of corned beef are really easy to find in the supermarket, and are very inexpensive. This is a really, really cheap dish to make, coming in at under £1 a head, and you may already have all the ingredients in your storecupboard. It’s also absolutely delicious, and a great breakfast to set you up for an active day ahead.

Finally, a word on the eggs. I used very fresh hen’s eggs, but this is an occasion where it’s really worth trying to get your hands on duck eggs, which are big, delicious and somehow very well suited indeed to this recipe. Some butchers carry duck and goose eggs – ask next time you visit.

To serve two, you’ll need:

2 baking potatoes, scrubbed but not peeled
2 large onions
1 can corned beef
1 tablespoon Worcestershire sauce
1 tablespoon chilli sauce (I used Sriracha – see below)
1 tablespoon Angostura bitters (use a tablespoon of vermouth if you don’t have any)
½ teaspoon onion salt
¼ teaspoon thyme
½ teaspoon paprika
¼ teaspoon ground cumin
8 twists of the pepper mill
1 tablespoon fresh parsley, chopped finely
4 eggs
Olive oil

Chop the corned beef into 2cm cubes and mix thoroughly with the herbs, spices, Angostura bitters, Worcestershire and chilli sauces. Choose a reasonably sweet chilli sauce with a good amount of garlic in it – Sriracha is great here, but experiment with other sauces if you have a particular favourite, and use more or less if you prefer extra heat or a milder dish. Set aside while you prepare the onions and potato.

Chop the onions in half and slice each half finely. Heat about a tablespoon of olive oil over a high flame in a non-stick pan, and tip the onions in. Chop the potatoes, with their skin, into 2cm cubes. Continue to fry the onions until they begin to take on colour, then add the potatoes to the pan with a little more oil. Keep stirring every minute or so.

When the potatoes are cooked through and are turning brown at the edges, and the onions are brown and caramelising (about 15 minutes), add the beef mixture to the pan. Stir thoroughly and turn the heat down to low. In another pan, fry the eggs. (I like mine with set whites and lovely runny yolks to mix into the hash.) Turn out the hash onto hot plates, and place two eggs on the top of each portion. Eat with toast and a big mug of hot coffee.

Curry puffs

I’m having a bit of a Malaysian food binge at the moment, and the beef curry puff is about as Malaysian as you can get. These little pasties are made from a mouth-meltingly short, flaky pastry, and are filled with a rich beef, onion and potato curry.

There are as many variations on the curry puff as there are cooks. Some prefer a shortcrust pastry, some like a chicken or vegetable filling – I’ve also seen sardine in Malaysia. Some are so fiercely spiced you need to cool your tongue between bites, some so subtle that they come across…well…a bit Cornish pasty. This recipe is just gorgeous – serve some curry puffs next time you have some friends round and just watch how fast they vanish. Try to use beef dripping to fry the filling if you can find it; it gives the curry puffs a delicious beefy depth. (Use vegetable oil if you can’t find any.)

To make about 30 you’ll need:

Filling
Beef dripping to fry
12 oz onions, diced
12 oz waxy potato, cut into 1cm cubes
1 teaspoon ginger, diced very fine
5 cloves garlic, diced very fine
8 shallots, sliced thinly
1 lb minced beef
4 tablespoons Madras curry powder
1 can coconut milk
Juice of 1 lemon
2 tablespoons caster sugar
3 teaspoons salt

Pastry
1 lb flour
4 oz butter
8 oz lard
1 egg, and another to glaze
2 tablespoons sugar
Juice of ½ a lemon
6 fl oz water

Start by cooking the filling. Stir fry the onions in a tablespoon of beef dripping until they are soft and translucent. Remove them to a bowl and set aside. Add another tablespoon of dripping to the pan and fry the potato cubes in the same wok with a pinch of salt until they begin to take on a little colour, then pour over 4 fl oz of water and put the lid on, reducing the heat to a simmer. Cook for between five and ten minutes, until the potatoes are cooked through. Put them in the bowl with the onions.

In the same wok, stir fry the ginger, garlic and shallots in a little more dripping. When the spices are giving off their scent, add the beef and stir-fry for five minutes until well mixed. Add the curry powder and continue to stir-fry until all the beef is coloured. Add the onion and potato, stir thoroughly, then add the coconut milk, sugar, salt and lemon juice.

Reduce the heat to a low simmer, and reduce the mixture until it’s thick and glistening. Taste, adding more lemon juice and salt if you think it needs it. Cool and refrigerate. (This is important – you’ll find the puffs much easier to fill if the curry is cold. A warm filling will be slightly runny.)
You can make the pastry and fill the puffs on the same day you prepare the filling, but the filling is one of these things that really improves by being kept in the fridge for a day – the flavours deepen and meld.

To make the pastry, mix the egg, sugar, salt, water and lemon in a measuring jug and refrigerate until it’s nice and cold. Sieve the flour into a bowl, and rub in the butter until the mixture looks like breadcrumbs. Cut the lard into little cubes (about the same size as you cut the potato) and blend it well with the flour/butter mixture. Add the contents of the measuring jug and bring everything together gently with your hands. Rest the pastry in the fridge, wrapped in clingfilm, for an hour.

Slice the pastry in two and roll out half into a thin rectangle. Fold the rectangle into three (as if you were folding an A4 sheet to fit in an envelope) and roll it out again. Repeat the folding and rolling four times. Cut out rounds about ½ cm thick with a large fluted pastry cutter and repeat the process with the other piece of pastry. (If you’ve scraps left over, just roll them out and use the cutter on them.)

Beat an egg and put it in a cup where you can reach it easily as you work.

Put a tablespoon of filling in the middle of each pastry circle, and wipe some beaten egg around half the edge. Press each edge together to seal and crimp the curry puff. Arrange the puffs on a baking tray and brush each with the beaten egg to glaze.

Bake at 230° C for the first 10 minutes, then reduce the heat to 200° for 20 minutes. Cool (if you can bear to – ours usually go straight from the oven into slobbering mouths) on a cake rack.