Chocolate puddle pudding

This is a rich chocolate pudding, which makes its own sauce when cooked and rises like a chocolate sponge island in a syrupy chocolate sea. Your mother probably made chocolate puddle pudding. I’ve been asking around, and everybody’s mother seems to have had a similar recipe – and what sensible mothers they were, because this is rich and delicious, malevolently chocolatey and so quick and easy that my cats could make it (given opposable thumbs, the ability to read recipes and access to some weighing scales, an oven, bowls and…you get the idea). To serve six, you’ll need:

6 tablespoons cocoa powder
150 g self-raising flour
1 teaspoon baking powder
200 g vanilla sugar (or 200g caster sugar and a few drops vanilla essence)
30 g salted butter
75 g dark chocolate (use something with a high proportion of cocoa solids)
150 ml milk
150 g soft brown sugar
500 ml hot water

Preheat the oven to 180° C (350° F).

Measure the flour and vanilla sugar into a large mixing bowl with two tablespoons of the cocoa powder and the baking powder. Melt the butter and chocolate together, and when melted, add them to the bowl with the milk. Stir with a wooden spoon until everything is well blended, and spread the mixture (which should be a thick paste) into the bottom of a baking dish. (I used a 20×30 cm dish.)

Mix the soft brown sugar with the remaining four tablespoons of cocoa, and sprinkle them over the top of the sponge mixture. Pour over the hot water (this should be hot from the kettle but not boiling) and put in the oven for 45 minutes. The sponge pudding will rise through the puddle of chocolate sauce. Serve with vanilla ice cream or a big dollop of cream.

Currant cakes

I love currants. The little dried rabbit-dropping things, I mean, not the tart currants that we grow in England, which are all very well in Cumberland sauce and so on, but lack the sweet seductiveness that you really need for an excellent cake. The currants I am talking about are Zante currants, which are tiny, tiny dried grapes grown absurdly sweet in the Greek sunshine. They’re the fruit you’ll find in Eccles cakes, and they have a wonderfully sweet and mildly tangy flavour, quite different from other dried vine fruits.

Horrifyingly, especially if you share my tidy British habit of compartmentalising foods, I discovered when living in France that on mainland Europe nobody differentiates between currants, sultanas and raisins. If it’s small, dark and wrinkly, it’s called a raisin, so if you are in France and want some currants, you’re going to have to do a bit of light mime in the grocer if you want to buy proper, tiny Zante currants rather than horrible giant American golden raisins, which are processed with sulphur and taste rubbish. The golden raisin sometimes masquerades as a sultana in the UK too – beware.

I’ve iced these currant cakes with a really easy buttercream, which is deliciously mellow with the tartness of the dried fruit. To make about 18 cakes, you’ll need:

Cakes
100g softened butter
100g caster sugar
100g self-raising flour
1 teaspoon baking powder
2 medium eggs
50g currants

Buttercream
175g softened butter
350g icing sugar
2 tablespoons warm water

Preheat the oven to 200° C (400° F). Lay 18 little paper cake cases in bun tins, and beat all the cake ingredients together in a mixing bowl with an electric whisk for two to three minutes, until the cake mixture is pale, smooth and fluffy. Divide the mixture between the cases (they should each be about half-full).

Bake in the hot oven for between 15 and 20 minutes. Devotees of this blog should be familiar with the Dr Weasel Aural Method of cake testing – when your little cakes come out of the oven, bring an ear close to them and listen carefully. If the cake is making tiny prickling noises, it is not ready: return it to the oven for a couple of minutes. A finished cake is silent. As Emily points out in the comments, a finished cake may not be *entirely* silent. Minimal prickling noises are allowed – do not allow your cakes to carbonise.

Put the cakes in their paper cases on a wire rack to cool. While they are cooling, make the buttercream icing by using your electric whisk to beat the butter, water and icing sugar together until it too is pale, smooth and fluffy. Spread the icing on the cakes when they are cold, and decorate any way you like.

Coconut ice

This is a recipe that’s ideal for child-centric bake sales – school fêtes, church fairs, that sort of thing. Kids love making sweeties, and coconut ice is one of the few sweets that doesn’t require any cooking, so it’s a safe recipe for little hands to get stuck into.

If you’re making this with children, it’s worth buying pink food colouring rather than just using a teeny amount of red. Children let loose on red colouring can easily produce coconut ice that looks like the St Valentine’s Day Massacre, so spend 40p on the pink stuff for a reliably Barbie-pink finish.

I have found myself a little queasy around condensed milk since John Prescott announced his uncanny ability to “sup a whole tin of Carnation…just for the taste” (and then spew it forth again). Coconut ice a very good way to rehabilitate the stuff. The amount this recipe produces will help you erase any such nasty images from your mind via the diabetic coma you’ll fall into if you eat all of it.

To make just over a kilogram of coconut ice, you’ll need:

400g dessicated coconut
400g icing sugar
1 tin (397g) condensed milk
½ teaspoon pink food colouring

In a large bowl, stir the dessicated coconut, icing sugar and condensed milk together until you have a stiff, sticky mixture. Remove half the coconut ice to a clean bowl and add the food colouring, then stir again until the colour is blended in smoothly. (Stirring this is hard work because the mixture is rather stiff, so children will need supervision.)

Line a small rectangular dish with cling film, making sure there is plenty overhanging at the sides. (Later, you will fold these overhanging bits over to cover the coconut ice.) Grease the cling film with a few drops of vegetable oil. Take the white portion of coconut ice and pack it firmly into the lined dish, making sure you produce an even layer. Pack the pink portion into a neat layer on top of the white layer. They will stick together firmly, thanks to the amazing adhesive qualities of sugar and condensed milk. Fold the cling film over the top and refrigerate the coconut ice overnight.

When the coconut ice is nice and firm from the fridge, turn it out of the dish, using the cling film to help, and peel the film away. Chop into little squares (a serrated knife is useful here), dust with icing sugar and pack in greaseproof paper for the school fête.

Chocolate fondue

Thanks for all the kind emails – I’m still recovering from the flu and am decidedly wobbly, but a whole lot better than I was at the start of the week. Just as well, because next week I’ll be in Helsinki, on the lookout for reindeer, vendace roe, rye bread and soused herrings.

Cooking’s been beyond me since my encounter with this horrible germ, and my tastebuds are still not giving any kind of sensible feedback to my brain – most things are still either tasteless or, oddly, extremely bitter. Happily, there’s one foodstuff that even the flu can’t ruin for me: chocolate. So it’s out with the new fondue set.

If you’re making your own chocolate fondue, try dipping cantucci, those hard little Italian biscuits; dried pear, marshmallows and fresh, ripe bananas are also great. I’m not a huge fan of strawberries in any chocolatey context; they’re too acid, especially out of season, to work well with chocolate. I’m aware that I’m in a minority here though – if you like strawberries dunked in chocolate, dip away.

To serve four, you’ll need:

250 g good quality dark chocolate
100 ml double cream
2 tablespoons Amaretto
Fruits, biscuits, fresh almonds etc. to dip

Hopelessly easy, this. Put your chocolate in a sealed bag and wallop the hell out of it with the end of a rolling pin, until it’s reduced to little bits. Stir the chocolate bits into the cream in your fondue pot, and melt together with the cream over a low heat on the hob, stirring all the time. Transfer to a low flame on the fondue stand and stir in the Amaretto. Proceed to fight over who gets the pink marshmallows.

Sticky toffee pudding

Way back in the early 1980s, my mother used to get a magazine (now sadly defunct) called A La Carte. It was some serious aspirational 1980s stuff – all glossy pages, gorgeous photos and recipes full of exotic (for the 80s) things like sun-dried tomatoes. Long after the rest of her collection had vanished, one issue of the magazine stayed downstairs on the cookery book shelves. It was Easter, so there was a fluffy rabbit frolicking in salad leaves on the front, and a bold headline saying ‘Lettuce play’. Page upon page of salad with more bunny porn followed – along with a recipe for something called an Ooey, Gooey Sticky Toffee Pudding – the sole reason for preserving this issue of the magazine for thirty years.

These were the dark days of the Falklands and the miners’ strike. Nobody else in Bedfordshire seemed very interested in food. At school and at my friend’s houses, pudding was always instant Angel Delight, a scoop of fatty, pink ice-cream or jelly. At home, it was different – where the other children were eating bowls of instant custard with a banana chopped into them, my lovely Mum was making sticky toffee pudding, and we had the most inventive salads in town.

To make sticky toffee pudding for six, you’ll need:

Pudding
150g stoned dates
250ml hot water from the kettle
1 tsp bicarbonate of soda
60g softened unsalted butter
60g caster sugar
2 large eggs
150g self-raising flour

Sauce
200g butter
400g soft brown sugar
1 vanilla pod (or a few drops of vanilla essence)
250ml double cream

Heat the oven to 180°C (370°F).

Chop the stoned dates finely with a small sharp knife and put in a bowl. Sprinkle over the bicarbonate of soda and pour over the hot water, stirring well. Set aside for ten minutes while you prepare the rest of the cake mixture.

Cream the butter and sugar together, then beat the eggs into the mixture. Gradually stir in the sifted flour, then fold in the date mixture. Pour the batter, which will be quite loose, into a greased, 20 cm square cake tin, and bake for 35-40 minutes, until a skewer comes out clean. The cake will have risen, but not dramatically – this is quite a dense pudding.

Make the sauce while the cake is baking. Melt the sugar and butter together with the vanilla pod and cook over a medium heat, stirring, for five minutes. Stir in the double cream and bring to a low simmer for another five minutes.

Make holes in the top of the cake with your skewer and pour over half of the sauce. Serve immediately with extra sauce to pour over at the table, and a jug of cold double cream. (Some like this dish with ice cream, but I like cream best.)

Easy chocolate truffles

It’s heartening to realise that the richest, velvety-est, most sinful chocolate truffles you can imagine are very easy indeed to make. There’s no faffing around with tempering or measuring fat/solid ratios – just some melting and chilling.

These dense little balls of silky paradise are full of things that make the animal bits of your brain go tick. The chocolate itself, packed with theobromine, stimulates the release of feel-good endorphins. The creamy, cocoa rush that emerges when they melt fatly on your tongue makes the hairs on the back of your neck stand up. If the way to someone’s heart really is through the stomach, these are the digestive equivalent of a scalpel: precise and potentially deadly.

You’ll need to keep these in the fridge and eat within about three days of making them for maximum freshness. If, unaccountably, you can’t manage to get through this volume of chocolate in half a week, these truffles freeze very well.

To make 50 truffles (depending on how many you find yourself eating as you roll them) you’ll need:

300g good quality, dark chocolate
300ml double cream plus 2 tablespoons
50g salted butter
Cocoa to roll

choc crumbsStart by preparing the chocolate by blitzing it in the food processor until it resembles very delicious-smelling breadcrumbs (see the picture for the sort of texture you’re aiming for). If you don’t have access to a food processor, you can grate it with the coarse side of your grater – this is laborious, but works well. Remove the chocolate to a large mixing bowl.

Using a thick-bottomed pan, bring 300ml of thick cream and the butter slowly to simmering point. I like to use salted butter in a ganache; the small amount of salt is undetectable in the finished product, but it lifts the flavour of the chocolate. Stir the hot cream mixture well and transfer it to a jug.

ganacheTo make the ganache that will form your truffles, pour the hot cream and butter into the bowl full of chocolate in a thin stream, stirring all the time. The chocolate will melt and combine with the cream, and you’ll end up with a very runny, silky, dark brown mixture. Finish by stirring two tablespoons of cold cream into the mixture (this helps to prevent the mixture from seizing, or becoming granular) until the ganache is evenly coloured. Cover the bowl and place in the refrigerator to firm the ganache up.

At this point, you have a choice. You can take the ganache out of the fridge and use an electric whisk to beat it to soft peaks about an hour into the chilling time. Be careful not to overbeat to avoid the dreaded seizing. This will result in soft, airy, fluffy truffles, and will also add volume to your mixture so you’ll have more truffles at the end. (You’ll find that many shop-bought truffles are the beaten kind – you need much less chocolate per truffle, so it works out cheaper for the manufacturer.) I much prefer my truffles dark, dense and silky, so I prefer to leave the ganache without beating.

If you are not whisking the ganache, leave it in the fridge for at least four hours or overnight. You’ll find you now have a nice stiff mixture. If you want to add flavourings or bits of nut, citrus zest, crystallised ginger or other spices, now is the time to do it, using the back of a fork to mush any well-chopped additions into the ganache. (Again, I like my truffles dark, dense and above all chocolatey, so I don’t adulterate them.)

Lay out petits fours cases and put a couple of heaped tablespoons of cocoa on a plate. Use clean hands to mould teaspoons of the ganache into balls, then roll them in the cocoa – this stops them from sticking and makes them look tidy. Place each one in a little case. Those feeling daring can roll their truffles in crushed nuts, shredded coconut or demerara sugar instead of cocoa. Presto – you’re finished. I think these are at their absolute best with a hot cup of freshly brewed coffee.

Brandysnaps

I’ve never met a person who doesn’t love brandysnaps. They’re a buttery, toffee-crisp, lacy bit of teatime royalty. Fox’s, the English biscuit people, started manufacturing these in the 1850s to sell to fairground traders, but they’re a much older recipe (the owner of Fox’s borrowed a family recipe from his neighbour in Yorkshire), which used to be cooked in the home. You can still buy them in packets – but they’re much, much nicer when they’re homemade.

There’s no brandy in the recipe – from what I can make out, brandysnaps never contained any at any point in their history. Some modern recipes will suggest that the cream you serve them with should have a couple of tablespoons of brandy whipped into it, but after some experimentation I’ve decided that this is overkill (and inauthentic overkill at that). The gentle spicing of the brandysnap can be overwhelmed by a strong-tasting filling, so I have used a simple Chantilly (which is just cream whipped with sugar and vanilla) alongside them. These fragile little gingery curls are delicious with cream and soft fruit as a dessert, but they’re also near-perfect eaten completely unadorned, alongside a cup of good coffee.

To make about 20 brandysnaps, you’ll need:

75 g caster (superfine) sugar
125 g golden syrup
125 g salted butter
90 g plain flour
1½ teaspoons ground ginger
Zest of one lemon

Start by measuring out the sugar in your measuring bowl, and spread it carefully over the bottom of the bowl. Then measure out the golden syrup into the same bowl, on top of the sugar. This will stop the golden syrup from sticking to your bowl, and will ensure that you don’t lose any because it’s adhering. Tip the sugar and syrup straight out into a small saucepan, add the butter to the pan and cook them all together over a low flame, stirring with a wooden spoon, until the butter is melted and you have a smooth paste. Don’t allow the mixture to boil. When it is smooth, remove the pan from the heat and tip in the flour, ginger and lemon zest. Stir vigorously until you have what looks like a smooth, thin batter.

Set the pan aside for about 30 minutes, until the mixture is cool, and heat the oven to 190° C (375° F). Grease a baking tin thoroughly.

You’re going to be cooking the brandysnaps four at a time -the mixture spreads out so four just about fill a baking tin, and you will have to curl them while they are still warm – handling more than four at a time is very difficult because they harden quickly, and if you cook more than one tray at a time, by the time you get to your fifth it is likely to have set solid.

Place four heaped teaspoons of the mixture, about four inches apart, on the greased baking tin and put in the oven for ten minutes, until the brandysnaps are bubbly and lacy. Remove the tin from the oven and allow the brandysnaps to cool for about a minute, until they are stiff enough to manoeuvre. Use a spatula to release each flexible brandysnap from the tin, and wrap them around the handle of a wooden spoon to create the tube shape. Cool on a wire rack. (If you want brandysnap baskets rather than curls, drape them over an upturned ramekin rather than wrapping them round a spoon.)

Repeat the process for the rest of the mixture.

I served my brandysnaps with Chantilly (150 ml whipping cream whisked into stiff peaks with 2 teaspoons of vanilla sugar, or 2 teaspoons of caster sugar and a few drops of vanilla essence) and blueberries. You can pipe the cream into the little tubes or serve it alongside them, but don’t fill them more than about half an hour before serving, or the brandysnaps will lose their crispness. Surprisingly, brandysnaps freeze very well once cooked, maintaining their crunch.

Pineapple upside-down cake

Pineapple upside-down cakeTwo cake recipes in a week! This is blog democracy in action – many of you have asked for more dessert recipes, so in response, I have been baking like a demon.

This is a handsome cake. The caramel and fruit layer on a pineapple upside-down cake looks positively jewel-like, and tastes glorious, soaking into the cake to add a rich moistness to an already toothsome sponge. If, like me, you significantly lack cake-decorating skills, you’ll like this recipe, which produces a foolproof but rather beautiful piece of baking. If you can get pineapple tinned in syrup rather than juice, use that for an extra kick of gloss and sweetness; however, if all that’s available near you is the kind in juice, that will work perfectly well. (It’s what I used here.)

To make one pineapple upside-down cake, you’ll need:

50g salted butter
50g soft brown sugar
1 can pineapple rings (in syrup if possible)
Glacé cherries
3 tablespoons milk
175 g softened unsalted butter
175 g caster (superfine) sugar
3 large eggs
175 g self-raising flour
1½ teaspoons baking powder
Vanilla essence

Pineapple upside down cakePreheat the oven to 180° C (350° F).

Begin by greasing and lining a 25cm round cake tin with greaseproof paper. Don’t use a springform tin – there is caramel in the pineapple layer which will dribble out of a tin with a loose bottom when heated.

Prepare the caramel by melting the salted butter, a couple of drops of vanilla essence and the soft brown sugar together in a small pan and boiling hard for five minutes. (Watch out here – the caramel will be very hot.) Pour the caramel into the bottom of the lined tin, and tip the tin carefully to make sure that it covers the base well.

Arrange the pineapple rings in a tight pattern on the bottom of the tin (see pictures), and put a glacé cherry in the middle of each one. Set the tin aside while you prepare the cake batter.

Put the milk, unsalted butter, sugar, flour, eggs and baking powder in a large bowl and beat with an electric mixer for two minutes, until the batter is pale and stiff. Spread the batter out over the pineapple pieces with a spatula and bake the cake for 50 minutes, until a skewer pushed into the centre of the cake comes out clean.

Allow the cake to cool for about ten minutes in its tin, until it is cool enough to handle (this sponge can be quite fragile when very hot), then place a plate over the top of the cake tin, hold it there firmly and turn the whole assembly upside down, so the cake slips out, upside-down, onto the plate. Slide the cake off the plate onto a cooling rack until it is completely cold.

Elvis sandwich

fat Gordon Brown
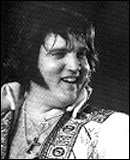
On hearing yet more government waffle about obesity (surely a delicious, cinnamon sugar-dusted waffle) on the radio yesterday morning, I felt moved to action. Especially when Gordon Brown announced that access to the NHS should be rationed for the fat. This seems somewhat hypocritical. Gordon Brown’s own flabby udders are usually concealed by a well-cut suit, but do spare a moment to compare his wobbling great jowls with those of the undeniably fat Vegas-era Elvis, who has been much on my mind recently, it being his birthday yesterday. (Elvis is the one a bit lower down on the right, in case there was any confusion).  I have been kind here. This was not the least flattering photo of Gordon I could find.

Vegas ElvisThe obese pay as much National Insurance as you or I do, and conditional access to a service that we all pay for is a truly alarming idea – my guess is that Gordon’s trying to make sure the NHS reaches its targets by ensuring it has no patients at all. Only last month, the House of Lords, which surely has better things to do with its time, had a debate on restricting the sale of thick-sliced bread so that our packed lunches are less fattening. What better way, I thought, to stick two fingers up at the lot of the buggers, than to use some thick-sliced bread to make one of Elvis Presley’s favourite, most deadly sandwiches – and to encourage you to too?

Elvis was a man of huge appetites. He was particularly big (if you’ll pardon the pun) on very large, very calorific sandwiches involving peanut butter. Legend has it that when visiting Denver, he ordered 22 Fool’s Gold sandwiches from the Colorado Mine Company restaurant (now closed) to be delivered to his aeroplane for the trip home. These sandwiches cost $49.50 each back in 1976. Each one was made from a single French loaf, hollowed out and rubbed generously with margarine. The greasy loaf was coated with peanut butter, baked until the bread was crisp and the peanut butter runny, then adorned with a pound of crisp bacon and a whole jar of grape jelly.

A single Fool’s Gold sandwich rocks up at more than 9000 calories.

I decided not to recreate the Fool’s Gold sandwich, because it seemed a sure-fire route to an untimely death on the toilet. Back at Graceland, however, a favourite snack (snack!) was the fried peanut butter and banana sandwich, which comes in at a relatively modest 750 calories. I used the canonical recipe, which uses an unholy amount of butter, as described by Mary Jenkins Langston, Elvis’s own cook. Now, I am a fan of peanut butter, of white bread, of bananas and of butter. But I have to tell you that I wasn’t able to eat a whole one, and that as I write this I am feeling distinctly unwell and am clutching at a glass of Alka Seltzer.

peanut butter and banana sandwichThis is largely because of the huge amount of butter that goes into this sandwich – two US sticks of the stuff (that’s eight ounces) for every three sandwiches. As Mary herself said, Elvis was very, very keen on using other substances as a mere vehicle for gallons and gallons of good old fat:

”For breakfast, he’d have homemade biscuits fried in butter, sausage patties, four scrambled eggs and sometimes fried bacon,” she said. “I’d bring the tray up to his room, he’d say, ‘This is good, Mary.’ He’d have butter running down his arms.”

Of the sandwich, she said:

”It’d be just floating in butter. You’d turn it and turn it and turn it until all the butter was soaked up; that’s when he liked it.”

It wasn’t drugs that killed Elvis. It was Mary’s cooking.

To make one sandwich (do not, under any circumstances, attempt to eat the whole thing yourself, because you’ll make yourself sick) you’ll need:

1 large banana
2 slices white bread
Peanut butter
2½ oz butter

banana sandwich
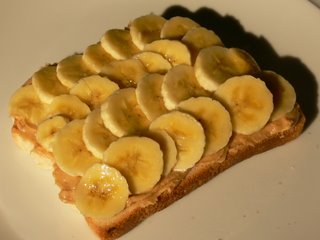
Toast the bread lightly, and spread both slices thickly (I know, I know, but Mary says ‘thickly’, so thickly is how I am spreading) with peanut butter. Slice the banana into coins and layer them on top of one peanut-slathered slice of bread, then put the other on top, pressing so the whole thing sticks together.

Melt the butter in a non-stick frying pan or cast-iron skillet and heat it until it foams. Slide the sandwich in and fry it, turning frequently (important, this turning, or else you will end up with a hunk-a hunk-a burning sandwich) for about five minutes, until the centre is heated through and the lake of butter absorbed.

Eat with a knife and fork, a glass of antacid, and intimations of mortality.
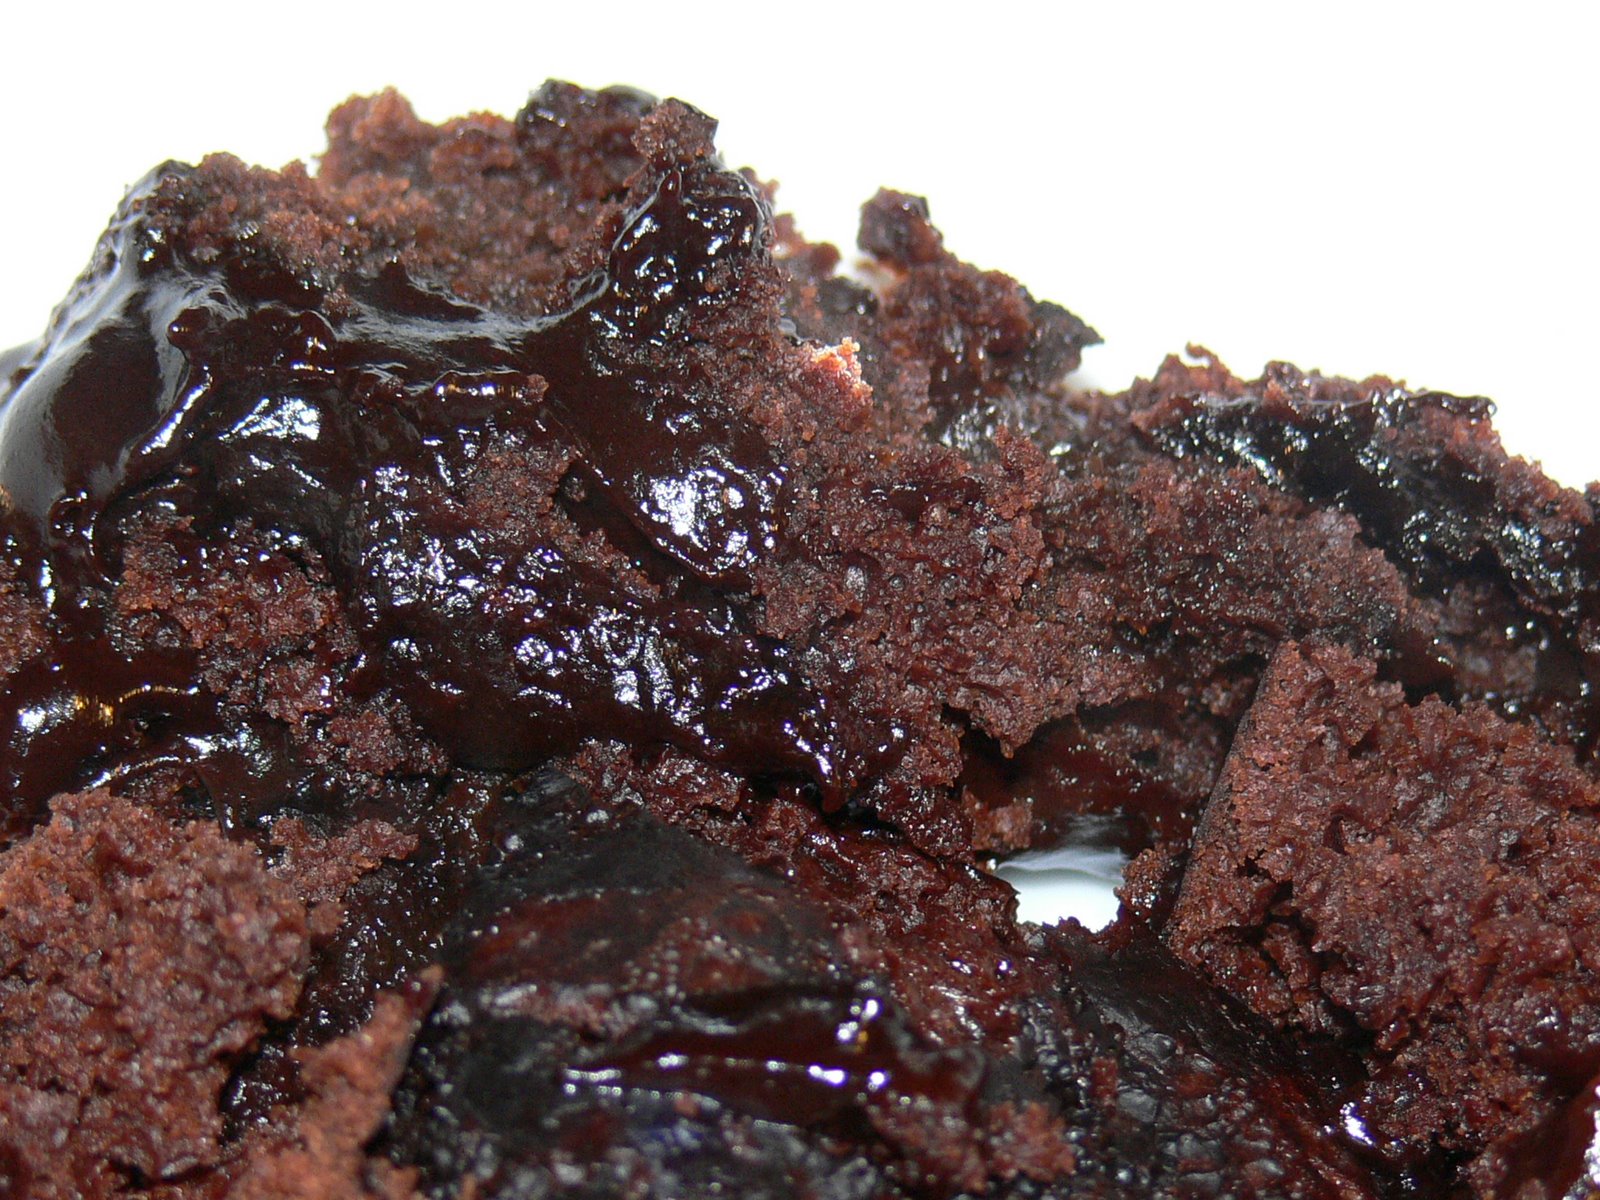
Chocolate fudge cake

Chocolate fudge cakeIcing a cake neatly is a stressful task, so a recipe like this, where a soft, fudgy icing is just slathered all over the cake with a spatula is much more fun than obsessional piping. The cake in the middle of all that icing is a lovely light, moist spongy affair, made rich with plenty of butter and cocoa. This is probably not great for your New Year’s diet, but I’d suggest doing what Dr Weasel is doing today, and making one to take to the office in order to scotch the weight-loss ambitions of your colleagues.

You’ll need:

Cake
3 tablespoons cocoa
6 tablespoons boiling water
175 g softened unsalted butter
175 g caster (superfine) sugar
3 large eggs
175 g self-raising flour
1½ teaspoons baking powder

Fudge icing
50 g softened unsalted butter
35 g cocoa
3 tablespoons milk
225 g icing (confectioner’s) sugar

Preheat the oven to 180° C (350° F). Grease and line a 25cm round cake tin – I like to use a springform tin, which makes turning the cake out later much easier.

Mix the cocoa with the hot water from the kettle in a mixing bowl, and leave aside to cool. Sift the flour into the bowl and add the butter, sugar, eggs and baking powder. Beat with an electric whisk on high for about two minutes, until the mixture is stiff and pale. Spoon into the lined cake tin and bake for 35 minutes. Check for done-ness by pushing a skewer into the middle of the cake. If it comes out clean, with no chocolatey bits adhering, the cake is done. Turn out onto a metal rack and remove the greaseproof paper to cool.

To make the icing, melt the butter in a small saucepan and stir in the cocoa. Cook, stirring well, for about a minute. Remove from the heat and stir in the milk and icing sugar. Beat with a wooden spoon until the mixture is smooth, and cool until thick enough to spread over the cooled cake.

If you like, you can cut the cake in half horizontally at this point and glue the halves together with some of the icing. Dr Weasel, who is in charge of cakes in our house, decided to use the fudgy mixture to ice the top and sides of the cake – and very delicious it was too.