How to shuck oysters

On the phone to my friend James yesterday, I mentioned that I was planning on visiting Waitrose to pick up some Christmas supplies. He suddenly became very excited and started making insistent noises about visiting the fish counter, where, he said, oysters are currently cheap and plentiful. It’s an ‘R’ month, the middle of the oyster season, and he was right; there were dozens spread out on ice for 39p each. I managed to score twelve of my favourite transexual bivalve for less than £5.

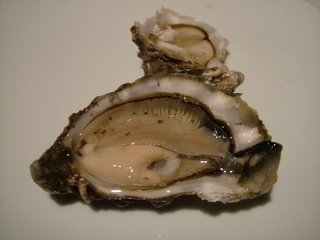
Transexual bivalve, you ask? It’s true; Tiresias, the chap in Ovid who spent seven years being a lady as a punishment for being mean to snakes, didn’t have it this easy. Oysters of the genus Crassostrea (like those we had last night; you can tell them apart from Ostrea oysters by their asymmetrical, elongated shape) decide to be male or female from season to season on a whim. (Ostrea oysters, which are scallop-shaped and symmetrical, are even more confused, changing gender at the drop of a shelly hat, often many times in one breeding season.)

As well as having a phenomenally exciting sex life, the oyster produces pearls (sadly, the oyster you eat is vanishingly unlikely to produce anything that’s not small, brown, gritty and liable to break your teeth), can live for up to fifty years, is said to be an aphrodisiac (I’m saying nothing) and often ends up attached to a rock in the most picturesque bits of sea in the world. When I was a little girl visiting family in Malaysia, my cousin Margaret and I used to wade out into the sea where there were rocks covered with oysters at low tide, and bash the shells open with a stone, scooping the quivering flesh into greedy mouths. We were horrible children.

Eating-oysters will not be particularly venerable; the flavour becomes less good after they’re about five years old, so those you buy at the fishmongers (which are almost certainly farmed; minuscule oyster spats are encouraged to attach themselves to tiles or other collecting devices as their permanent home, and are scraped off and lovingly cared for until supper time three years later by professional oyster herdsmen) will be mere oyster striplings.

So. You’ve bought your oysters. How should you go about opening them? You’ll need an oyster knife (or another short, wide-bladed knife with a point), a towel, and a bowl to catch any juices you spill. Hold the oyster in a towel in your left hand (right hand if you are left-handed) with the curved half of the shell in the palm of your hand. The flat shell on top is the oyster’s lid. Force the point of the knife in where you can (as close to the hinge as you can manage), and twist it ninety degrees to break the muscle and pop the lid off. Use the blade of the knife to remove the meat from the underside of the lid, and scrape it into the bowl full of meat created by the curved half of the shell. You can release the meat from the bottom of the shell with the knife too, or leave it for the person eating the oyster to do it with a fork.

You need that towel. You will see from the picture that Mr Weasel started the evening considering towel-use unmanly; he changed his mind pretty quickly once he’d stabbed himself for the second time in the palm of the hand. (Those concerned for him have nothing to worry about. He says he’s very happy to be able to point at scars and say casually, ‘That? I did it shucking oysters.’)

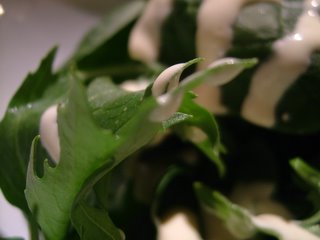
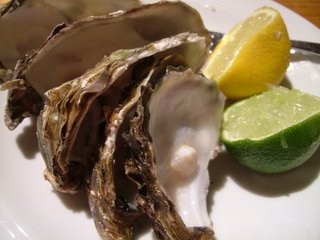
They’re nigh on perfect tipped straight into your mouth from the shell, raw and tasting of the sea, but they do benefit from some carefully chosen accompaniments. We used a squeeze of lemon, a squeeze of lime and a microscopic dab of wasabi. (When you buy wasabi, try to get hold of it in powdered form to make up yourself. If you do get a tube, do your best to find one whose ingredients list reads ‘horseradish’ or ‘wasabi’ and nothing else.) Some people use Tabasco sauce or minced shallots in wine vinegar; I find both these a bit too strong. They can hide the subtle, seashore flavour of the oyster.

I should have bought more than a dozen. We scarfed these in five minutes flat.

Peking dumplings

It’s nearly Christmas. The family is descending upon the Uptonarium, and this calls for finger foods which I can freeze and cook quickly, with the minimum of fuss. Not for me, though, the supermarket mini-samosa or the tiny quiche in a box. I’m making Peking dumplings; lovely little pockets exploding with Chinese flavours, which are fried golden and crisp on one side, and steamed soft and tender on the other. In the north of China, these are traditionally eaten on New Year’s Day. Here in the south of England, we’re going to be eating them on Christmas Eve; infinitely nicer than the traditional glass of sherry and a carrot.

These dumplings freeze, uncooked, brilliantly, and, being tiny, defrost very quickly for cooking. If you’re freezing them, you can do the final, cooking step once your dumplings have defrosted. Try them as an alternative to sausage rolls.

For sixty Peking dumplings (I am informed that Americans call these ‘pot-stickers’), you’ll need:

Wonton wrappers
You can either buy sixty wonton wrappers in the Chinese supermarket, or make your own, as I did, using:
1lb very strong white bread flour
1 1/2 cups water

Filling
1lb minced pork
1/4 white cabbage, chopped finely
15 spring onions, chopped finely
1 small tin water chestnuts, chopped finely
1 bulb garlic (about ten cloves), chopped finely
2 in piece of ginger, peeled and chopped finely
1 teaspoon caster sugar
1 teaspoon salt
1 teaspoon msg (leave out if you really must)
2 tablespoons light soy sauce
2 tablespoons Chinese rice wine (substitute cooking sherry if you can’t find any)
1 tablespoon sesame oil

Start by mixing the bread flour and water into a soft, but not sticky, dough, adding more flour or water if your dough is sticky or dry. The resulting dough should be as soft as the plump bit at the heel of your thumb. Set aside in a covered bowl for the gluten to develop.

Chop all the filling ingredients to the same size. You should end up with around the same amount of vegetables as you have pork. Using your hands (I hope you took your rings off to mix the dough, or your diamonds are going to be set in a lovely crusty dumpling mixture), squish the whole lot together until it’s well mixed and holding together loosely. Don’t worry about adding eggs or anything else to bind; the wrappers will keep everything together for you.


Set the filling mixture to one side for the flavours to mingle while you prepare the wonton skins.

There’s a reason you used strong bread flour; the gluten in it will give you a very smooth, tough dough, which stretches easily and doesn’t break and snap. Looking at your ball of dough, I realise it is hard to imagine that you’ll get sixty bits out of it large enough to make into wrappers. Trust me; you will. It’s stretchy stuff. Start by dividing it into two, then divide each of those bits into three. The remaining small pieces are easy to chop into ten equal-sized bits.

Roll each piece into a rough circle on a floury board. You don’t need to be terribly accurate with these; the tops will be frilly anyway, so don’t worry if, like me, you suddenly start acting like someone with fewer than the full complement of fingers when faced with dough and a rolling pin. When you’ve rolled your little wrapper, put it on a plate; you can stack the others on top of it and they won’t stick together.

When all your wrappers are made, put one on the board and place a teaspoon of the mixture (this is quite easy to judge if you make the spoonful about the size of the ball of dough that went to make up one wrapper) in the middle of it. Moisten a semicircle around the edge of the dough (don’t moisten all the way round or it won’t stick), and push the two halves of the circle together, crimping the edges as you go.

I am full of admiration for dim sum chefs, with their lightness of finger and artistry when faced with wrappers. Some of them even make them look like fish or little bunny rabbits. My own are always functional, and never pretty. Anyway; crimp away, and if you’re even half good at this, you’ll end up with something that looks prettier than this picture.

At this point, you can freeze the little dumplings. Line a container with floured greaseproof paper, put a layer of dumplings in, cover with more floured greaseproof paper, add another layer and so on until the container is full. Defrost before continuing to the next stage.

To cook, heat some vegetable oil in a thick-bottomed, non-stick (there is a reason the Americans call these things pot-stickers) frying pan, and when it is hot, slide the dumplings in carefully in one layer, their bottoms in the sizzling fat and their frilly tops pointing upwards. After about five minutes, pour water into the pan until it reaches halfway up the sides of the dumplings. Simmer over a medium heat without a cover until all the water has evaporated. The tops will be delicately steamed and the bottoms brown and crisp. Remove with a slotted skimmer.

These dumplings are traditionally served with black vinegar. (Chinese black vinegar, not the stuff you heathens put on chips.) I enjoy them with a good, sweet, bottled chili sauce mixed with a little soya sauce, alongside a nice cold beer.

Weekend herb blogging – Gnocchi alla Romana in a herbed butter

Everything in the garden is dead or hibernating. Even the slugs seem to have vanished for warmer climes. So today’s Weekend Herb Blogging post (thanks to Kalyn from Kalyn’s Kitchen for organising things again), although packed with herbs, is packed with herbs from the supermarket. I feel like I’m cheating. Roll on summer.

You might be used to gnocchi as little Italian dumplings made of potato, served in a sauce. Gnocchi alla Romana are the traditional form of dumpling from Rome, and they don’t contain potato; instead, they’re made with semolina, and they’re usually served with a flavoured butter. Clearly going to Prague didn’t manage to put me off dumplings.

Semolina is durum wheat, ground coarsely. In the UK you may find it in the same aisle as the ready-made custard, the jelly and the Angel Delight; it’s used in English cookery to make a sort of sloppy pudding. I’d recommend feigning Italian-ness for the day and using it to make these gnocchi; they’re light, fluffy and infinitely nicer than any doughy pudding. You’ll often see semolina gnocchi baked into sliced or cookie-cut shapes, but I prefer to make them into roughly-textured balls; this way you get a larger surface area, and therefore more delicious crusty bits.

The gnocchi are roasted in a garlic-flavoured butter which has been infused in a warm place with handfuls and handfuls of herbs. This time I used great gouts of flat-leaved parsley, basil and tarragon; use whatever comes to hand in yours. Chervil is excellent if you you can get your hands on any. Rosemary and sage are also very good in this.

To serve between four and six people (depends on levels of hunger; frankly, I’ve had three people finish a dish this size in about five minutes flat, making self-satisfied gargling noises), you’ll need:

Herbed butter
1 pack butter (1/2 lb)
1 glug olive oil (about a shot glass full)
5 cloves garlic, crushed and chopped
Around 4 large handfuls fresh herbs – I used parsley, tarragon and basil
Salt and pepper

Gnocchi
1 and a half pints milk
12 oz semolina
1/2 lb grated parmesan (plus some extra to sprinkle)
2 eggs
Freshly grated nutmeg
Salt and pepper

Start by melting the butter with the olive oil over a very, very gentle heat. (I realise this is an awful lot of fat. Personally, I don’t find this terribly upsetting, but if you are the sort to be upset by butter, please still try it; you can spend the week following your triumph eating rice cakes.) Stir in all the herbs and garlic until they’re coated with the butter and leave in a warm place for an hour or so.

While the butter is infusing, grate a little nutmeg into the milk, sprinkle in some salt and pepper, and bring the milk to a simmer. When it starts bubbling, keep it on a low heat and pour the semolina into it in a very thin stream, stirring all the time. Keep pouring and stirring until you have a thick paste that you can stand a spoon in. Take it off the heat, beat the eggs and the parmesan into the semolina mixture, and leave the pan until the mixture is cool enough to handle.

Form the mixture into little balls (try for something a bit smaller than a ping-pong ball) with your hands. Don’t make them too smooth; a rough surface is better for making the lovely crispy bits. Place them in one layer in a roasting tin, pour over the butter (which will now have infused with the gorgeous rich flavour of the herbs and garlic), sprinkle with parmesan cheese, and put in an oven at 200 C (390 F) for fifty minutes until everything is brown and bubbling. Serve to loud applause.

Crostini al funghi – mushrooms on toast for grown-ups

Mushrooms on toast is a noble and ancient English nursery tea. When I was tiny, I read Alison Uttley’s Little Grey Rabbit and loved it dearly; Little Grey Rabbit would peel the pinky-beige satin skins off field mushrooms and stroke them before cooking them on her stove. In love with the bunny, I developed a fascination with mushrooms.

I’m grown up now. I can’t eat mushrooms on toast without being all post-ironic about it. In this form, though, kiddies’ mushrooms on toast becomes elevated to a dinner party amuse bouche; a gorgeous, silky, creamy, rich cloud of mushrooms on crisp slices of grilled ciabatta.

I still eat it for tea. What the hell; I’m posh.

To serve three for a grown-up nursery supper, you’ll need:

1 large knob of butter
1 punnet small chestnut mushrooms, sliced thin
1 punnet shitake mushrooms, sliced thin
4 shallots, chopped finely
3 cloves garlic, minced
1 small handful (palmful, really) dried porcini mushrooms, soaked
A glug of Marsala
1/4 pint cream
Juice of half a lemon
1/2 teaspoon cayenne pepper
1/2 teaspoon Dijon mustard
1 large handful chopped parsley
Salt and pepper
1 ciabatta

Melt the butter over a medium heat in a non-stick pan until it’s bubbling gently, and turn the fresh mushrooms, shallots and garlic into it. Saute, stirring frequently, until they soften and give up their juices. Add the soaked porcini, and continue to saute until all the juices have evaporated.

Add the Marsala (about a shot-glass full) and simmer until it’s all evaporated and the alcohol has burned off. Add the cream, cayenne pepper and mustard, and stir in the lemon juice, tasting all the time (you might want to use more or less than half a lemon). Simmer until the mixture bubbles and thickens, stir in the parsley off the heat, and season to taste.

While you cook the mushrooms, slice a ciabatta diagonally into ten, and toast the slices until crisp. Pile the mushrooms on the ciabatta slices, and serve immediately. Little Grey Rabbit was missing a trick.

Hummus with whole spices

This one’s a real favourite for those days when I’m working at home. Homemade hummus only takes about five minutes to make, tastes great, and is cheaper and better than anything you’ll get from the cold aisle in the supermarket.

When my brother and I were kids, hummus and pitta bread was a favourite breakfast, up until the day I got called garlic-breath at ten-o-clock by a girl in gym at school. I swore off it for a few sensitive teenaged years. Since then, I’ve learned not to care about upsetting those around me by eating garlic. (Life’s too short; I once had a boyfriend whose mother worked as a teacher and wouldn’t eat garlic until she had retired, lest the children smelled it on her breath. For God’s sake; it’s Chicken Kiev, not twenty whiskies and soda. Nowadays I just ensure that the people I feel like doing gym with are also eating plenty of what I eat. Poor, reeking Mr Weasel.)

Hummus is one of those dishes that has been around for so long that its origins are now uncertain. It’s from somewhere in the Middle East, and variations on it pop up all over the place; there’s even an Indian version. Hummus bi tahina is made from pureed chickpeas (called garbanzo beans in America) and tahini, a paste made from crushed sesame seeds. The cumin in this is typical of Egyptian hummus – the other spices are in there because I like them.

Work by volume. For every volume of cooked, cold chick peas you use, you’ll need half that volume of tahini, so if you’re using canned chick peas (as, I’m afraid, I do, because to soak, cook and cool them would ruin the whole five-minute lunch-ness of this), you’ll need half a can’s-worth of tahini. If you’re going for the long haul and are organised enough to remember to soak them the night before, you’ll find home-cooked chick peas even nicer, and you can spend a few minutes dry-frying the spices too.

For a one-can lunch for two, you’ll need:

1 can chickpeas
1/2 jar tahini
Zest and juice of one lemon
1 teaspoon whole cumin seeds
2 teaspoons whole coriander seeds
1 teaspoon whole fennel seeds
3 cloves of garlic, crushed
1 teaspoon salt
Olive oil to drizzle
Paprika to sprinkle

Put the chick peas, tahini, lemon zest (not the juice), whole spices, garlic and salt in a blender, and whizz until everything is smooth. (You’ll still have some spice pieces in there; this is a good thing. When you bite one unexpectedly, you’ll thank me.) Add the lemon juice and stir it in by hand, tasting frequently until you’ve got the desired tartness. (Add a bit more if you like, or put lemon wedges on the plates when you serve.) Drizzle with olive oil, and powder the whole thing with paprika.

Salad cream – edible by human beings

Sometimes, bad, bad things happen to good recipes. Until a few years ago, I imagined that salad cream had always been that unspeakable pasteurised egg product out of a bottle by Heinz. My grandma was a lady fond of boiled eggs and cucumber, which she always anointed with a hearty gulp of the stuff. It was perfectly repellent – eggy, slimy and wafting fumes of vinegar strong enough to knock out a medium-sized rodent. (Grandma was not characterised by her love for salad cream; she was, in fact, a lady of otherwise splendid taste. I think the salad cream thing was something to do with rationing in the war. I hope it was, because otherwise this means that I might have a vinegar-loving chromosome lurking somewhere in my genome.)

Then, I found a copy of Mrs Beeton, whose recipe for salad cream did not sound remotely like the wet slick Grandma used to top our salads with. It was a recipe full of good, fresh things; a hard-boiled egg yolk, cream, mustard and so on. I braced myself and made it. It was bloody marvellous. I’ve changed the recipe a little since then (fresh lemons are more freely available these days, and I think Mrs Beeton liked her salad cream rather more tart than modern salad-munchers might like), and present it for your eating pleasure.

You’ll need:

1 hard boiled egg yolk
6 tbsp double cream
1 tbsp olive oil
1 tsp Dijon mustard (no seeds)
½ tsp caster sugar
¼ tsp salt
Juice of ½ a lemon

Mash the egg yolk with the back of a spoon, and add all the rest of the ingredients except the lemon juice. Mash furiously with the spoon until you’ve got a creamy paste. (If you still have any lumps, pass through a sieve, and you’ll end up with a perfectly smooth mixture.) Add lemon juice to taste. (Mrs Beeton uses vinegar, which you can try if you like; use a white wine vinegar or a cider vinegar. She does, however, use two tablespoons of the stuff, which is far too much. Exercise caution.)

This is, against all reason, a really excellent salad dressing. It’ll keep in the fridge for about three days. It’s also extremely good with cold new potatoes, over warm asparagus and on eggs instead of mayonnaise. Spend the five minutes it takes to make some, and encourage your Grandma to stop buying the Heinz stuff.

Spice-crusted chicken with Boursin stuffing

Regular readers will note that I’m very fond of Boursin – the garlic-spiked cream cheese which comes in a dear little corrugated tinfoil hat. It’s got a lot more kick than the Philadelphia variety, and I find it much more robust in cooking than other cream cheeses.

It may be a mass-produced cheese, but Boursin actually has quite a history behind it. It’s been around for more than forty years, and was the first large-scale soft cheese production business in France. François Boursin took the idea behind the meal of fromage frais and herbs eaten in French villages (it was a popular meal in Gournay, his own home town), and turned it into “All-natural Gournay cheese”. The ad campaign with the “Du pain, du vin, du Boursin” tagline has been around for nearly as long; it started in 1968, and you can still buy wedge-shaped bits of Boursin for your cheeseboard, if you are the sort of person who has a cheeseboard and thinks Boursin belongs on it.

I like it very much on bread, but Boursin really comes into its own when it’s hot, and acting as a hard sauce.

For this dish you’ll need (per person):

1 breast joint of chicken with skin and bones
1/2 round Boursin
1 teaspoon coriander seeds
1 teaspoon cumin seeds
Butter, olive oil, salt

Push your fingers under the skin of the chicken until it’s loosened and you’ve got a little pocket under all the skin. Push the Boursin under it, squashing and flattening until you’ve forced it all into the pocket. (This is a lot of cheese for a little chicken; just keep going until it’s all packed in there.) Smear any that’s left over the outside of the breast – it’ll help the crust to stick.

Bash the coriander, cumin and a pinch of salt in a pestle and mortar; you’re aiming for a rough grind, so don’t go mad with it. Press the spices and salt into the skin side of the chicken breast (which you have cleverly prepared by making it sticky with cheese).

Melt butter (about a teaspoon per breast) and a slug of olive oil in a large, non-stick frying pan which will fit in your oven (if you don’t own one, use a non-stick roasting tin on the hob) over a high heat, and put the chicken breasts in it, skin side up, for three minutes. Turn the breasts skin-side down when your three minutes are up, and put the whole pan in the oven at 180c for 25 minutes.

You’ll end up with a sweet, toothsome chicken breast annointed with a creamy garlic sauce, and a crisp, herbed skin. Serve with rice, to soak up the cheese and the chicken’s spicy juices.

Incidentally, the corn in this picture, which I served with the chicken, is white corn (maïs blanc) which I found in France, produced by good old Green Giant. The kernels are paler, smaller and longer than normal niblets, and they’re delicious; buttery and sweet. If anybody has seen any in the UK, please let me know. I’ve only got two tins left, and I seem to have become addicted.

Pasta alla Medici

Now, while I might rail against Nigella Lawson’s approach to ham in cola, I am full of gratitude for her inclusion in Feast of a recipe for Pasta alla Medici, using any remaining ham you might have from the chunk you boiled the hell out of the day before. I’d last eaten it decades ago, and had been looking for a recipe ever since.

When I was twelve or so, a pamphlet was deposited on our school desks. It came from a company (pre-Internet, this) which would fix you up with a penfriend in a foreign country, depending on which boxes you ticked. (I don’t recall an ‘eating’ box to tick under the ‘hobbies’ heading; I think I ticked something typically precocious along the lines of ‘classical music’ and ‘visiting museums’. It is not surprising that girls on the school bus used to save pockets full of breakfast cereal to put in my hair every morning.)

There were also boxes to tick on the age, nationality and gender of your desired penfriend. Being newly possessed of all kinds of exciting hormones, and also possessed of a very overactive imagination, I decided that the thing every twelve-year-old English schoolgirl required for a full and satisfying life was a seventeen-year-old, Italian, male penfriend.

Fortunately, the penfriend company saw me coming, and allotted me a twelve-year-old girl. She was Italian, though, and she liked reading and music too, so we suited one another rather well, and wrote to each other (in English; my Italian remains limited to deciphering menus and asking the way to the museum) for years.

Eventually, Lisa and I had been writing to one another for such a long time that our parents decided we should visit each other. Her family lived in a beautiful flat in Genoa, where I went to school with her for a couple of weeks and discovered marron glace ice cream (my Mum had sent me to Italy saying sagely: ‘in Italy you can buy ice cream in every colour of the rainbow’, and I must have annoyed the hell out of Lisa’s family by obsessing about finding one in each colour).

Lisa’s Mum was a doctor, and didn’t have much time at home. When she was at home, she was not, in retrospect, a very engaged cook, and the Findus Crispy Pancake was my introduction to an Italian mother’s kitchen. Later that week we ate bollito misto (which translates roughly as ‘mixed boilings’, and was about as appetising as it sounds).

One thing, though, that Lisa’s mother cooked and cooked exceptionally well, was a really fabulous pasta dish, with sweet little peas, ham, and a creamy, buttery parmesan sauce. I asked her what it was called (although not for the recipe; my own mother didn’t like me cooking at home, since I did what I do now and sprayed the walls with food when cooking), and was delighted when she cooked it again twice before I left.

Pasta alla Medici is a very simple recipe, but is also, for some reason, a very hard one to find in books. I had to wait nearly twenty years before I came across Nigella Lawson’s recipe, and I am gushingly, pathetically grateful. She offers this three-person recipe as one which children will enjoy, and her portions are child-sized – make a larger amount if you’re feeding adults.

200g pasta
100g frozen petits pois
150ml double cream
150g diced ham
2 tablespoons grated Parmesan

Cook the pasta following the packet instructions, and after five minutes add the peas to the pasta water. When the peas and pasta are cooked, drain them. Warm the rest of the ingredients through in the pan you cooked the pasta in, then add the pasta and peas, toss to coat, and serve.

I added a few gratings of nutmeg to Nigella’s recipe. I also stripped some of the white fat off the ham I had cooked the day before and dry-fried it until crisp, adding a tablespoon of maple syrup and a pinch of cinnamon at the end, bubbling the syrup down to a caramel. I used this crisp, sweet crackling to dress the pasta. This is, however, mostly because I am greedy; you’ll probably be perfectly happy just eating the pasta on its own.

Ham in Coke

Several years ago, I stumbled on a Usenet post waxing lyrical about the savoury potential of Coca Cola when combined with pork. That same Coca Cola that your teachers spent years warning you about in the very darkest terms; at my school they used a can to dissolve a volunteer’s recently shed milk tooth away to nothing, and demonstrated its unholy ability to clean pennies with rotten-incisored glee.

I have a caffeine-addicted husband and a yen to flout the outdated authority of my Home Economics teacher. I have spent several years perfecting a ham in cola recipe, and am more than mildly irritated to find that these days, Nigella Lawson is publishing a version of ham in Coke in every book she writes. No matter. Mine’s better. Ham needs something sweet and spicy to counter its savoury saltiness – it happens that cola is the perfect foil. I can’t think of another way I’d prefer to cook ham now – this may sound a perverse thing to do to a nice chunk of pork, but trust me; it’s fabulous.

You’ll need:

1kg smoked gammon
1-2 large bottles cola (more or less depending on the size of your pan)
1 red onion
1 bulb garlic
1 stick cinnamon
1 tablespoon coriander seeds
2 dried chilis
20 cloves (give or take a few)
1 teaspoon ground chipotle chili
1 teaspoon ground cinnamon
1 teaspoon ground mustard
4 tablespoons maple syrup

Place the gammon in a close-fitting, thick-bottomed pan (important, this thick bottom; you need to avoid singing the bottom of your ham) with the onion, halved, the bulb of garlic, cut in halves, the cinnamon stick, coriander seeds and whole chilis. Pour over Coke to cover (I’m afraid it has to be the full-fat version; Diet Coke won’t caramelise properly) and put on a medium heat until it reaches a simmer. Lower the heat enough to keep a gentle simmer, and put the lid on for 2 1/2 hours.

After your kitchen timer has gone, preheat the oven to 200c and lift the whole ham carefully from the liquid (Hang onto that liquid if you want to make Boston baked beans). Leave the ham to cool enough to handle. With a sharp knife, remove the rind, without removing the fat.

You’ll be left with a joint of meat with a glistening covering of fat. Use your sharp knife to score the top in diamonds, and stick a clove in each corner of each diamond. Make a paste from the ground cinnamon, ground chipotles, mustard powder and maple syrup, and brush it all over the ham, concentrating on the fatty surface. The sweet mixture will caramelise onto the crisping fat; this is pretty much 90% bad for you, but, unfortunately, it tastes approximately 100% good. I really should talk a friendly social statistician somewhere into working out just how bad for you things have to be to start tasting good; I’m sure there’s an interesting graph in that somewhere.

Put the whole ham in the oven, uncovered, for twenty minutes, remove and check that the fatty surface has formed a crust. (If you prefer more crust, put the ham under a high grill for two minutes.)

If you have made a large ham, you can make several good meals from it. Eat it like this, freshly cooked, with some sautéed potatoes; eat it in Pasta alla Medici; use it to flavour Boston baked beans.

If you’re having people round for dinner and feel like cheating, feel free not to mention the cola. And if you enjoyed this as much as I do, you’ll probably want to check out the sticky chicken pieces in coke too.

Beef and Guinness casserole

My Dad told me a while ago that he doesn’t enjoy stews and casseroles which use stout as a base; he finds them, he said, bitter. This is an opinion shared by a lot of people, and it’ s such a shame; the only reason the stout casseroles you’ve eaten in the past have been bitter has to do with length of time in the oven. Cooked at a low temperature for several hours, the beer will magically turn into a rich, sweet and glossy sauce, and there won’t be a hint of bitterness. Promise.

The preparation of this dish doesn’t take too long, but you’ll need to leave it in the oven for at least three hours – if making if for lunch, I usually make it the night before, leave it in the fridge overnight and reheat. Like many casseroles, it improves with keeping.

Stout, for those who are only familiar with good old Guinness, is a generic term for a very dark, heavy beer made with roasted malts and barley. You can use any stout; it doesn’t have to be Guinness. Stout has a toasty, dry flavour; buy a couple of cans to drink with the meal.

I used:
2 1/2 lb rump steak, cubed
3 red onions, quartered and split into layers
2 cans Guinness (or other stout)
1 tablespoon fresh thyme
4 cloves garlic, squashed
1 jar of pickled walnuts, halved
2 tablespoons of juice from the walnut jar
2 tablespoons flour
Olive oil
Salt and pepper

Pickled walnuts are another curiously English thing; walnuts picked before they are ripe and pickled whole in a sweetened vinegar. They’re perfect with sharp English cheeses like cheddar; sweet and tangy, with a lovely nutty aroma. I use Opie’s pickled walnuts; they do look like tiny roast mouse brains (that’s one in the photo at the top, nestling to the right of the meat and kind of indistinguishable from it), but they’re extremely good. Leave them out if you can’t find any (English supermarkets carry them all year round with the other pickles), and add the juice of a lemon and a tablespoon of sugar instead.

Preheat the oven to a very low setting (140c/275f).

Brown the meat in olive oil in small batches. (In the picture on the right, it’s just been browned. There is only half a glass of Guinness because I have drunk the rest of the can already. Oops.) Use the pan you’ll be cooking the casserole in, over a high flame, and remove the browned meat to a dish. You can really go to town with the browning; you want a good deep brown, almost charred finish to give the flavour depth. When the meat is removed from the pan, add some more olive oil, and add the onions to the pan, stirring them until their edges are also a little charred. Return the meat to the dish with its juices, and stir in the flour (which will help to thicken the sauce). Continue stirring for a minute, then add both cans of Guinness, the herbs and garlic, and the pickled walnuts and their juice. Season, bring to a simmer (hard to spot, this; Guinness gets very frothy when you make it hot), and then put the lid on and put the dish in the oven.

Three hours later, you’ll have a rich and unctuous casserole. The meat will be incredibly tender, dark brown and full of juices. I served it with some mashed King Edward potatoes, with quarter of a pint of boiling milk beaten into them, some truffle-infused olive oil and a sprinkling of thyme. I’d like to try making this with Young’s Chocolate Stout some time; there’s a world of chocolate beer out there just crying out to be cooked with.