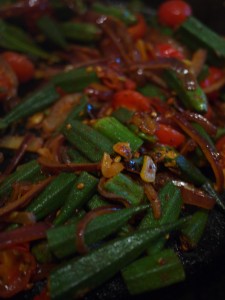
Bhindi bahji with whole spices

Bhindi bahji
Bhindi bahji

I’ve got collection of bad habits which do nothing to endear me to my local Indian takeaway. If we’re having takeout, I usually cook our own rice, occasionally heat up some oil for DIY poppadoms, and then fail miserably to order anything other than vegetable dishes, which happen to be the least expensive thing on the menu.  This doesn’t all come from being a hideous cheapskate; it’s just that I like my own pilau rice better than the stuff with the red and green food colouring in it, and have had a preference for vegetable curries ever since I got food poisoning in India in 2005. (A tip: if you’re in a city where the sewers drain directly into the sea, don’t eat the prawns.) And poppadoms are great fun to make at home, as you’ll know if you’ve ever tried.

Sadly for the local takeaway, I’ve started to take to making bhindi bahji, which is probably my all-time favourite curryhouse dish, at home too. There are a few reasons for creating this extra work for myself: home-made bhindi bahji is a lot less greasy than the restaurant kind, which always comes drowning in ghee for no reason that I can really make out, and I can control the cooking of the okra to make sure it doesn’t produce any of the snotty slime that puts so many people off the vegetable.

I love okra. I like its texture (I even like slippery, slimy okra, especially for its ability to thicken the base it’s cooked in), its flavour and the shuddery feeling I got aged about ten when my parents used to refer to it as “ladies’ fingers”. It’s a much maligned vegetable, and I’d encourage you to have a go at making this dish if the only okra you have experienced is olive green and exuding stuff that looks as if it came out of a snail. Cooked like this, it is crisp, fresh- tasting and entirely snot-free.

To serve two as one of two curries on the table, you’ll need:

150g fresh okra
12 fresh, sweet cherry tomatoes
1 medium red onion
2 cloves garlic
1 teaspoon black mustard seeds
1 teaspoon fennel seeds
1 teaspoon coriander seeds
1½ teaspoons turmeric powder
1 tablespoon ghee or groundnut oil

Chop the okra into pieces about an inch long (larger pieces mean less potential for slime) and dunk in a large bowl of water with a couple of spoons of salt dissolved in it. Drain in a colander. Halve the tomatoes and set aside, and chop the garlic.

Cut the onion in half, and slice it into half moons. Heat the ghee or groundnut oil to a high temperature in a frying pan or wok, and throw the onion in. Stir fry it for three minutes, then add all the spices and the garlic to the pan. Continue to stir fry until the onion is turning translucent (a couple of minutes) and the spices are giving off their fragrance.

Add the drained okra to the pan and keep stir-frying for one minute. Add the tomatoes, and continue to cook, stirring all the time, until the tomatoes start to collapse in on themselves and the okra is a bright green and piping hot. Taste for seasoning, and add some salt if necessary.

Serve immediately.

Garlic bread

Garlic bread
Garlic bread

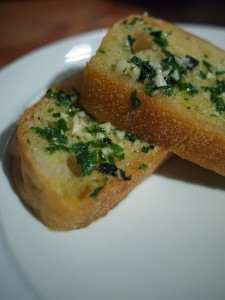
I was tempted to title this post “F***ing fantastic garlic bread”, because when people taste it, they tend to say something along the lines of: “Cripes. This is f***ing fantastic garlic bread.” But my Mum reads this blog and has a habit of looking horrified and exclaiming: “Elizabeth!” if I so much as say “Damn” in her presence, so plain old “Garlic bread” it’ll have to be. Sorry, Mum.

I wooed a boyfriend with this stuff once (and swiftly thereafter wished I hadn’t, but that’s by the bye). It’s powerfully good; you won’t go back to shop-bought garlic bread once you’ve tried it. The trick here is to simmer the garlic in the butter to sweeten it up and release its aroma before you let it anywhere near the bread, alongside the judicious application of some herbs. Use whatever loaf you fancy here. Something reasonably open-textured to soak up all that butter is a good move. This recipe will make sufficient garlic butter to anoint a whole baguette, but you can make a smaller loaf and keep any leftover butter in the fridge for up to a week. There were just two of us eating when I made this, so I used a ciabatta and steeled myself for leftovers – if you put the remains back together into something that resembles a cut-down loaf, rewrap it in the tin foil and refrigerate, you can take the recipe from the point where you put it in the oven again the next day.

You’ll need:

450g butter
2 large, juicy heads garlic
15g fresh chives
15g fresh flat-leaf parsley
15g fresh oregano
½ teaspoon salt
Several turns of the peppermill

Peel the garlic, and use a knife to mince it until you have a heap of garlicky rubble in the middle of your chopping board.

Melt the butter in a small saucepan over a very low heat, and spoon the garlic into it. Allow the garlic to cook very gently in the butter for about ten minutes, until it is soft and fragrant. While the garlic is cooking, chop the herbs and put them with the salt and pepper in a bowl.

Pour the hot butter and garlic mixture over the herbs in the bowl, and stir well to combine everything. Leave at room temperature for ten minutes, then cover with cling film and move to the fridge. Refrigerate until solid. (The butter doesn’t need to be rock-hard – a couple of hours should be sufficient.)

When the butter is stiff enough to spread, warm the oven to 150ºC (300ºF).

Slice the bread and spread each side of each slice generously with the garlic butter. Reassemble the loaf, and wrap it tightly in tin foil. Bake on a metal tray for 20 minutes, and remove from the oven. Unwrap and serve piping hot. You will be unable to avoid getting garlic butter all over your chin as you eat, and possibly on your elbows, so have napkins standing by.

Potato salad

Potato salad
Potato salad

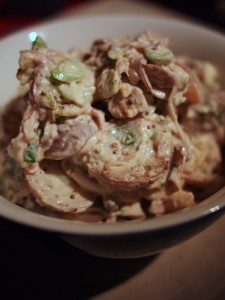
So now you’ve got your hands on some really fine mayonnaise, you’ll be wanting to use it to make a really fine potato salad. The ingredients list here is a simple one. Use the best waxy little potatoes you can; I used Roseval, which have a sweet, yellow flesh sometimes tinged with red rings. Pink Fir Apple, all knobbly and smooth-skinned, are another favourite, but Jersey Royals are best of all, and this is a great way to showcase their delicate flavour during their short season (around May and June). Don’t peel your potatoes or scrub off their delicate skins when you clean them; much of the potato’s flavour is held just below the skin, and the tasty skins themselves are a good source of vitamin C.

You can boil or steam your potatoes. Many varieties of new potato are perfectly happy being boiled, but if you’re not familiar with the variety you’ve chosen, steam them – they’re less likely to crack or collapse this way.

The sweet red onions in this salad should be sliced as fine as you possibly can. They’re less harsh this way, and their flavour gently infuses the whole salad. If you have a mandoline (mine, which I love and fear in equal measure, was a present from my lovely in-laws – I am pretty sure they are not trying to kill me, but that rather, they imagine I’m actually competent around razor-sharp blades), set it to slice paper-thin. If you’re using a knife, sharpen it before you start on the onion to help you slice thinly.

To make enough potato salad for a side-dish for four, you’ll need:

500g new potatoes
3 spring onions
½ red onion
2 tablespoons mayonnaise
2 tablespoons crème fraîche
1 teaspoon nonpareil capers, drained of their vinegar
1 heaping teaspoon grainy Dijon mustard
1 tablespoon parsley, chopped finely

Steam or boil the potatoes for 20 minutes, and allow to cool to a point where you can handle them. While the potatoes are cooling, slice the red onion into paper-thin half-moons, and chop the spring onions on the diagonal into 1cm pieces. Mix together the mayonnaise, crème fraîche, capers, mustard and parsley in a bowl.

Cut the warm potatoes into slices and toss them well with the onions in a serving bowl. Pour over the dressing, toss again and serve. You shouldn’t need any additional salt, but taste to check and season if you want to.

Labneh

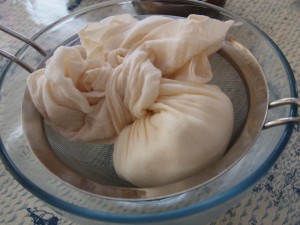
Labneh in a cheesecloth
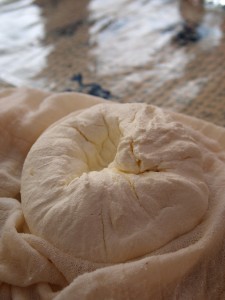
Labneh about to be unwrapped

If you’re anything like me, you’ll be feeling somewhat bloated and liverish after Christmas and New Year, so I’ll hold the roast goose recipe back until later in the week when our gall bladders have all recovered. I was racking my brains for a nice easy recipe to start the year with – something that’s simple to prepare, and has few ingredients, but that tastes great and will impress guests or a picky family. How about labneh, a soft “cheese” from the middle east, made in your fridge from thick Greek-style yoghurt?

Greek yoghurt is thicker than the sloppy variety by virtue of having been strained until much of the whey drains out, leaving you with a richer, thicker product. Labneh takes the process further, continuing to drain until almost all of the whey has gone, and you are left with a thick, sharp-tasting ball that looks like soft cream cheese. It’s not a true cheese because rennet is not used in making it, but I like to use it where you might use something like Philadelphia – and when it’s made by the method below, with fresh garlic, you’ll find that it’s a mighty fine substitute for Boursin, richer, denser and without the dusty dried garlic taste you get in the packaged stuff from the supermarket. Labneh is a great addition to a cheeseboard, either in a chunk on its own or in a bowl, splashed with olive oil. Experiment by adding herbs to the garlic: for a Turkish flavour, try some dill and chillies; chop in some mint with the garlic for a Greek platter.

My Mum made the labneh in the pictures at Christmas as part of a cold supper. It’s fantastic wherever you’d use cream cheese or with crudites, and great crumbled over rich middle-eastern dishes, especially those containing lamb; I’ve got a cheesecloth full going in the fridge at the moment which is destined to be spread on crusty bread and served with a Greek-style lamb shoulder.

You’ll need:

400g Greek yoghurt (make sure that you choose a version without emulsifiers or thickeners; I like Total)
1 large pinch salt
2 cloves garlic, chopped as finely as possible

Labneh
Labneh straight out of the cheesecloth

Line a sieve with a boiled cheesecloth, and put it over a bowl to catch drips. You can also use a boiled kitchen towel if you don’t have a cheesecloth – an old linen one which has been washed many times will be softer and easier to work with.

Stir the yoghurt, salt and garlic well in a bowl to make sure everything is well combined. You can leave the garlic out if you want a plain labneh; the garlic gives a lovely fiery kick to the finished cheese. Pour the yoghurt mixture into the lined sieve, bring the corners and edges up to form a bag around the labneh and twist together. You can secure the twist with string if you like, but it’s not really necessary.

Put the bowl and sieve into the fridge and leave the labneh to drain for between 24 and 48 hours, squeezing the bag every now and then. The cheese will be a pleasant, creamy texture after 24 hours, and leaving it for longer will make it even stiffer, and harder to spread.

To keep your labneh in the fridge, cover it completely with olive oil in a bowl. It will keep for two weeks, but I bet you won’t be able to stop yourself finishing it much sooner than that.

Congee – Chinese rice porridge

Congee
Congee

Congee is a Chinese breakfast dish – soothing, savoury, and aromatic with ginger and stock. (You may know it as choke, jook, bobo or cháo; it’s common all over Asia and its name varies as you’d expect with language and dialect.) I find it hard to separate the physiological effects of eating congee from the cultural ones. It’s a favourite dish when I’m ill, cold or miserable, but I couldn’t honestly tell you whether that’s because it makes me think of sharing a bowl in my pyjamas with my Dad; or because of the soothing magic that so many cultures assign to soupy, chickeny mixtures. It’s filling, easy to digest, and wonderfully satisfying. The Chinese say it’s good for an upset stomach, and it’s a standard sickbed dish used to perk up those with little appetite.

For Dad, it’s all about the texture. He’s even fond of plain congee, where water is used instead of stock. As a novice in congee, you’re likely to find the plain version too bland; my (English) mother and husband both say they would sooner eat papier-maché. At a conference in China earlier this year, I filled up happily every morning at the hotel buffet with a couple of small bowls of congee with century eggs, pickled bamboo shoots and catkins, while all my English colleagues looked on in horror over their Danish pastries. So I’ll happily admit that congee is not for everyone, though I can’t for the life of me work out why – you texture-phobes are eating more outlandish things every day. (Sausages, anybody?)

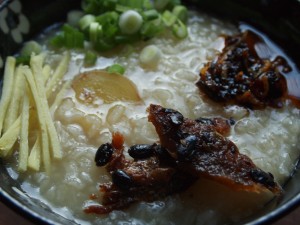
Congee is a base for you to add extra flavours to. There’s no ruleset to follow – top your porridge off with what you fancy. Here, I’ve used canned fried dace, a small oily fish, with black beans (available at all Chinese supermarkets). Try a dollop of Chinese chilli oil, some fresh ginger and spring onions, a splash of sesame oil. Experiment with your toppings, which are best when they’re salty and umami; I love Chinese pork floss (a kind of atomised jerky), Chinese wind-dried ham, century eggs or salted duck eggs, roasted meat, garlicky shitake mushrooms, and, for days when I’m feeling seriously brave, fermented tofu. Crispy dough crullers are a traditional addition, as are pickled mustard greens (zha cai), which you’ll find sold in vacuum-sealed plastic packs. This is a good time to explore the aisles of your local oriental supermarket; you’ll need to visit anyway to pick up the glutinous rice, so go mad and furtle in the darker corners of the shop to see if you can find any gingko nuts or dried scallops to accompany your porridge.

Congee with toppings
Toppings, clockwise from top: spring onions, chilli oil, fried dace with black beans, fresh ginger

I like my congee relatively loose in texture. For a stiffer porridge, reduce the stock in the recipe by a couple of hundred millilitres. Some rice cookers have a congee setting – follow the instructions on yours if you’re lucky enough to have one. And as always, the stock you use should be as good as you can find; home-made is always best, and if it has a little fat floating on top, all the better.

For a congee base for 2-3 people, you’ll need:
150g glutinous rice
1.2 litres home-made chicken or pork stock
1-inch piece of ginger, cut into coins
1 teaspoon salt

Whatever you choose to top the congee with, you’ll find it much improved by:
Another 1-inch piece of ginger, peeled and cut into julienne strips
3-4 spring onions, cut into coins
2 teaspoons sesame oil
Soy sauce to taste

Rinse the rice in a sieve under the cold tap. Combine the stock and rice in a large saucepan with the salt and coins of ginger, and bring to the boil. Turn down to a bare simmer, and put the lid on. Continue to simmer for 1-1½ hours, until the congee has a creamy, porridgy texture. Stir the congee well. Spoon into bowls to serve, and sprinkle over the toppings.

I much prefer the flavour and texture you’ll get with glutinous rice, but if you really can’t find any, you can try the Cantonese style of congee, which is made with regular white rice and liquid in the same proportions as the recipe above, and boiled for about six hours until it breaks down into a mush. You’ll also find congee mixes including other grains, like barley and beans, for sale, particularly in the medicinal foods section.

Gazpacho

GazpachoI’m looking out of the window as I type this, and I’ve come to the sad conclusion that it’s definitely not summer any more. This will be this 2010’s final recipe for the contents of your greenhouse. This year hasn’t been fantastic for tomatoes, but the cucumbers have been glorious (full disclosure here – I didn’t grow any myself, but my parents have enough to club a small army to death with), and peppers are at their best now. It goes without saying that this recipe is totally dependent on the quality of your ingredients.

Most think of gazpacho as a cold tomato soup. Tomatoes do make up the dominant ingredient by weight, but a good gazpacho should take much of its flavour from the cucumber (surprisingly aromatic) and peppers. Get the finest, ripest vegetables you can find, and if at all possible, try to get your hands on one of those lovely, spurred, English cucumbers  – they’ve a lot more flavour to them than one of the smooth-skinned supermarket variety. Use your best olive oil, and enjoy the last of the sunshine. If you’re preparing this as part of a special meal, you can jazz it up something spectacular by shredding some fresh, sweet white crab meat, and putting a couple of tablespoons of it in the bottom of each bowl before you pour the soup over.

Finally, a word of warning. Your guests might have a baked-in dislike of chilled soups. Check before you serve this up. I remember the look of utter misery on my Dad’s face when we visited a friend’s house once and were presented with a choice of Vichyssoise and gazpacho to open a meal with. Dad, you’re a heathen, but for you I’d warm this through on the hob.

To serve four as a starter, you’ll need:

1kg ripe tomatoes, as fresh as possible
4 banana shallots
3 cloves garlic
2 red peppers
1 green pepper
1 large cucumber
2 slices stale white bread, soaked in water and squeezed
1 teaspoon red wine vinegar
4 tablespoons olive oil
½ teaspoon smoked paprika
Salt and pepper

Peel the tomatoes by scoring them around the equator and dunking them in boiling water to loosen the skins. Cut them open and discard the seeds. Blacken the skin of the peppers under the grill, pop the steaming peppers in a plastic box with the lid on for a few minutes to loosen the skins, peel and seed. Peel the cucumber, chop the shallots into quarters and mince or otherwise squish the garlic.

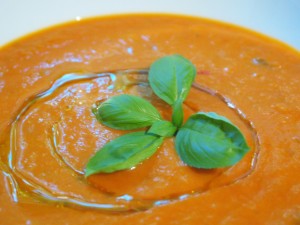
Blitz the vegetables and bread to a smooth purée in batches with the other ingredients. Taste for seasoning; you may want to add a little more vinegar or paprika as well as salt. Chill thoroughly and serve cold, with a little more olive oil drizzled over.

Iceberg lettuce and beansprout stir-fry

Iceberg lettuce and beansprout stir fryI’ve never really caught on to this British idea of the lettuce as mere salad vegetable. The Chinese aren’t alone in cooking them; you’ll find lettuce simmered gently in French soups and especially in dishes with peas. Cooked, the lettuce becomes silky and sweet; a totally different beast from the salad leaf you’re used to.

In China, you’re much more likely to find a lettuce cooked than raw. This preparation works very well with the spicy, rich, Vietnamese caramel pork from the other day; in Chinese terms, its clean, fresh flavour would be described as being Yin, against the Yang of the pork. This philosophy of food strives to balance the body – if you are prone to cold fingers and toes, and have a slow heart rate, you’re considered to have an excess of Yin. If you’re sleepless, sweaty or jittery,  Chinese grandmothers would tell you you’ve too much Yang. Yang foods tend towards richness: think chestnuts, squashes, onions and garlic, meat, ginger, coffee, alcoholic drinks and fruits like peaches, mangoes and cherries. Apples, bananas, asparagus, watermelon (as distinct from cantaloupe, which is Yang), shellfish, lettuce, beansprouts, citrus fruits and cucumbers are among the foods considered Yin.

I live in a post-enlightenment age, and do not think my cold fingers are due to an excess of lettuce, rather an excess of typing. But it’s still an interesting philosophy which works surprisingly well to help you balance the flavours in a meal. In Malaysian Chinese households, you’ll often be offered a Yin mangosteen to accompany the excessive Yang of a durian, for example; the two work together exceptionally well. Try this dish, which only takes minutes to cook (and is only Yanged-up slightly by the chicken stock, rice wine and a little garlic) to accompany fierce and rich flavours like Monday’s pork. To serve two generously, you’ll need:

1 iceberg lettuce, halved and chopped into strips
500g beansprouts
3 fat cloves garlic, sliced
1 ladle good home-made chicken stock
2 tablespoons light soy sauce
2 tablespoons Chinese rice wine
Groundnut or grape seed oil to stir fry

Bring a small amount of oil to a high temperature in a wok. Throw in the sliced garlic and stir-fry for ten seconds, then add the beansprouts to the pan and continue to cook, stirring all the time. After three minutes, add the liquid ingredients, bring to a simmer and add the lettuce. Cook, stirring, until all the lettuce is wilted, and serve immediately.

Stupendous tomato sauce

Tomato sauceStupendous because, really, there is no other word for this stuff. It’ll take you the best part of a day to make, although there’s not much real work involved, just a bit of stirring every half hour or so – if you’re going to be around the house all day, just carry a timer with you set to go “bing” every half hour to remind you to go and stir the sauce. You’ll use up two kilos of those tomatoes you’ve got ripening away in the greenhouse, and you’ll finish with a sauce that tastes like pure condensed summer. It freezes well – I have a few boxes of this sauce in the freezer to be hauled out in the middle of winter, when tomatoes are indistinguishable from potatoes.

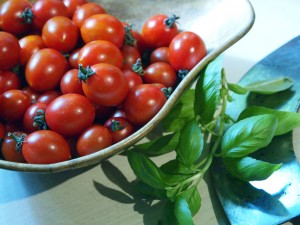
The idea here is to drive as much of the moisture as possible out of sweet, summery peppers and tomatoes, encouraging their natural sugars to caramelise. The tomatoes you choose should be the very best you can find. This recipe is fantastic for gardeners with a glut of tomatoes, but you can make it with good tomatoes from the market too. Just make sure you use the sort of tomatoes that you’d be happy to snack on raw; the sort where you suddenly discover you don’t have any left because they were so good you accidentally ate them all without noticing.

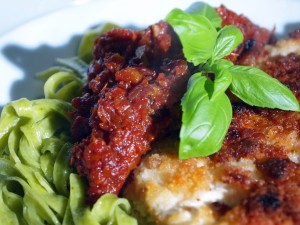
This sauce is beyond fabulous on its own, dressing some pasta – if you can find Giovanni Rana fresh pasta at your local supermarket or deli, the basil and spinach fettuccine is a great match, with its intense basil aroma. For plain pasta, throw a few basil leaves and maybe some oregano over when you serve. I also love it as a sauce for chicken breasts that have been butterflied, beaten flat, breaded and fried crisp (you don’t need a recipe for those – just put the butterflied breasts between two pieces of cling film; wallop the hell out them with a rolling pin; then flour, egg and crumb them before frying for five minutes on each side); it’s great mixed with some grilled vegetables or as a sauce for grilled, oily fish too. You can use it as a dip, in sandwiches, as an enriching ingredient for other sauces, as a base for soups – versatile, delicious, wonderful stuff.

To make about 12 servings (you’ll be freezing these in individual portions, and with something that takes so long to cook it seems a waste to make any less) you’ll need:

6 bell peppers (orange, red or yellow)
2kg tomatoes
100g butter
150ml olive oil
2 large onions
1 head garlic
Salt and pepper

Tomatoes and basilBlitz the bell peppers with the onions in the food processor. You’re aiming for a rough, wet puree. Put the resulting glop in your biggest saucepan (preferably something with a heavy base that will disperse the heat evenly – I have a giant le Creuset casserole which is perfect for this sort of thing) with the butter and cook over a medium flame without a lid, stirring occasionally, for about an hour. Eventually, the peppers will start darkening in colour, most of the liquid will have been cooked off, and the whole arrangement will have a jammy texture. It may take more than an hour to get to this stage, depending on the water content of your peppers and the diameter of your pan.

Puree the tomatoes with the peeled garlic. Add them to the jammy contents of the saucepan with the olive oil and stir well to make sure everything is combined. Now go and busy yourself doing whatever it is you do when you’re not cooking, being sure to return to the pan every half hour to stir it, scraping the bottom and moving the sauce around the pan. After a few hours, as the sauce thickens, start returning to the pan every 15 or 20 minutes if you feel it is in danger of sticking when left for half an hour.

Again, timing here varies on your tomatoes and your pan, but around six hours (maybe more) after you first put the tomatoes on the hob, the contents of the pan will have reduced by more than half. The sauce will be fabulously gloppy when stirred, and will be darkening and beginning to give up its oil.  No tomato juice will rush to the surface when you press down on the sauce with a wooden spoon. Taste the sauce, which should look a bit like rusty sun-dried tomato paste, try not to jump too high for joy at the intense, umami flavour, and season.

I freeze this sauce in 250g bags – enough to serve two generously. Your yield should be about six bags, give or take. Unfrozen, the sauce will keep in the fridge for about a week.

Pea and edamame falafel

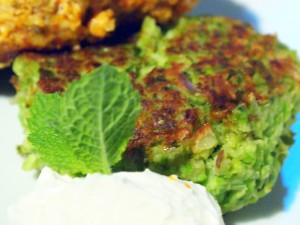
Pea and edamame falafelFalafel? Well, kind of, although I don’t think anyone from the Middle East, or anywhere else where they’re a staple, would necessarily agree with me. I threw this together after eating something advertised as a pea falafel wrap at Harvey Nichols cafe in Leeds last week. I felt the Harvey Nicks version could do with some work – it was underseasoned, underspiced and crying out for a squeeze of lemon and some mint, but had the makings of something really rather good, as I discovered after some experimentation with a bag of peas and some soybeans back home.

Frozen peas and edamame cooked like this make a very quick store-cupboard supper, and the results taste as if you’ve spent much, much longer on them than the few minutes these take to throw together. This is a great dish to whip out when you’ve been landed with an unexpected vegetarian guest (like my poor parents-in-law, who were told that the foreign students they were hosting a few weeks ago were Germany’s only veggies barely a day before they arrived), and a good burger substitute for vegetarian barbecue-goers. Lacto-ovo vegetarians who do it for moral reasons befuddle me. What do they think happens to the calves who were going to drink the milk, and the chickens who weren’t female enough to lay eggs? I can guarantee you that they’re not all prancing in the sun and nibbling on tender shoots, shepherded by the consciences of unimaginative veggies. Cue comments storm.

Anyway. These falafel make for a great side-dish, or a main event on their own. Stick them in a wrap, once they’ve cooled, for an easy and uncharacteristicly healthy lunch, if you have any left over.

To make 12 burger-proportioned falafel, you’ll need:

200g sweet frozen peas (the frozen ones are almost always sweeter than fresh, unless you’re picking straight from your own garden and shelling immediately)
100g frozen edamame (soy beans) without pods
1 medium onion
1 teaspoon cumin seeds
1 teaspoon coriander seeds
1 small handful (about 20g) fresh mint leaves
50g fresh breadcrumbs
Zest of 1 lemon
Juice of ½ lemon
1 egg
Salt and pepper
Olive oil to fry

Defrost the peas and beans, throw all the ingredients into the bowl of the food processor and pulse until you have a rough paste. Use your hands to bring the paste together into patties about the size of a burger.

In a non-stick pan, heat the olive oil until it shimmers and starts to give up its fragrance. Slide in the patties and cook for a couple of minutes per side, until golden on the outside. Serve with a big dollop of Greek yoghurt and some lemon to squeeze over.

Bombay new potatoes

Here’s the recipe I promised last week to use up the other half of that curry paste. I particularly like new potatoes in this sort of dry curry; their waxy texture and delicate flavour works very well against the aromatic spicing, and leaving the skins on helps them finish with a nice crisp.

600g new potatoes
Half of Friday’s curry paste
1 teaspoon ground turmeric
2 teaspoons fennel seeds
Flavourless oil or ghee to fry
Salt
Fresh coriander to garnish

If you didn’t cook the peas keema, Friday’s curry paste was made with 1 peeled bulb of garlic, 10 spring onions, 1 fat piece of ginger, about 5cm long and 4 green chillies. I used half of it for the peas keema and the other half for this recipe, which makes a fantastic accompaniment for the lamb and peas. If you’re only cooking one of the recipes, either make up a whole batch of curry paste and freeze half, or just halve the amounts.

A few hours before you cook the meal, steam the new potatoes for 25 minutes, drain and leave in the saucepan to cool completely. When cold, chop them in half (or quarters, if yours are large).

When you are ready to start cooking, stir the turmeric into the curry paste. Bring a couple of tablespoons of oil or ghee to temperature in a large, non-stick saucepan over a medium flame, and sauté the whole fennel seeds in the hot oil for a few seconds. Add the curry paste (now bright yellow) and fry, stirring all the time, for a couple of minutes. Tip in the potatoes with a large pinch of salt and keep frying, stirring every now and then, for about 10 minutes until the potatoes are crusty and golden. Serve immediately. These potatoes are also extremely good cold.